In Chapter 1 we learned how to create and display a basic contact form. In this chapter you will learn how to manage form validation.
Before we start
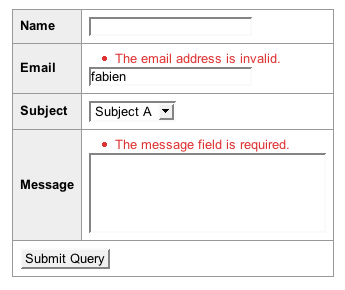
The contact form created in Chapter 1 is not yet fully functional. What happens if a user submits an invalid email address or if the message the user submits is empty? In these cases, we would like to display error messages to ask the user to correct the input, as shown in Figure 2-1.
Figure 2-1 - Displaying Error Messages
Here are the validation rules to implement for the contact form:
name: optionalemail: mandatory, the value must be a valid email addresssubject: mandatory, the selected value must be valid to a list of valuesmessage: mandatory, the length of the message must be at least four characters
note
Why do we need to validate the subject field? The <select> tag is already binding the user with pre-defined values. An average user can only select one of the displayed choices, but other values can be submitted using tools like the Firefox Developer Toolbar, or by simulating a request with tools like curl or wget.
Listing 2-1 shows the template we used in Chapter 1.
Listing 2-1 - The Contact Form Template
// apps/frontend/modules/contact/templates/indexSucces.php
<form action="<?php echo url_for('contact/index') ?>" method="POST">
  <table>
    <?php echo $form ?>
    <tr>
      <td colspan="2">
        <input type="submit" />
      </td>
    </tr>
  </table>
</form>
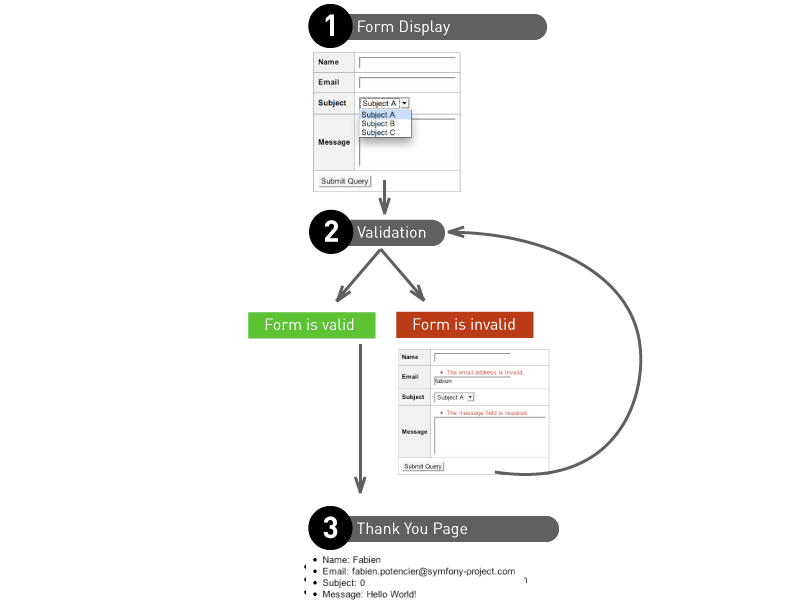
Figure 2-2 breaks down the interaction between the application and the user. The first step is to present the form to the user. When the user submits the form, either the input is valid and the user is redirected to the thank you page, or the input includes invalid values and the form is displayed again with error messages.
Figure 2-2 - Interaction between the Application and the User
Validators
A symfony form is made of fields. Each field can be identified by a unique name as we observed in Chapter 1. We connected a widget to each field in order to display it to the user, now let's see how we can apply validation rules to each of the fields.
The sfValidatorBase class
The validation of each field is done by objects inheriting from the sfValidatorBase class. In order to validate the contact form, we must define validator objects for each of the four fields: name, email, subject, and message. Listing 2-2 shows the implementation of these validators in the form class using the setValidators() method.
Listing 2-2 - Adding Validators to the ContactForm Class
// lib/form/ContactForm.class.php
class ContactForm extends sfForm
{
  protected static $subjects = array('Subject A', 'Subject B', 'Subject C');

  public function configure()
  {
    $this->setWidgets(array(
      'name'    => new sfWidgetFormInput(),
      'email'   => new sfWidgetFormInput(),
      'subject' => new sfWidgetFormSelect(array('choices' => self::$subjects)),
      'message' => new sfWidgetFormTextarea(),
    ));
    $this->widgetSchema->setNameFormat('contact[%s]');

    $this->setValidators(array(
      'name'    => new sfValidatorString(array('required' => false)),
      'email'   => new sfValidatorEmail(),
      'subject' => new sfValidatorChoice(array('choices' => array_keys(self::$subjects))),
      'message' => new sfValidatorString(array('min_length' => 4)),
    ));
  }
}
We use three distinct validators:
sfValidatorString: validates a stringsfValidatorEmail: validates an emailsfValidatorChoice: validates the input value comes from a pre-defined list of choices
Each validator takes a list of options as its first argument. Like the widgets, some of these options are mandatory, some are optional. For instance, the sfValidatorChoice validator takes one mandatory option, choices. Each validator can also take the options required and trim, defined by default in the sfValidatorBase class:
| Option | Default Value | Description |
|---|---|---|
| required | true |
Specifies if the field is mandatory |
| trim | false |
Automatically removes whitespaces at the beginning and at the end of a string before the validation occurs |
Let's see the available options for the validators we have just used:
| Validator | Mandatory Options | Optional Options |
|---|---|---|
| sfValidatorString | max_length |
|
min_length |
||
| sfValidatorEmail | pattern |
|
| sfValidatorChoice | choices |
If you try to submit the form with invalid values, you will not see any change in the behavior. We must update the contact module to validate the submitted values, as shown in Listing 2-3.
Listing 2-3 - Implementing Validation in the contact Module
class contactActions extends sfActions
{
  public function executeIndex($request)
  {
    $this->form = new ContactForm();

    if ($request->isMethod('post'))
    {
      $this->form->bind($request->getParameter('contact'));
      if ($this->form->isValid())
      {
        $this->redirect('contact/thankyou?'.http_build_query($this->form->getValues()));
      }
    }
  }

  public function executeThankyou()
  {
  }
}
The Listing 2-3 introduces a lot of new concepts:
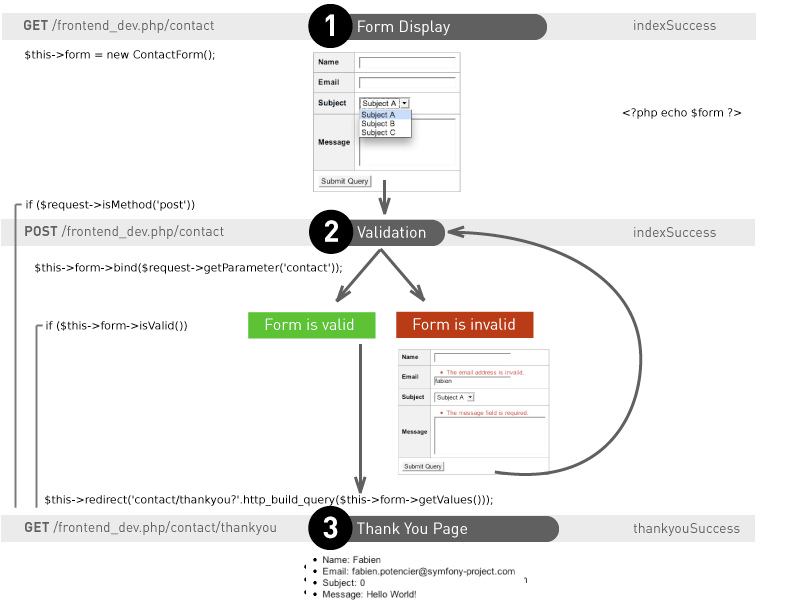
In the case of the initial
GETrequest, the form is initialized and passed on to the template to display to the user. The form is then in an initial state:$this->form = new ContactForm();
When the user submits the form with a
POSTrequest, thebind()method binds the form with the user input data and triggers the validation mechanism. The form then changes to a bound state.if ($request->isMethod('post')) { $this->form->bind($request->getParameter('contact'));
Once the form is bound, it is possible to check its validity using the
isValid()method:If the return value is
true, the form is valid and the user can be redirected to the thank you page:if ($this->form->isValid()) { $this->redirect('contact/thankyou?'.http_build_query($this->form->getValues())); }
If not, the
indexSuccesstemplate is displayed as initially. The validation process adds the error messages into the form to be displayed to the user.
note
When a form is in an initial state, the isValid() method always return false and the getValues() method will always return an empty array.
Figure 2-3 shows the code that is executed during the interaction between the application and the user.
Figure 2-3 - Code executed during the Interaction between the Application and the User
The Purpose of Validators
You might have noticed that during the redirection to the thank you page, we are not using $request->getParameter('contact') but $this->form->getValues(). In fact, $request->getParameter('contact') returns the user data when $this->form->getValues() returns the validated data.
If the form is valid, why can not those two statements be identical? Each validator actually has two tasks: a validation task, but also a cleaning task. The getValues() method is in fact returning the validated and cleaned data.
The cleaning process has two main actions: normalization and conversion of the input data.
We already went over a case of data normalization with the trim option. But the normalization action is much more important for a date field for instance. The sfValidatorDate validates a date. This validator takes a lot of formats for input (a timestamp, a format based on a regular expression, ...). Instead of simply returning the input value, it converts it by default in the Y-m-d H:i:s format. Therefore, the developer is guaranteed to get a stable format, despite the quality of the input format. The system offers a lot of flexibility to the user, and ensures consistency to the developer.
Now, consider a conversion action, like a file upload. A file validation can be done using the sfValidatorFile. Once the file is uploaded, instead of returning the name of the file, the validator returns a sfValidatedFile object, making it easier to handle the file information. We will see later on in this chapter how to use this validator.
tip
The getValues() method returns an array of all the validated and cleaned data. But as retrieving just one value is sometimes helpful, there is also a getValue() method: $email = $this->form->getValue('email').
Invalid Form
Whenever there are invalid fields in the form, the indexSuccess template is displayed. Figure 2-4 shows what we get when we submit a form with invalid data.
Figure 2-4 - Invalid Form
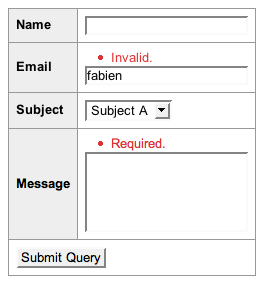
The call to the <?php echo $form ?> statement automatically takes into consideration the error messages associated with the fields, and will automatically populate the users cleaned input data.
When the form is bound to external data by using the bind() method, the form switches to a bound state and the following actions are triggered:
The validation process is executed
The error messages are stored in the form in order to be available to the template
The default values of the form are replaced with the users cleaned input data
The information needed to display the error messages or the user input data are easily available by using the form variable in the template.
caution
As seen in Chapter 1, we can pass default values to the form class constructor. After the submission of an invalid form, these default values are overridden by the submitted values, so that the user can correct their mistakes. So, never use the input data as default values like in this example: $this->form->setDefaults($request->getParameter('contact')).
Validator Customization
Customizing error messages
As you may have noticed in Figure 2-4, error messages are not really useful. Let's see how to customize them to be more intuitive.
Each validator can add errors to the form. An error consists of an error code and an error message. Every validator has at least the required and invalid errors defined in the sfValidatorBase:
| Code | Message | Description |
|---|---|---|
| required | Required. |
The field is mandatory and the value is empty |
| invalid | Invalid. |
The field is invalid |
Here are the error codes associated to the validators we have already used:
| Validator | Error Codes |
|---|---|
| sfValidatorString | max_length |
min_length |
|
| sfValidatorEmail | |
| sfValidatorChoice |
Customizing error messages can be done by passing a second argument when creating the validation objects. Listing 2-4 customizes several error messages and Figure 2-5 shows customized error messages in action.
Listing 2-4 - Customizing Error Messages
class ContactForm extends sfForm
{
  protected static $subjects = array('Subject A', 'Subject B', 'Subject C');

  public function configure()
  {
    // ...

    $this->setValidators(array(
      'name'    => new sfValidatorString(array('required' => false)),
      'email'   => new sfValidatorEmail(array(), array('invalid' => 'The email address is invalid.')),
      'subject' => new sfValidatorChoice(array('choices' => array_keys(self::$subjects))),
      'message' => new sfValidatorString(array('min_length' => 4), array('required' => 'The message field is required.')),
    ));
  }
}
Figure 2-5 - Customized Error Messages
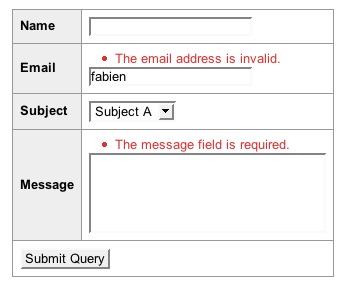
Figure 2-6 shows the error message you get if you try to submit a message too short (we set the minimum length to 4 characters).
Figure 2-6 - Too short Message Error
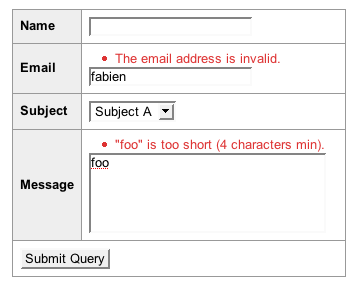
The default error message related to this error code (min_length) is different from the messages we already went over, since it implements two dynamic values: the user input data (foo) and the minimum number of characters allowed for this field (4). Listing 2-5 customizes this message using theses dynamic values and Figure 2-7 shows the result.
Listing 2-5 - Customizing the Error Messages with Dynamic Values
class ContactForm extends sfForm
{
  public function configure()
  {
    // ...

    $this->setValidators(array(
      'name'    => new sfValidatorString(array('required' => false)),
      'email'   => new sfValidatorEmail(array(), array('invalid' => 'Email address is invalid.')),
      'subject' => new sfValidatorChoice(array('choices' => array_keys(self::$subjects))),
      'message' => new sfValidatorString(array('min_length' => 4), array(
        'required'   => 'The message field is required',
        'min_length' => 'The message "%value%" is too short. It must be of %min_length% characters at least.',
      )),
    ));
  }
}
Figure 2-7 - Customized Error Messages with Dynamic Values
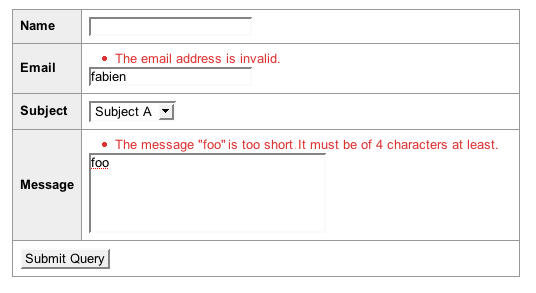
Each error message can use dynamic values, enclosing the value name with the percent character (%). Available values are usually the user input data (value) and the option values of the validator related to the error.
tip
If you want to review all the error codes, options, and default message of a validator, please refer to the API online documentation (/api/1_2/). Each code, option and error message are detailed there, along with the default values (for instance, the sfValidatorString validator API is available at /api/1_2/sfValidatorString).
Validators Security
By default, a form is valid only if every field submitted by the user has a validator. This ensures that each field has its validation rules and that it is not possible to inject values for fields that are not defined in the form.
To help understand this security rule, let's consider a user object as shown in Listing 2-6.
Listing 2-6 - The User Class
class User
{
  protected
    $name = '',
    $is_admin = false;

  public function setFields($fields)
  {
    if (isset($fields['name']))
    {
      $this->name = $fields['name'];
    }

    if (isset($fields['is_admin']))
    {
      $this->is_admin = $fields['is_admin'];
    }
  }

  // ...
}
A User object is composed of two properties, the user name (name), and a boolean that stores the administrator status (is_admin). The setFields() method updates both properties. Listing 2-7 shows the form related to the User class, allowing the user to modify the name property only.
Listing 2-7 - User Form
class UserForm extends sfForm
{
  public function configure()
  {
    $this->setWidgets(array('name' => new sfWidgetFormInputString()));
    $this->widgetSchema->setNameFormat('user[%s]');

    $this->setValidators(array('name' => new sfValidatorString()));
  }
}
Listing 2-8 shows an implementation of the user module using the previously defined form allowing the user to modify the name field.
Listing 2-8 - user Module Implementation
class userActions extends sfActions
{
  public function executeIndex($request)
  {
    $this->form = new UserForm();

    if ($request->isMethod('post'))
    {
      $this->form->bind($request->getParameter('user'));
      if ($this->form->isValid())
      {
        $user = // retrieving the current user

        $user->setFields($this->form->getValues());

        $this->redirect('...');
      }
    }
  }
}
Without any protection, if the user submits a form with a value for the name field, and also for the is_admin field, then our code is vulnerable. This is easily accomplished using a tool like Firebug. In fact, the is_admin value is always valid, because the field does not have any validator associated with it in the form. Whatever the value is, the setFields() method will update not only the name property, but also the is_admin property.
If you test out this code passing a value for both the name and is_admin fields, you'll get an "Extra field name." global error, as shown in Figure 2-8. The system generated an error because some submitted fields does not have any validator associated with themselves; the is_admin field is not defined in the UserForm form.
Figure 2-8 - Missing Validator Error
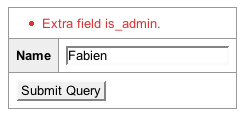
All the validators we have seen so far generate errors associated with fields. Where can this global error come from? When we use the setValidators() method, symfony creates a sfValidatorSchema object. The sfValidatorSchema defines a collection of validators. The call to setValidators() is equivalent to the following code:
$this->setValidatorSchema(new sfValidatorSchema(array(
  'email'   => new sfValidatorEmail(),
  'subject' => new sfValidatorChoice(array('choices' => array_keys(self::$subjects))),
  'message' => new sfValidatorString(array('min_length' => 4)),
)));
The sfValidatorSchema has two validation rules enabled by default to protect the collection of validators. These rules can be configured with the allow_extra_fields and filter_extra_fields options.
The allow_extra_fields option, which is set to false by default, checks that every user input data has a validator. If not, an "Extra field name." global error is thrown, as shown in the previous example. When developing, this allows developers to be warned if one forgets to explicitly validate a field.
Let's get back to the contact form. Let's change the validation rules by changing the name field into a mandatory field. Since the default value of the required option is true, we could change the name validator to:
$nameValidator = new sfValidatorString();
This validator has no impact as it has neither a min_length nor a max_length option. In this case, we could also replace it with an empty validator:
$nameValidator = new sfValidatorPass();
Instead of defining an empty validator, we could get rid of it, but the protection by default we previously went over prevents us from doing so. Listing 2-9 shows how to disable the protection using the allow_extra_fields option.
Listing 2-9 - Disable the allow_extra_fields Protection
class ContactForm extends sfForm
{
  public function configure()
  {
    // ...

    $this->setValidators(array(
      'email'   => new sfValidatorEmail(),
      'subject' => new sfValidatorChoice(array('choices' => array_keys(self::$subjects))),
      'message' => new sfValidatorString(array('min_length' => 4)),
    ));

    $this->validatorSchema->setOption('allow_extra_fields', true);
  }
}
You should now be able to validate the form as shown in Figure 2-9.
Figure 2-9 - Validating with allow_extra_fields set to true

If you have a closer look, you will notice that even if the form is valid, the value of the name field is empty in the thank you page, despite any value that was submitted. In fact, the value wasn't even set in the array sent back by $this->form->getValues(). Disabling the allow_extra_fields option let us get rid of the error due to the lack of validator, but the filter_extra_fields option, which is set to true by default, filters those values, removing them from the validated values. It is of course possible to change this behavior, as shown in Listing 2-10.
Listing 2-10 - Disabling the filter_extra_fields protection
class ContactForm extends sfForm
{
  public function configure()
  {
    // ...

    $this->setValidators(array(
      'email'   => new sfValidatorEmail(),
      'subject' => new sfValidatorChoice(array('choices' => array_keys(self::$subjects))),
      'message' => new sfValidatorString(array('min_length' => 4)),
    ));

    $this->validatorSchema->setOption('allow_extra_fields', true);
    $this->validatorSchema->setOption('filter_extra_fields', false);
  }
}
You should now be able to validate your form and retrieve the input value in the thank you page.
We will see in Chapter 4 that these protections can be used to safely serialize Propel objects from form values.
Logical Validators
Several validators can be defined for a single field by using logical validators:
sfValidatorAnd: To be valid, the field must pass all validatorssfValidatorOr: To be valid, the field must pass at least one validator
The constructors of the logical operators take a list of validators as their first argument. Listing 2-11 uses the sfValidatorAnd to associate two required validators to the name field.
Listing 2-11 - Using the sfValidatorAnd validator
class ContactForm extends sfForm
{
 public function configure()
 {
    // ...

    $this->setValidators(array(
      // ...
      'name' => new sfValidatorAnd(array(
        new sfValidatorString(array('min_length' => 5)),
        new sfValidatorRegex(array('pattern' => '/[\w- ]+/')),
      )),
    ));
  }
}
When submitting the form, the name field input data must be made of at least five characters and match the regular expression ([\w- ]+).
As logical validators are validators themselves, they can be combined to define advanced logical expressions as shown in Listing 2-12.
Listing 2-12 - Combining several logical Operators
class ContactForm extends sfForm
{
 public function configure()
 {
    // ...

    $this->setValidators(array(
      // ...
      'name' => new sfValidatorOr(array(
        new sfValidatorAnd(array(
          new sfValidatorString(array('min_length' => 5)),
          new sfValidatorRegex(array('pattern' => '/[\w- ]+/')),
        )),
        new sfValidatorEmail(),
      )),
    ));
  }
}
Global Validators
Each validator we went over so far are associated with a specific field and lets us validate only one value at a time. By default, they behave disregarding other data submitted by the user, but sometimes the validation of a field depends on the context or depends on many other field values. For example, a global validator is needed when two passwords must be the same, or when a start date must be before an end date.
In both of these cases, we must use a global validator to validate the input user data in their context. We can store a global validator before or after the individual field validation by using a pre-validator or a post-validator respectively. It is usually better to use a post-validator, because the data is already validated and cleaned, i.e. in a normalized format. Listing 2-13 shows how to implement the two passwords comparison using the sfValidatorSchemaCompare validator.
Listing 2-13 - Using the sfValidatorSchemaCompare Validator
$this->validatorSchema->setPostValidator(new sfValidatorSchemaCompare('password', sfValidatorSchemaCompare::EQUAL, 'password_again'));
As of symfony 1.2, you can also use the "natural" PHP operators instead of the sfValidatorSchemaCompare class constants. The previous example is equivalent to:
$this->validatorSchema->setPostValidator(new sfValidatorSchemaCompare('password', '==', 'password_again'));
tip
The sfValidatorSchemaCompare class inherits from the sfValidatorSchema validator, like every global validator. sfValidatorSchema is itself a global validator since it validates the whole user input data, passing to other validators the validation of each field.
Listing 2-14 shows how to use a single validator to validate that a start date is before an end date, customizing the error message.
Listing 2-14 - Using the sfValidatorSchemaCompare Validator
$this->validatorSchema->setPostValidator(
  new sfValidatorSchemaCompare('start_date', sfValidatorSchemaCompare::LESS_THAN_EQUAL, 'end_date',
    array(),
    array('invalid' => 'The start date ("%left_field%") must be before the end date ("%right_field%")')
  )
);
Using a post-validator ensures that the comparison of the two dates will be accurate. Whatever date format was used for the input, the validation of the start_date and end_date fields will always be converted to values in a comparable format (Y-m-d H:i:s by default).
By default, pre-validators and post-validators return global errors to the form. Nevertheless, some of them can associate an error to a specific field. For instance, the throw_global_error option of the sfValidatorSchemaCompare validator can choose between a global error (Figure 2-10) or an error associated to the first field (Figure 2-11). Listing 2-15 shows how to use the throw_global_error option.
Listing 2-15 - Using the throw_global_error Option
$this->validatorSchema->setPostValidator(
  new sfValidatorSchemaCompare('start_date', sfValidatorSchemaCompare::LESS_THAN_EQUAL, 'end_date',
    array('throw_global_error' => true),
    array('invalid' => 'The start date ("%left_field%") must be before the end date ("%right_field%")')
  )
);
Figure 2-10 - Global Error for a Global Validator
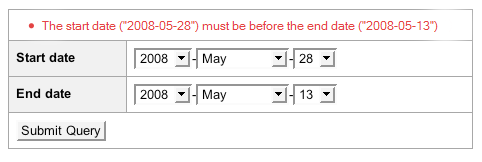
Figure 2-11 - Local Error for a Global Validator

At last, using a logical validator allows you to combine several post-validators as shown Listing 2-16.
Listing 2-16 - Combining several Post-Validators with a logical Validator
$this->validatorSchema->setPostValidator(new sfValidatorAnd(array(
  new sfValidatorSchemaCompare('start_date', sfValidatorSchemaCompare::LESS_THAN_EQUAL, 'end_date'),
  new sfValidatorSchemaCompare('password', sfValidatorSchemaCompare::EQUAL, 'password_again'),
)));
File Upload
Dealing with file uploads in PHP, like in every web oriented language, involves handling both HTML code and server-side file retrieving. In this section we will see the tools the form framework has to offer to the developer to make their life easier. We will also see how to avoid falling into common traps.
Let's change the contact form to allow the attaching of a file to
the message. To do this, we will add a file field as shown in Listing 2-17.
Listing 2-17 - Adding a file Field to the ContactForm form
// lib/form/ContactForm.class.php
class ContactForm extends sfForm
{
  protected static $subjects = array('Subject A', 'Subject B', 'Subject C');

  public function configure()
  {
    $this->setWidgets(array(
      'name'    => new sfWidgetFormInput(),
      'email'   => new sfWidgetFormInput(),
      'subject' => new sfWidgetFormSelect(array('choices' => self::$subjects)),
      'message' => new sfWidgetFormTextarea(),
      'file'    => new sfWidgetFormInputFile(),
    ));
    $this->widgetSchema->setNameFormat('contact[%s]');

    $this->setValidators(array(
      'name'    => new sfValidatorString(array('required' => false)),
      'email'   => new sfValidatorEmail(),
      'subject' => new sfValidatorChoice(array('choices' => array_keys(self::$subjects))),
      'message' => new sfValidatorString(array('min_length' => 4)),
      'file'    => new sfValidatorFile(),
    ));
  }
}
When there is a sfWidgetFormInputFile widget in a form allowing to upload a file, we must also add an enctype attribute to the form tag as shown in Listing 2-18.
Listing 2-18 - Modifying the Template to take the file Field into account
<form action="<?php echo url_for('contact/index') ?>" method="POST" enctype="multipart/form-data">
  <table>
    <?php echo $form ?>
    <tr>
      <td colspan="2">
        <input type="submit" />
      </td>
    </tr>
  </table>
</form>
note
If you dynamically generate the template associated to a form, the isMultipart() method of the form object return true, if it needs the enctype attribute.
Information about uploaded files are not stored with the other submitted values in PHP. It is then necessary to modify the call to the bind() method to pass on this information as a second argument, as shown in Listing 2-19.
Listing 2-19 - Passing uploaded Files to the bind() Method
class contactActions extends sfActions
{
  public function executeIndex($request)
  {
    $this->form = new ContactForm();

    if ($request->isMethod('post'))
    {
      $this->form->bind($request->getParameter('contact'), $request->getFiles('contact'));
      if ($this->form->isValid())
      {
        $values = $this->form->getValues();
        // do something with the values

        // ...
      }
    }
  }

  public function executeThankyou()
  {
  }
}
Now that the form is fully operational, we still need to change the action in order to store the uploaded file on disk. As we observed at the beginning of this chapter, the sfValidatorFile converts the information related to the uploaded file to a sfValidatedFile object. Listing 2-20 shows how to handle this object to store the file in the web/uploads directory.
Listing 2-20 - Using the sfValidatedFile Object
if ($this->form->isValid())
{
  $file = $this->form->getValue('file');

  $filename = 'uploaded_'.sha1($file->getOriginalName());
  $extension = $file->getExtension($file->getOriginalExtension());
  $file->save(sfConfig::get('sf_upload_dir').'/'.$filename.$extension);

  // ...
}
The following table lists all the sfValidatedFile object methods:
| Method | Description |
|---|---|
| save() | Saves the uploaded file |
| isSaved() | Returns true if the file has been saved |
| getSavedName() | Returns the name of the saved file |
| getExtension() | Returns the extension of the file, according to the mime type |
| getOriginalName() | Returns the name of the uploaded file |
| getOriginalExtension() | Returns the extension of the uploaded file name |
| getTempName() | Returns the path of the temporary file |
| getType() | Returns the mime type of the file |
| getSize() | Returns the size of the file |
tip
The mime type provided by the browser during the file upload is not reliable. In order to ensure maximum security, the functions finfo_open and mime_content_type, and the file tool are used in turn during the file validation. As a last resort, if any of the functions can not guess the mime type, or if the system does not provide them, the browser mime type is taken into account. To add or change the functions that guess the mime type, just pass the mime_type_guessers option to the sfValidatorFile constructor.
This work is licensed under the Creative Commons Attribution-Share Alike 3.0 Unported License license.