So, after my last tutorial demonstrating how to customize the sfGuardUser admin generator module in the sfDoctrineGuardPlugin I have had several requests for a simple tutorial on how to build a registration module for the plugin as well.
This tutorial assumes you have read my first post on customizing sfDoctrineGuardPlugin.
Generate the Module
First we need to generate a new module named register where we will implement our initial registration functionality.
$ ./symfony generate:module frontend register
Create RegisterForm
Next thing we need to do is create a custom form class that is a child of the generated sfGuardUserForm located in lib/model/doctrine/sfDoctrineGuardPlugin/sfGuardUserForm.class.php. You can put this file anywhere but I would recommend putting it in apps/frontend/modules/register/lib/RegisterForm.class.php.
<?php
class RegisterForm extends sfGuardUserForm
{
  public function configure()
  {
    // Remove all widgets we don't want to show
    unset(
      $this['is_active'],
      $this['is_super_admin'],
      $this['updated_at'],
      $this['groups_list'],
      $this['permissions_list'],
      $this['last_login'],
      $this['created_at'],
      $this['salt'],
      $this['algorithm']
    );

    // Setup proper password validation with confirmation
    $this->widgetSchema['password'] = new sfWidgetFormInputPassword();
    $this->validatorSchema['password']->setOption('required', true);
    $this->widgetSchema['password_confirmation'] = new sfWidgetFormInputPassword();
    $this->validatorSchema['password_confirmation'] = clone $this->validatorSchema['password'];

    $this->widgetSchema->moveField('password_confirmation', 'after', 'password');

    $this->mergePostValidator(new sfValidatorSchemaCompare('password', sfValidatorSchemaCompare::EQUAL, 'password_confirmation', array(), array('invalid' => 'The two passwords must be the same.')));
  }
}
Implement the Action
Now we need to implement the action which will handle the registration. This code needs to be added to apps/frontend/modules/register/actions.class.php in the executeIndex() function.
public function executeIndex(sfWebRequest $request)
{
  $this->form = new RegisterForm();
  if ($request->isMethod('post'))
  {
    $this->form->bind($request->getParameter('sf_guard_user'));
    if ($this->form->isValid())
    {
      $this->form->save();

      $this->getUser()->signIn($this->form->getObject());
      $this->redirect('@homepage');
    }
  }
}
The above action will process the form, save the user and sign the new user in.
Implement the Template
In the last step we implemented an action that creates a RegisterForm instance in the $this->form variable. This form instance is available in apps/frontend/modules/register/templates/indexSuccess.php in the $form variable so we can easily render the form like below:
<h1>Register</h1>

<?php echo $form->renderFormTag(url_for('register/index')) ?>
  <table>
    <?php echo $form ?>
  </table>

  <input type="submit" name="register" value="Register" />
</form>
Use sfGuardSecurityUser
The last thing we need to do is change apps/frontend/lib/myUser.class.php to extend sfGuardSecurityUser instead of sfBasicSecurityUser.
class myUser extends sfGuardSecurityUser
{
}
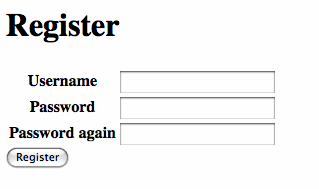
Now when you view http://localhost/register you should see the following in your browser.

with doctrine? this is same for propel and doctrine..
When I try to register, I get an error: Call to undefined method myUser::signIn.
check if myUser is extending sfGuardSecurityUser
Please break lines in your source code at a reasonable width as otherwise some feed readers, such as the LiveJournal friendspage, will introduce a horizontal scrollbar for one's entire feed for the day. Thanks!
You probably want to ensure that the username provided is unique:
$this->validatorSchema['username'] = new sfValidatorDoctrineUnique(array('model' => 'sfGuardUser', 'column' => 'username'));
@jeremy
Uniqueness is enforced via Doctrine validators (through schema).
True, however, that sf should validate. I'm guessing this is an error of the Form base class generator.
If anyone is wondering how to add the custom Profile Form, just add this to the RegisterForm.class.php:
$profileForm = new ProfileForm($this->object->Profile); unset($profileForm['id'], $profileForm['sf_guard_user_id']); $this->embedForm('Profile', $profileForm);