The Form Component
Warning: You are browsing the documentation for Symfony 3.x, which is no longer maintained.
Read the updated version of this page for Symfony 7.2 (the current stable version).
The Form component allows you to create, process and reuse forms.
The Form component is a tool to help you solve the problem of allowing end-users to interact with the data and modify the data in your application. And though traditionally this has been through HTML forms, the component focuses on processing data to and from your client and application, whether that data be from a normal form post or from an API.
Installation
1
$ composer require symfony/form:^3.4Note
If you install this component outside of a Symfony application, you must
require the vendor/autoload.php file in your code to enable the class
autoloading mechanism provided by Composer. Read
this article for more details.
Configuration
See also
This article explains how to use the Form features as an independent component in any PHP application. Read the Forms article to learn about how to use it in Symfony applications.
In Symfony, forms are represented by objects and these objects are built by using a form factory. Building a form factory is simple:
1
2
3
use Symfony\Component\Form\Forms;

$formFactory = Forms::createFormFactory();
This factory can already be used to create basic forms, but it is lacking support for very important features:
- Request Handling: Support for request handling and file uploads;
- CSRF Protection: Support for protection against Cross-Site-Request-Forgery (CSRF) attacks;
- Templating: Integration with a templating layer that allows you to reuse HTML fragments when rendering a form;
- Translation: Support for translating error messages, field labels and other strings;
- Validation: Integration with a validation library to generate error messages for submitted data.
The Symfony Form component relies on other libraries to solve these problems. Most of the time you will use Twig and the Symfony HttpFoundation, Translation and Validator components, but you can replace any of these with a different library of your choice.
The following sections explain how to plug these libraries into the form factory.
Tip
For a working example, see https://github.com/webmozart/standalone-forms
Request Handling
To process form data, you'll need to call the handleRequest() method:
1
$form->handleRequest();Behind the scenes, this uses a NativeRequestHandler
object to read data off of the correct PHP superglobals (i.e. $_POST or
$_GET) based on the HTTP method configured on the form (POST is default).
See also
If you need more control over exactly when your form is submitted or which data is passed to it, you can use the submit() for this. Read more about it How to Use the submit() Function to Handle Form Submissions.
CSRF Protection
Protection against CSRF attacks is built into the Form component, but you need to explicitly enable it or replace it with a custom solution. If you want to use the built-in support, first install the Security CSRF component:
1
$ composer require symfony/security-csrf:^3.4The following snippet adds CSRF protection to the form factory:
1 2 3 4 5 6 7 8 9 10 11 12 13 14 15 16 17 18
use Symfony\Component\Form\Extension\Csrf\CsrfExtension;
use Symfony\Component\Form\Forms;
use Symfony\Component\HttpFoundation\Session\Session;
use Symfony\Component\Security\Csrf\CsrfTokenManager;
use Symfony\Component\Security\Csrf\TokenGenerator\UriSafeTokenGenerator;
use Symfony\Component\Security\Csrf\TokenStorage\SessionTokenStorage;
// creates a Session object from the HttpFoundation component
$session = new Session();
$csrfGenerator = new UriSafeTokenGenerator();
$csrfStorage = new SessionTokenStorage($session);
$csrfManager = new CsrfTokenManager($csrfGenerator, $csrfStorage);
$formFactory = Forms::createFormFactoryBuilder()
// ...
->addExtension(new CsrfExtension($csrfManager))
->getFormFactory();Internally, this extension will automatically add a hidden field to every
form (called _token by default) whose value is automatically generated by
the CSRF generator and validated when binding the form.
Tip
If you're not using the HttpFoundation component, you can use NativeSessionTokenStorage instead, which relies on PHP's native session handling:
1 2 3 4
use Symfony\Component\Security\Csrf\TokenStorage\NativeSessionTokenStorage;
$csrfStorage = new NativeSessionTokenStorage();
// ...You can disable CSRF protection per form using the csrf_protection option:
1 2 3 4
use Symfony\Component\Form\Extension\Core\Type\FormType;
$form = $formFactory->createBuilder(FormType::class, null, ['csrf_protection' => false])
->getForm();Twig Templating
If you're using the Form component to process HTML forms, you'll need a way to render your form as HTML form fields (complete with field values, errors, and labels). If you use Twig as your template engine, the Form component offers a rich integration.
To use the integration, you'll need the twig bridge, which provides integration between Twig and several Symfony components:
1
$ composer require symfony/twig-bridge:^3.4The TwigBridge integration provides you with several Twig Functions that help you render the HTML widget, label and error for each field (as well as a few other things). To configure the integration, you'll need to bootstrap or access Twig and add the FormExtension:
1 2 3 4 5 6 7 8 9 10 11 12 13 14 15 16 17 18 19 20 21 22 23 24 25 26 27 28 29 30 31 32 33 34 35 36 37 38 39 40
use Symfony\Bridge\Twig\Extension\FormExtension;
use Symfony\Bridge\Twig\Form\TwigRendererEngine;
use Symfony\Component\Form\FormRenderer;
use Symfony\Component\Form\Forms;
use Twig\Environment;
use Twig\Loader\FilesystemLoader;
use Twig\RuntimeLoader\FactoryRuntimeLoader;
// the Twig file that holds all the default markup for rendering forms
// this file comes with TwigBridge
$defaultFormTheme = 'form_div_layout.html.twig';
$vendorDirectory = realpath(__DIR__.'/../vendor');
// the path to TwigBridge library so Twig can locate the
// form_div_layout.html.twig file
$appVariableReflection = new \ReflectionClass('\Symfony\Bridge\Twig\AppVariable');
$vendorTwigBridgeDirectory = dirname($appVariableReflection->getFileName());
// the path to your other templates
$viewsDirectory = realpath(__DIR__.'/../views');
$twig = new Environment(new FilesystemLoader([
$viewsDirectory,
$vendorTwigBridgeDirectory.'/Resources/views/Form',
]));
$formEngine = new TwigRendererEngine([$defaultFormTheme], $twig);
$twig->addRuntimeLoader(new FactoryRuntimeLoader([
FormRenderer::class => function () use ($formEngine, $csrfManager) {
return new FormRenderer($formEngine, $csrfManager);
},
]));
// ... (see the previous CSRF Protection section for more information)
// adds the FormExtension to Twig
$twig->addExtension(new FormExtension());
// creates a form factory
$formFactory = Forms::createFormFactoryBuilder()
// ...
->getFormFactory();1.30
The Twig\RuntimeLoader\FactoryRuntimeLoader was introduced in Twig 1.30.
The exact details of your Twig Configuration will vary, but the goal is always to add the FormExtension to Twig, which gives you access to the Twig functions for rendering forms. To do this, you first need to create a TwigRendererEngine, where you define your form themes (i.e. resources/files that define form HTML markup).
For general details on rendering forms, see How to Customize Form Rendering.
Note
If you use the Twig integration, read "The Form Component" below for details on the needed translation filters.
Translation
If you're using the Twig integration with one of the default form theme files
(e.g. form_div_layout.html.twig), there are 2 Twig filters (trans
and transChoice) that are used for translating form labels, errors, option
text and other strings.
To add these Twig filters, you can either use the built-in TranslationExtension that integrates with Symfony's Translation component, or add the 2 Twig filters yourself, via your own Twig extension.
To use the built-in integration, be sure that your project has Symfony's Translation and Config components installed:
1
$ composer require symfony/translation symfony/config:^3.4Next, add the TranslationExtension
to your Twig\Environment instance:
1 2 3 4 5 6 7 8 9 10 11 12 13 14 15 16 17 18 19 20 21
use Symfony\Bridge\Twig\Extension\TranslationExtension;
use Symfony\Component\Form\Forms;
use Symfony\Component\Translation\Loader\XliffFileLoader;
use Symfony\Component\Translation\Translator;
// creates the Translator
$translator = new Translator('en');
// somehow load some translations into it
$translator->addLoader('xlf', new XliffFileLoader());
$translator->addResource(
'xlf',
__DIR__.'/path/to/translations/messages.en.xlf',
'en'
);
// adds the TranslationExtension (gives us trans and transChoice filters)
$twig->addExtension(new TranslationExtension($translator));
$formFactory = Forms::createFormFactoryBuilder()
// ...
->getFormFactory();Depending on how your translations are being loaded, you can now add string keys, such as field labels, and their translations to your translation files.
For more details on translations, see Translations.
Validation
The Form component comes with tight (but optional) integration with Symfony's Validator component. If you're using a different solution for validation, no problem! Simply take the submitted/bound data of your form (which is an array or object) and pass it through your own validation system.
To use the integration with Symfony's Validator component, first make sure it's installed in your application:
1
$ composer require symfony/validator:^3.4If you're not familiar with Symfony's Validator component, read more about it: Validation. The Form component comes with a ValidatorExtension class, which automatically applies validation to your data on bind. These errors are then mapped to the correct field and rendered.
Your integration with the Validation component will look something like this:
1 2 3 4 5 6 7 8 9 10 11 12 13 14 15 16 17 18 19 20 21 22 23 24 25 26 27 28 29
use Symfony\Component\Form\Extension\Validator\ValidatorExtension;
use Symfony\Component\Form\Forms;
use Symfony\Component\Validator\Validation;
$vendorDirectory = realpath(__DIR__.'/../vendor');
$vendorFormDirectory = $vendorDirectory.'/symfony/form';
$vendorValidatorDirectory = $vendorDirectory.'/symfony/validator';
// creates the validator - details will vary
$validator = Validation::createValidator();
// there are built-in translations for the core error messages
$translator->addResource(
'xlf',
$vendorFormDirectory.'/Resources/translations/validators.en.xlf',
'en',
'validators'
);
$translator->addResource(
'xlf',
$vendorValidatorDirectory.'/Resources/translations/validators.en.xlf',
'en',
'validators'
);
$formFactory = Forms::createFormFactoryBuilder()
// ...
->addExtension(new ValidatorExtension($validator))
->getFormFactory();To learn more, skip down to the The Form Component section.
Accessing the Form Factory
Your application only needs one form factory, and that one factory object should be used to create any and all form objects in your application. This means that you should create it in some central, bootstrap part of your application and then access it whenever you need to build a form.
Note
In this document, the form factory is always a local variable called
$formFactory. The point here is that you will probably need to create
this object in some more "global" way so you can access it from anywhere.
Exactly how you gain access to your one form factory is up to you. If you're using a service container (like provided with the DependencyInjection component), then you should add the form factory to your container and grab it out whenever you need to. If your application uses global or static variables (not usually a good idea), then you can store the object on some static class or do something similar.
Regardless of how you architect your application, just remember that you should only have one form factory and that you'll need to be able to access it throughout your application.
Creating a simple Form
Tip
If you're using the Symfony Framework, then the form factory is available
automatically as a service called form.factory. Also, the default
base controller class has a createFormBuilder()
method, which is a shortcut to fetch the form factory and call createBuilder()
on it.
Creating a form is done via a FormBuilder object, where you build and configure different fields. The form builder is created from the form factory.
1 2 3 4 5 6 7 8 9 10 11 12 13
use Symfony\Component\Form\Extension\Core\Type\TextType;
use Symfony\Component\Form\Extension\Core\Type\DateType;
// ...
$form = $formFactory->createBuilder()
->add('task', TextType::class)
->add('dueDate', DateType::class)
->getForm();
var_dump($twig->render('new.html.twig', [
'form' => $form->createView(),
]));As you can see, creating a form is like writing a recipe: you call add()
for each new field you want to create. The first argument to add() is the
name of your field, and the second is the fully qualified class name. The Form
component comes with a lot of built-in types.
Now that you've built your form, learn how to render it and process the form submission.
Setting default Values
If you need your form to load with some default values (or you're building an "edit" form), simply pass in the default data when creating your form builder:
1 2 3 4 5 6 7 8 9 10 11 12 13 14
use Symfony\Component\Form\Extension\Core\Type\FormType;
use Symfony\Component\Form\Extension\Core\Type\TextType;
use Symfony\Component\Form\Extension\Core\Type\DateType;
// ...
$defaults = [
'dueDate' => new \DateTime('tomorrow'),
];
$form = $formFactory->createBuilder(FormType::class, $defaults)
->add('task', TextType::class)
->add('dueDate', DateType::class)
->getForm();Tip
In this example, the default data is an array. Later, when you use the data_class option to bind data directly to objects, your default data will be an instance of that object.
Rendering the Form
Now that the form has been created, the next step is to render it. This is
done by passing a special form "view" object to your template (notice the
$form->createView() in the controller above) and using a set of form
helper functions:
1 2 3 4 5
{{ form_start(form) }}
{{ form_widget(form) }}
<input type="submit"/>
{{ form_end(form) }}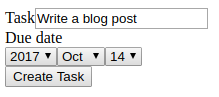
That's it! By printing form_widget(form), each field in the form is
rendered, along with a label and error message (if there is one). As easy
as this is, it's not very flexible (yet). Usually, you'll want to render each
form field individually so you can control how the form looks. You'll learn how
to do that in the "How to Control the Rendering of a Form" section.
Changing a Form's Method and Action
By default, a form is submitted to the same URI that rendered the form with
an HTTP POST request. This behavior can be changed using the FormType Field
and FormType Field options (the method option is also used
by handleRequest() to determine whether a form has been submitted):
1 2 3 4 5 6 7 8 9 10
use Symfony\Component\Form\Extension\Core\Type\FormType;
// ...
$formBuilder = $formFactory->createBuilder(FormType::class, null, [
'action' => '/search',
'method' => 'GET',
]);
// ...Handling Form Submissions
To handle form submissions, use the handleRequest() method:
1 2 3 4 5 6 7 8 9 10 11 12 13 14 15 16 17 18 19 20 21 22 23 24 25 26 27 28
use Symfony\Component\HttpFoundation\Request;
use Symfony\Component\HttpFoundation\RedirectResponse;
use Symfony\Component\Form\Extension\Core\Type\DateType;
use Symfony\Component\Form\Extension\Core\Type\TextType;
// ...
$form = $formFactory->createBuilder()
->add('task', TextType::class)
->add('dueDate', DateType::class)
->getForm();
$request = Request::createFromGlobals();
$form->handleRequest($request);
if ($form->isSubmitted() && $form->isValid()) {
$data = $form->getData();
// ... perform some action, such as saving the data to the database
$response = new RedirectResponse('/task/success');
$response->prepare($request);
return $response->send();
}
// ...This defines a common form "workflow", which contains 3 different possibilities:
- On the initial GET request (i.e. when the user "surfs" to your page), build your form and render it;
If the request is a POST, process the submitted data (via handleRequest()). Then:
- if the form is invalid, re-render the form (which will now contain errors);
- if the form is valid, perform some action and redirect.
Luckily, you don't need to decide whether or not a form has been submitted. Just pass the current request to the handleRequest() method. Then, the Form component will do all the necessary work for you.
Form Validation
The easiest way to add validation to your form is via the constraints
option when building each field:
1 2 3 4 5 6 7 8 9 10 11 12 13 14 15 16
use Symfony\Component\Validator\Constraints\NotBlank;
use Symfony\Component\Validator\Constraints\Type;
use Symfony\Component\Form\Extension\Core\Type\TextType;
use Symfony\Component\Form\Extension\Core\Type\DateType;
$form = $formFactory->createBuilder()
->add('task', TextType::class, [
'constraints' => new NotBlank(),
])
->add('dueDate', DateType::class, [
'constraints' => [
new NotBlank(),
new Type(\DateTime::class),
]
])
->getForm();When the form is bound, these validation constraints will be applied automatically and the errors will display next to the fields on error.
Note
For a list of all of the built-in validation constraints, see Validation Constraints Reference.
Accessing Form Errors
You can use the getErrors() method to access the list of errors. It returns a FormErrorIterator instance:
1 2 3 4 5 6 7 8 9 10 11 12 13 14 15 16 17 18
$form = ...;

// ...

// a FormErrorIterator instance, but only errors attached to this
// form level (e.g. global errors)
$errors = $form->getErrors();

// a FormErrorIterator instance, but only errors attached to the
// "firstName" field
$errors = $form['firstName']->getErrors();

// a FormErrorIterator instance in a flattened structure
// use getOrigin() to determine the form causing the error
$errors = $form->getErrors(true);

// a FormErrorIterator instance representing the form tree structure
$errors = $form->getErrors(true, false);
Learn more
- How to Change the Action and Method of a Form
- Bootstrap 4 Form Theme
- How to Choose Validation Groups Based on the Clicked Button
- How to Create a Custom Form Field Type
- How to Create a Form Type Extension
- How to Implement CSRF Protection
- How to Choose Validation Groups Based on the Submitted Data
- When and How to Use Data Mappers
- How to Use Data Transformers
- How to Use the submit() Function to Handle Form Submissions
- How to Disable the Validation of Submitted Data
- How to Dynamically Modify Forms Using Form Events
- How to Embed Forms
- Form Events
- How to Embed a Collection of Forms
- How to Customize Form Rendering
- How to Access Services or Config from Inside a Form
- How to Work with Form Themes
- How to Reduce Code Duplication with "inherit_data"
- How to Submit a Form with Multiple Buttons
- How to Control the Rendering of a Form
- Creating a custom Type Guesser
- How to Unit Test your Forms
- How to Configure empty Data for a Form Class
- How to Dynamically Configure Form Validation Groups
- How to Define the Validation Groups to Use
- How to Use a Form without a Data Class