Forms
Screencast
Do you prefer video tutorials? Check out the Symfony Forms screencast series.
Creating and processing HTML forms is hard and repetitive. You need to deal with rendering HTML form fields, validating submitted data, mapping the form data into objects and a lot more. Symfony includes a powerful form feature that provides all these features and many more for truly complex scenarios.
Installation
In applications using Symfony Flex, run this command to install the form feature before using it:
1
$ composer require symfony/formNote
If you install this component outside of a Symfony application, you must
require the vendor/autoload.php file in your code to enable the class
autoloading mechanism provided by Composer. Read
this article for more details.
In Symfony applications, the framework creates and configures the form factory for you. If you use the Form component in any other PHP application, you must create that factory yourself, as explained in Forms.
Understanding How Forms Work
Before diving into the code, it's helpful to understand the mental model behind Symfony forms. Think of a form as a bidirectional mapping layer between your PHP objects (or arrays) and HTML forms.
This mapping works in two directions:
- Object to HTML: When rendering a form, Symfony reads data from your object and turns it into HTML fields that users can edit;
- HTML to Object: When processing a submission, Symfony takes the raw values from the HTTP request (typically strings) and converts them back into the appropriate PHP types on your object.
This flow is the core of the Form component. From simple text fields to complex nested collections, everything follows the same pattern.
The Data Transformation Lifecycle
Data in a form goes through three representations, often called data layers:
- Model Data
-
The data in the format your application uses. For example, a
DateTimeobject, a Doctrine entity, or a custom value object. This is what you pass tocreateForm()and what you get back after a successful submission viagetData(). - Normalized Data
-
An intermediate representation that normalizes the model data. For most
field types, this is identical to the model data. However, for some types
it's different. For example,
DateTypeis normalized as an array withyear,month, anddaykeys. - View Data
- The format used to populate HTML form fields and received from user submissions. In most cases, this is string-based (or arrays of strings), because browsers submit text. Some fields may use other representations or remain empty for security reasons (for example, file inputs).
High-level flow:
Form Rendering
- Start with model data from your object.
- Model transformers convert it to normalized data.
- View transformers convert it to view data (typically strings).
- Symfony renders the corresponding HTML widgets.
Form Submission
- Symfony reads raw values from the HTTP request (typically strings).
- View transformers reverse the data into normalized data.
- Model transformers reverse the data into model data.
- The data is written back to the underlying object or array.
For a DateType field configured to render as three <select> elements:
- Model data: a
DateTimeobject; - Norm data: an array like
['year' => 2026, 'month' => 10, 'day' => 18]; (values are integers) - View data: an array like
['year' => '2026', 'month' => '10', 'day' => '18'](values are strings, as submitted by the browser).
Most of the time you don't need to think about these layers. They become relevant when debugging why a field doesn't display or submit correctly, or when creating custom data transformers.
Usage
The recommended workflow when working with Symfony forms is the following:
- Build the form in a Symfony controller or using a dedicated form class;
- Render the form in a template so the user can edit and submit it;
- Process the form to validate the submitted data, transform it into PHP data and do something with it (e.g. persist it in a database).
Each of these steps is explained in detail in the next sections. To make examples easier to follow, all of them assume that you're building a small Todo list application that displays "tasks".
Users create and edit tasks using Symfony forms. Each task is an instance of the
following Task class:
1
2
3
4
5
6
7
8
9
10
11
12
13
14
15
16
17
18
19
20
21
22
23
24
25
26
27
28
29
// src/Entity/Task.php
namespace App\Entity;

class Task
{
    protected string $task;

    protected ?\DateTimeInterface $dueDate;

    public function getTask(): string
    {
        return $this->task;
    }

    public function setTask(string $task): void
    {
        $this->task = $task;
    }

    public function getDueDate(): ?\DateTimeInterface
    {
        return $this->dueDate;
    }

    public function setDueDate(?\DateTimeInterface $dueDate): void
    {
        $this->dueDate = $dueDate;
    }
}
This class is a "plain-old-PHP-object" because, so far, it has nothing to do with Symfony or any other library. It's a normal PHP object that directly solves a problem inside your application (i.e. the need to represent a task in your application). But you can also edit Doctrine entities in the same way.
Form Types
Before creating your first Symfony form, it's important to understand the concept of "form type". In other projects, it's common to differentiate between "forms" and "form fields". In Symfony, all of them are "form types":
- a single
<input type="text">form field is a "form type" (e.g.TextType); - a group of several HTML fields used to input a postal address is a "form type"
(e.g.
PostalAddressType); - an entire
<form>with multiple fields to edit a user profile is a "form type" (e.g.UserProfileType).
This unified concept makes the Form component more flexible. You can compose complex forms from simpler types, embed forms within forms, and reuse the same type definition across your application.
The Form Type Hierarchy
Every form type has a parent type. The parent determines the base behavior, options, and rendering that your type inherits. Here's a simplified view:
1
2
3
4
5
6
7
8
9
10
11
12
13
FormType        (the root parent of all types)
├─ TextType    (renders a text input)
│  ├─ EmailType
│  ├─ PasswordType
│  ├─ ...
│  └─ UrlType
├─ ChoiceType  (renders select, radio, or checkboxes)
│  ├─ CountryType
│  ├─ EntityType
│  └─ ...
├─ DateType    (renders single or multiple fields for date input)
│  └─ ...
└─ ...
When you create a custom form type and specify a parent (via getParent()),
your type inherits options, template blocks, and behavior from that parent. This
is why EmailType reuses the rendering and options from TextType.
There are dozens of form types provided by Symfony and you can also create your own form types.
Tip
You can use the debug:form to list all the available types, type
extensions and type guessers in your application:
1
2
3
4
5
6
7
8
$ php bin/console debug:form

# pass the form type FQCN to only show the options for that type, its parents and extensions
# For built-in types, you can pass the short classname instead of the FQCN
$ php bin/console debug:form BirthdayType

# pass also an option name to only display the full definition of that option
$ php bin/console debug:form BirthdayType label_attr
Building Forms
Symfony provides a "form builder" object which allows you to describe the form fields using a fluent interface. Later, this builder creates the actual form object used to render and process contents.
Creating Forms in Controllers
If your controller extends from the AbstractController,
use the createFormBuilder() helper:
1
2
3
4
5
6
7
8
9
10
11
12
13
14
15
16
17
18
19
20
21
22
23
24
25
26
27
28
29
// src/Controller/TaskController.php
namespace App\Controller;

use App\Entity\Task;
use Symfony\Bundle\FrameworkBundle\Controller\AbstractController;
use Symfony\Component\Form\Extension\Core\Type\DateType;
use Symfony\Component\Form\Extension\Core\Type\SubmitType;
use Symfony\Component\Form\Extension\Core\Type\TextType;
use Symfony\Component\HttpFoundation\Request;
use Symfony\Component\HttpFoundation\Response;

class TaskController extends AbstractController
{
    public function new(Request $request): Response
    {
        // creates a task object and initializes some data for this example
        $task = new Task();
        $task->setTask('Write a blog post');
        $task->setDueDate(new \DateTimeImmutable('tomorrow'));

        $form = $this->createFormBuilder($task)
            ->add('task', TextType::class)
            ->add('dueDate', DateType::class)
            ->add('save', SubmitType::class, ['label' => 'Create Task'])
            ->getForm();

        // ...
    }
}If your controller does not extend from AbstractController, you'll need to
fetch services in your controller and
use the createBuilder() method of the form.factory service. You can
also inject that service by type-hinting a constructor or method argument with
FormFactoryInterface.
In this example, you've added two fields to your form - task and dueDate
- corresponding to the task and dueDate properties of the Task
class. You've also assigned each a form type (e.g. TextType
and DateType), represented by its fully qualified class name. Finally, you
added a submit button with a custom label for submitting the form to the server.
Tip
Symfony also provides a createFormFlowBuilder() helper so you can create
form flows (multi-step forms).
8.1
The createFormFlowBuilder helper was introduced in Symfony 8.1.
Creating Form Classes
Symfony recommends putting as little logic as possible in controllers. That's why it's better to move complex forms to dedicated classes instead of defining them in controller actions. Besides, forms defined in classes can be reused in multiple actions and services.
Form classes are form types that implement FormTypeInterface. However, it's better to extend from AbstractType, which already implements the interface and provides some utilities:
1 2 3 4 5 6 7 8 9 10 11 12 13 14 15 16 17 18 19 20
// src/Form/Type/TaskType.php
namespace App\Form\Type;
use Symfony\Component\Form\AbstractType;
use Symfony\Component\Form\Extension\Core\Type\DateType;
use Symfony\Component\Form\Extension\Core\Type\SubmitType;
use Symfony\Component\Form\Extension\Core\Type\TextType;
use Symfony\Component\Form\FormBuilderInterface;
class TaskType extends AbstractType
{
public function buildForm(FormBuilderInterface $builder, array $options): void
{
$builder
->add('task', TextType::class)
->add('dueDate', DateType::class)
->add('save', SubmitType::class)
;
}
}Tip
Install the MakerBundle in your project to generate form classes using
the make:form and make:registration-form commands.
The form class contains all the directions needed to create the task form. In
controllers extending from the AbstractController,
use the createForm() helper (otherwise, use the create() method of the
form.factory service):
1
2
3
4
5
6
7
8
9
10
11
12
13
14
15
16
17
18
19
20
// src/Controller/TaskController.php
namespace App\Controller;
use App\Form\Type\TaskType;
// ...
class TaskController extends AbstractController
{
public function new(): Response
{
// creates a task object and initializes some data for this example
$task = new Task();
$task->setTask('Write a blog post');
$task->setDueDate(new \DateTimeImmutable('tomorrow'));
$form = $this->createForm(TaskType::class, $task);
// ...
}
}Every form needs to know the name of the class that holds the underlying data
(e.g. App\Entity\Task). Usually, this is guessed based on the object passed
to the second argument to createForm() (i.e. $task). Later, when you
begin embedding forms, this will no longer be sufficient.
So, while not always necessary, it's generally a good idea to explicitly specify
the data_class option by adding the following to your form type class:
1 2 3 4 5 6 7 8 9 10 11 12 13 14 15 16 17 18
// src/Form/Type/TaskType.php
namespace App\Form\Type;
use App\Entity\Task;
use Symfony\Component\OptionsResolver\OptionsResolver;
// ...
class TaskType extends AbstractType
{
// ...
public function configureOptions(OptionsResolver $resolver): void
{
$resolver->setDefaults([
'data_class' => Task::class,
]);
}
}Mapping Fields to Object Properties
By default, a form field named dueDate reads and writes the dueDate
property on your object. This uses the PropertyAccess component,
which can work with public properties and common accessor names (get*(),
is*(), has*(), set*()).
The property_path option lets you customize this mapping.
Mapping to a Different Property
If your form field name doesn't match the object property:
1 2 3 4
$builder->add('deadline', DateType::class, [
// this field will read/write the 'dueDate' property
'property_path' => 'dueDate',
]);Mapping to Nested Properties
You can access nested object properties using dot notation:
1 2 3 4
// assuming Task::getCategory() returns a Category object with getName()/setName()
$builder->add('categoryName', TextType::class, [
'property_path' => 'category.name',
]);For fields that shouldn't be written back to the underlying data, use unmapped fields.
Injecting Services in Form Classes
Form classes are regular services, which means you can inject other services using autowiring:
1 2 3 4 5 6 7 8 9 10 11 12 13 14 15 16 17 18 19
// src/Form/Type/TaskType.php
namespace App\Form\Type;
use App\Repository\CategoryRepository;
use Symfony\Component\Form\AbstractType;
// ...
class TaskType extends AbstractType
{
public function __construct(
private CategoryRepository $categoryRepository,
) {
}
public function buildForm(FormBuilderInterface $builder, array $options): void
{
// use $this->categoryRepository to access the repository
}
}If you're using the default services.yaml configuration, this works automatically. See How to Create a Custom Form Field Type for more information about injecting services in custom form types.
Rendering Forms
Now that the form has been created, the next step is to render it:
1 2 3 4 5 6 7 8 9 10 11 12 13 14 15 16 17 18 19 20 21 22 23
// src/Controller/TaskController.php
namespace App\Controller;
use App\Entity\Task;
use App\Form\Type\TaskType;
use Symfony\Bundle\FrameworkBundle\Controller\AbstractController;
use Symfony\Component\HttpFoundation\Request;
use Symfony\Component\HttpFoundation\Response;
class TaskController extends AbstractController
{
public function new(Request $request): Response
{
$task = new Task();
// ...
$form = $this->createForm(TaskType::class, $task);
return $this->render('task/new.html.twig', [
'form' => $form,
]);
}
}Internally, the render() method calls $form->createView() to
transform the form into a form view instance.
Then, use some form helper functions to render the form contents:
1 2
{# templates/task/new.html.twig #}
{{ form(form) }}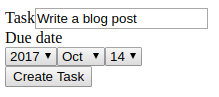
That's it! The form() function renders all
fields and the <form> start and end tags. By default, the form method is
POST and the target URL is the same that displayed the form, but
you can change both.
Notice how the rendered task input field has the value of the task
property from the $task object (i.e. "Write a blog post"). This is the first
job of a form: to take data from an object and translate it into a format that's
suitable for being rendered in an HTML form.
Tip
The form system is smart enough to access the value of the protected
task property via the getTask() and setTask() methods on the
Task class. Unless a property is public, it must have a "getter" and
"setter" method so that Symfony can get and put data onto the property. For
a boolean property, you can use an "isser" or "hasser" method (e.g.
isPublished() or hasReminder()) instead of a getter (e.g.
getPublished() or getReminder()).
As short as this rendering is, it's not very flexible. Usually, you'll need more control over how the entire form or some of its fields look. For example, thanks to the Bootstrap 5 integration with Symfony forms you can set this option to generate forms compatible with the Bootstrap 5 CSS framework:
1 2 3
# config/packages/twig.yaml
twig:
form_themes: ['bootstrap_5_layout.html.twig']The built-in Symfony form themes include Bootstrap 3, 4 and 5, Foundation 5 and 6, as well as Tailwind 2. You can also create your own Symfony form theme.
In addition to form themes, Symfony allows you to customize the way fields are rendered with multiple functions to render each field part separately (widgets, labels, errors, help messages, etc.)
Processing Forms
The recommended way of processing forms is to use a single action for both rendering the form and handling the form submit. You can use separate actions, but using one action simplifies everything while keeping the code concise and maintainable.
Processing a form means to translate user-submitted data back to the properties of an object. To make this happen, the submitted data from the user must be written into the form object:
1 2 3 4 5 6 7 8 9 10 11 12 13 14 15 16 17 18 19 20 21 22 23 24 25 26 27 28 29 30
// src/Controller/TaskController.php
// ...
use Symfony\Component\HttpFoundation\Request;
class TaskController extends AbstractController
{
public function new(Request $request): Response
{
// set up a fresh $task object (remove the example data)
$task = new Task();
$form = $this->createForm(TaskType::class, $task);
$form->handleRequest($request);
if ($form->isSubmitted() && $form->isValid()) {
// $form->getData() holds the submitted values
// but, the original `$task` variable has also been updated
$task = $form->getData();
// ... perform some action, such as saving the task to the database
return $this->redirectToRoute('task_success');
}
return $this->render('task/new.html.twig', [
'form' => $form,
]);
}
}In standalone applications, passing the Request object to the
handleRequest() method requires registering the HttpFoundationExtension
in your form factory, as explained in Forms.
Warning
The form's createView() method must be called after handleRequest().
Otherwise, when using form events, changes done
in the *_SUBMIT events won't be applied to the view (like validation errors).
This controller follows a common pattern for handling forms and has three possible paths:
- When initially loading the page in a browser, the form hasn't been submitted
yet and
$form->isSubmitted()returnsfalse. So, the form is created and rendered; When the user submits the form, handleRequest() recognizes this and immediately writes the submitted data back into the
taskanddueDateproperties of the$taskobject. Then this object is validated (validation is explained in the next section). If it is invalid, isValid() returnsfalseand the form is rendered again, but now with validation errors.By passing
$formto therender()method (instead of$form->createView()), the response code is automatically set to HTTP 422 Unprocessable Content. This ensures compatibility with tools relying on the HTTP specification, like Symfony UX Turbo;- When the user submits the form with valid data, the submitted data is again
written into the form, but this time isValid()
returns
true. Now you have the opportunity to perform some actions using the$taskobject (e.g. persisting it to the database) before redirecting the user to some other page (e.g. a "thank you" or "success" page);
Note
Redirecting a user after a successful form submission is a best practice that prevents the user from being able to hit the "Refresh" button of their browser and re-post the data.
Accessing Form Data
You'll use the getData() method most often to access the form's data,
but Symfony forms also provide methods to access data at each layer:
getData()- Returns the model data. This is the method you'll use most often. After submission, it returns the populated object (or array) with all the submitted values transformed into their proper PHP types.
getNormData()- Returns the normalized data. Useful when debugging transformer issues or when you need the intermediate representation.
getViewData()- Returns the view data. This is what gets rendered into HTML fields and what comes back from user submissions (before transformation).
See also
When adding extra fields to the form, you can also
use the getExtraData() method to get any submitted data that doesn't
correspond to a form field.
Example showing these methods in action:
1 2 3 4 5 6 7 8 9 10 11 12 13
// after form submission
$form->handleRequest($request);
if ($form->isSubmitted()) {
// the populated Task object
$task = $form->getData();
// for a DateType field, this might be ['year' => 2024, 'month' => 6, ...]
$normData = $form->get('dueDate')->getNormData();
// the raw submitted values (usually strings): ['year' => '2024', 'month' => '6', ...]
$viewData = $form->get('dueDate')->getViewData();
}If a transformer fails, the form (or the affected field) may be marked as not
synchronized. Check isSynchronized() and inspect field errors to understand
what went wrong.
Using the submit() Method
The handleRequest() method is the recommended way to process forms. However, you can also use the submit() method for finer control over when exactly your form is submitted and what data is passed to it:
1 2 3 4 5 6 7 8 9 10 11 12 13 14 15 16 17 18 19 20 21 22 23
use Symfony\Component\HttpFoundation\Request;
use Symfony\Component\HttpFoundation\Response;
// ...
public function new(Request $request): Response
{
$task = new Task();
$form = $this->createForm(TaskType::class, $task);
if ($request->isMethod('POST')) {
$form->submit($request->getPayload()->get($form->getName()));
if ($form->isSubmitted() && $form->isValid()) {
// perform some action...
return $this->redirectToRoute('task_success');
}
}
return $this->render('task/new.html.twig', [
'form' => $form,
]);
}The list of fields submitted with the submit() method must be the same as
the fields defined by the form class. Otherwise, you'll see a form validation error:
1 2 3 4 5 6 7 8 9 10 11 12 13 14
public function new(Request $request): Response
{
// ...
if ($request->isMethod('POST')) {
// '$json' represents payload data sent by React/Angular/Vue
// the merge of parameters is needed to submit all form fields
$form->submit(array_merge($json, $request->getPayload()->all()));
// ...
}
// ...
}Tip
Forms consisting of nested fields expect an array in submit(). You can also submit individual fields by calling submit() directly on the field:
1
$form->get('firstName')->submit('Fabien');Tip
When submitting a form via a "PATCH" request, you may want to update only a few
submitted fields. To achieve this, you may pass an optional second boolean
argument to submit(). Passing false will remove any missing fields
within the form object. Otherwise, the missing fields will be set to null.
Warning
When the second parameter $clearMissing is false, like with the
"PATCH" method, the validation will only apply to the submitted fields. If
you need to validate all the underlying data, add the required fields
manually so that they are validated:
1 2 3 4 5
// 'email' and 'username' are added manually to force their validation
$form->submit(array_merge(
['email' => null, 'username' => null],
$request->getPayload()->all()
), false);Handling Multiple Submit Buttons
When your form contains more than one submit button, you'll want to check which of the buttons was clicked to adapt the program flow in your controller. For example, if you add a second button with the caption "Save and Add" to your form:
1 2 3 4 5 6
$form = $this->createFormBuilder($task)
->add('task', TextType::class)
->add('dueDate', DateType::class)
->add('save', SubmitType::class, ['label' => 'Create Task'])
->add('saveAndAdd', SubmitType::class, ['label' => 'Save and Add'])
->getForm();In your controller, use the button's isClicked() method for querying if the "Save and Add" button was clicked:
1 2 3 4 5 6 7 8 9
if ($form->isSubmitted() && $form->isValid()) {
// ... perform some action, such as saving the task to the database
$nextAction = $form->get('saveAndAdd')->isClicked()
? 'task_new'
: 'task_success';
return $this->redirectToRoute($nextAction);
}Alternatively you can use the getClickedButton() method to get the clicked button's name:
1 2 3 4 5 6 7 8 9
if ($form->getClickedButton() && 'saveAndAdd' === $form->getClickedButton()->getName()) {
// ...
}
// when using nested forms, two or more buttons can have the same name;
// in those cases, compare the button objects instead of the button names
if ($form->getClickedButton() === $form->get('saveAndAdd')) {
// ...
}Validating Forms
In the previous section, you learned how a form can be submitted with valid
or invalid data. In Symfony, the question isn't whether the "form" is valid, but
whether or not the underlying object ($task in this example) is valid after
the form has applied the submitted data to it. Calling $form->isValid() is a
shortcut that asks the $task object whether or not it has valid data.
Before using validation, add support for it in your application:
1
$ composer require symfony/validatorValidation is done by adding a set of rules, called (validation) constraints, to a class. You can add them either to the entity class or by using the constraints option of form types.
To see the first approach - adding constraints to the entity - in action,
add the validation constraints, so that the task field cannot be empty,
and the dueDate field cannot be empty, and must be a valid DateTimeImmutable
object.
1 2 3 4 5 6 7 8 9 10 11 12 13 14
// src/Entity/Task.php
namespace App\Entity;
use Symfony\Component\Validator\Constraints as Assert;
class Task
{
#[Assert\NotBlank]
public string $task;
#[Assert\NotBlank]
#[Assert\Type(\DateTimeInterface::class)]
protected \DateTimeInterface $dueDate;
}That's it! If you re-submit the form with invalid data, you'll see the corresponding errors printed out with the form.
To see the second approach - adding constraints to the form - refer to this section. Both approaches can be used together.
See also
See Validation Constraints Reference for the list of all built-in validation constraints.
Accessing Form Errors
You can use the getErrors() method to access the list of errors. It returns a FormErrorIterator instance:
1 2 3 4 5 6 7 8 9 10 11 12 13 14 15 16 17 18
$form = ...;
// ...
// a FormErrorIterator instance, but only errors attached to this
// form level (e.g. global errors)
$errors = $form->getErrors();
// a FormErrorIterator instance, but only errors attached to the
// "firstName" field
$errors = $form['firstName']->getErrors();
// a FormErrorIterator instance including child forms in a flattened structure
// use getOrigin() to determine the form causing the error
$errors = $form->getErrors(true);
// a FormErrorIterator instance including child forms without flattening the output structure
$errors = $form->getErrors(true, false);Clearing Form Errors
Any errors can be manually cleared using the clearErrors() method. This is useful when you'd like to validate the form without showing validation errors to the user (i.e. during a partial AJAX submission or dynamic form modification).
Because clearing the errors makes the form valid, clearErrors() should only be called after testing whether the form is valid.
Disabling Validation
Sometimes it's useful to suppress the validation of a form altogether. For
these cases, set the validation_groups option to false:
1 2 3 4 5 6 7 8
use Symfony\Component\OptionsResolver\OptionsResolver;
public function configureOptions(OptionsResolver $resolver): void
{
$resolver->setDefaults([
'validation_groups' => false,
]);
}Note that when you do that, the form will still run basic integrity checks, for example whether an uploaded file was too large or whether non-existing fields were submitted.
The submission of extra form fields can be controlled with the allow_extra_fields config option and the maximum upload file size should be handled via your PHP and web server configuration.
You can also disable validation for specific submit buttons using
'validation_groups' => false. This is useful in multi-step forms when you
want a "Previous" button to save data without running validation:
1 2 3 4 5 6 7
$form = $this->createFormBuilder($task)
// ...
->add('nextStep', SubmitType::class)
->add('previousStep', SubmitType::class, [
'validation_groups' => false,
])
->getForm();The form will still validate basic integrity constraints even when clicking "previousStep".
Customizing the Violation Mapper
8.1
The ViolationMapperInterface and its integration into the form
validation system were introduced in Symfony 8.1.
When a form is validated, the ViolationMapper class is responsible for mapping constraint violations to the corresponding form fields. To customize this mapping logic, create a class that implements ViolationMapperInterface and register it as a service:
1 2 3 4 5 6 7 8 9 10 11 12 13 14
// src/Form/CustomViolationMapper.php
namespace App\Form;
use Symfony\Component\Form\Extension\Validator\ViolationMapper\ViolationMapperInterface;
use Symfony\Component\Form\FormInterface;
use Symfony\Component\Validator\ConstraintViolation;
class CustomViolationMapper implements ViolationMapperInterface
{
public function mapViolation(ConstraintViolation $violation, FormInterface $form, bool $allowNonSynchronized = false): void
{
// custom mapping logic...
}
}The custom violation mapper is used automatically because ViolationMapperInterface
is registered as a service alias. To decorate
the default violation mapper instead, decorate the form.violation_mapper service.
Other Common Form Features
Passing Options to Forms
If you create forms in classes, when building
the form in the controller you can pass custom options to it as the third optional
argument of createForm():
1 2 3 4 5 6 7 8 9 10 11 12 13 14 15 16 17 18 19 20 21
// src/Controller/TaskController.php
namespace App\Controller;
use App\Form\Type\TaskType;
// ...
class TaskController extends AbstractController
{
public function new(): Response
{
$task = new Task();
// use some PHP logic to decide if this form field is required or not
$dueDateIsRequired = ...;
$form = $this->createForm(TaskType::class, $task, [
'require_due_date' => $dueDateIsRequired,
]);
// ...
}
}If you try to use the form now, you'll see an error message: The option
"require_due_date" does not exist. That's because forms must declare all the
options they accept using the configureOptions() method:
1 2 3 4 5 6 7 8 9 10 11 12 13 14 15 16 17 18 19 20 21 22
// src/Form/Type/TaskType.php
namespace App\Form\Type;
use Symfony\Component\OptionsResolver\OptionsResolver;
// ...
class TaskType extends AbstractType
{
// ...
public function configureOptions(OptionsResolver $resolver): void
{
$resolver->setDefaults([
// ...,
'require_due_date' => false,
]);
// you can also define the allowed types, allowed values and
// any other feature supported by the OptionsResolver component
$resolver->setAllowedTypes('require_due_date', 'bool');
}
}Now you can use this new form option inside the buildForm() method:
1 2 3 4 5 6 7 8 9 10 11 12 13 14 15 16 17 18 19 20 21
// src/Form/Type/TaskType.php
namespace App\Form\Type;
use Symfony\Component\Form\AbstractType;
use Symfony\Component\Form\Extension\Core\Type\DateType;
use Symfony\Component\Form\FormBuilderInterface;
class TaskType extends AbstractType
{
public function buildForm(FormBuilderInterface $builder, array $options): void
{
$builder
// ...
->add('dueDate', DateType::class, [
'required' => $options['require_due_date'],
])
;
}
// ...
}Form Type Options
Each form type has a number of options to configure it, as
explained in the Symfony form types reference.
Two commonly used options are required and label.
The required Option
The most common option is the required option, which can be applied to any
field. By default, this option is set to true, meaning that HTML5-ready
browsers will require you to fill in all fields before submitting the form.
If you don't want this behavior, either
disable client-side validation for the
entire form or set the required option to false on one or more fields:
1 2 3
->add('dueDate', DateType::class, [
'required' => false,
])The required option does not perform any server-side validation. If a user
submits a blank value for the field (either with an old browser or a web
service, for example), it will be accepted as a valid value unless you also use
Symfony's NotBlank or NotNull validation constraints.
The label Option
By default, the labels of form fields are the humanized versions of the
property name (user -> User; postalAddress -> Postal Address).
Set the label option on fields to define their labels explicitly:
1 2 3 4
->add('dueDate', DateType::class, [
// set it to FALSE to not display the label for this field
'label' => 'To Be Completed Before',
])Tip
By default, <label> tags of required fields are rendered with a
required CSS class, so you can display an asterisk by applying a CSS style:
1 2 3
label.required:before {
content: "*";
}Changing the Action and HTTP Method
By default, the <form> tag is rendered with a method="post" attribute,
and no action attribute. This means that the form is submitted via an HTTP
POST request to the same URL under which it was rendered. When building the form,
use the setAction() and setMethod() methods to change this:
1 2 3 4 5 6 7 8 9 10 11 12 13 14 15 16 17 18 19 20 21 22 23 24
// src/Controller/TaskController.php
namespace App\Controller;
// ...
use Symfony\Bundle\FrameworkBundle\Controller\AbstractController;
use Symfony\Component\Form\Extension\Core\Type\DateType;
use Symfony\Component\Form\Extension\Core\Type\SubmitType;
use Symfony\Component\Form\Extension\Core\Type\TextType;
class TaskController extends AbstractController
{
public function new(): Response
{
// ...
$form = $this->createFormBuilder($task)
->setAction($this->generateUrl('target_route'))
->setMethod('GET')
// ...
->getForm();
// ...
}
}When building the form in a class, pass the action and method as form options:
1 2 3 4 5 6 7 8 9 10 11 12 13 14 15 16 17 18 19 20 21
// src/Controller/TaskController.php
namespace App\Controller;
use App\Form\TaskType;
use Symfony\Bundle\FrameworkBundle\Controller\AbstractController;
// ...
class TaskController extends AbstractController
{
public function new(): Response
{
// ...
$form = $this->createForm(TaskType::class, $task, [
'action' => $this->generateUrl('target_route'),
'method' => 'GET',
]);
// ...
}
}Finally, you can override the action and method in the template by passing them
to the form() or the form_start() helper functions:
1
2
{# templates/task/new.html.twig #}
{{ form_start(form, {'action': path('target_route'), 'method': 'GET'}) }}Note
If the form's method is not GET or POST, but PUT, PATCH or
DELETE, Symfony will insert a hidden field with the name _method
that stores this method. The form will be submitted in a normal POST
request, but Symfony's routing is capable of detecting the
_method parameter and will interpret it as a PUT, PATCH or
DELETE request. The http_method_override
option must be enabled for this to work.
For security, you can restrict which HTTP methods can be overridden using the allowed_http_method_override option.
Changing the Form Field Names and Ids
When Symfony renders a form, it generates HTML name and id attributes
for each field following specific conventions. Understanding these conventions
helps when writing JavaScript, CSS selectors, or custom form themes.
In Twig templates, prefer form.vars.full_name and form.vars.id as the
source of truth, instead of reconstructing names manually.
The name Attribute
Field names follow the pattern: formName[fieldName]. For nested forms, names
are further nested: formName[childForm][fieldName].
Given a TaskType form with a dueDate field:
1
$form = $this->createForm(TaskType::class, $task);The rendered HTML will have:
1
<input name="task[dueDate]" ...>For a DateType field that renders as three separate <select> elements:
1
2
3
<select name="task[dueDate][month]">...</select>
<select name="task[dueDate][day]">...</select>
<select name="task[dueDate][year]">...</select>The id Attribute
The id attribute follows a similar pattern but uses underscores instead of
brackets: formName_fieldName. For the examples above:
1 2 3 4 5 6
<input id="task_dueDate" ...>
<!-- or for DateType with multiple fields: -->
<select id="task_dueDate_month">...</select>
<select id="task_dueDate_day">...</select>
<select id="task_dueDate_year">...</select>Customizing the Form Name
The default form name is derived from the form type class (for example,
TaskType becomes task and FooBarType becomes foo_bar). You can
customize this by returning a different value from the getBlockPrefix() method
of your form type class.
You can also customize this by creating the form with the createNamed() method:
1 2 3 4
// using FormFactory
$form = $formFactory->createNamed('my_task', TaskType::class, $task);
// this generates: <input name="my_task[dueDate]" id="my_task_dueDate">To create a form without any name prefix (fields named directly like dueDate
instead of task[dueDate]):
1
$form = $formFactory->createNamed('', TaskType::class, $task);Client-Side HTML Validation
Thanks to HTML5, many browsers can natively enforce certain validation
constraints on the client side. The most common validation is activated by
adding a required attribute on fields that are required. For browsers
that support HTML5, this will result in a native browser message being displayed
if the user tries to submit the form with that field blank.
Generated forms take full advantage of this new feature by adding sensible HTML
attributes that trigger the validation. The client-side validation, however, can
be disabled by adding the novalidate attribute to the <form> tag or
formnovalidate to the submit tag. This is especially useful when you want to
test your server-side validation constraints, but are being prevented by your
browser from, for example, submitting blank fields.
1 2 3 4
{# templates/task/new.html.twig #}
{{ form_start(form, {'attr': {'novalidate': 'novalidate'}}) }}
{{ form_widget(form) }}
{{ form_end(form) }}HTML Validation for date/time inputs
When using DateType or DateTimeType, you can rely on attr option to
enable client-side validation:
1 2 3 4
$builder->add('dueDate', DateTimeType::class, [
'years' => range(2020, 2030),
'attr' => ['min' => '2020-01-01T00:00', 'max' => '2030-12-31T23:59']
]);Form Type Guessing
If the object handled by the form includes validation constraints, Symfony can
introspect that metadata to guess the type of your field.
In the above example, Symfony can guess from the validation rules that the
task field is a normal TextType field and the dueDate field is a
DateType field.
To enable Symfony's "guessing mechanism", omit the second argument to the add() method, or
pass null to it:
1 2 3 4 5 6 7 8 9 10 11 12 13 14 15 16 17 18 19 20 21 22
// src/Form/Type/TaskType.php
namespace App\Form\Type;
use Symfony\Component\Form\AbstractType;
use Symfony\Component\Form\Extension\Core\Type\DateType;
use Symfony\Component\Form\Extension\Core\Type\SubmitType;
use Symfony\Component\Form\Extension\Core\Type\TextType;
use Symfony\Component\Form\FormBuilderInterface;
class TaskType extends AbstractType
{
public function buildForm(FormBuilderInterface $builder, array $options): void
{
$builder
// if you don't define field options, you can omit the second argument
->add('task')
// if you define field options, pass NULL as second argument
->add('dueDate', null, ['required' => false])
->add('save', SubmitType::class)
;
}
}Warning
When using a specific form validation group, the field type guesser will still consider all validation constraints when guessing your field types (including constraints that are not part of the validation group(s) being used).
Form Type Options Guessing
When the guessing mechanism is enabled for some field, in addition to its form type, the following options will be guessed too:
required-
The
requiredoption is guessed based on the validation rules (i.e. is the fieldNotBlankorNotNull) or the Doctrine metadata (i.e. is the fieldnullable). This is very useful, as your client-side validation will automatically match your validation rules. maxlength-
If the field is some sort of text field, then the
maxlengthoption attribute is guessed from the validation constraints (ifLengthorRangeis used) or from the Doctrine metadata (via the field's length).
If you'd like to change one of the guessed values, override it in the options field array:
1
->add('task', null, ['attr' => ['maxlength' => 4]])See also
Besides guessing the form type, Symfony also guesses validation constraints if you're using a Doctrine entity. Read Databases and the Doctrine ORM guide for more information.
Unmapped Fields
When editing an object via a form, all form fields are considered properties of the object. Any fields on the form that do not exist on the object will cause an exception to be thrown.
If you need extra fields in the form that won't be stored in the object (for
example to add an "I agree with these terms" checkbox), set the mapped
option to false in those fields:
1 2 3 4 5 6 7 8 9 10 11 12 13 14 15 16 17
// ...
use Symfony\Component\Form\Extension\Core\Type\CheckboxType;
use Symfony\Component\Form\Extension\Core\Type\SubmitType;
use Symfony\Component\Form\FormBuilderInterface;
class TaskType extends AbstractType
{
public function buildForm(FormBuilderInterface $builder, array $options): void
{
$builder
->add('task')
->add('dueDate')
->add('agreeTerms', CheckboxType::class, ['mapped' => false])
->add('save', SubmitType::class)
;
}
}These "unmapped fields" can be set and accessed in a controller with:
1 2
$form->get('agreeTerms')->getData();
$form->get('agreeTerms')->setData(true);Additionally, if there are any fields on the form that aren't included in
the submitted data, those fields will be explicitly set to null.
Extra fields
By default, Symfony expects every submitted field to be defined in the form. Any additional submitted fields are treated as "extra fields". You can access them via the FormInterface::getExtraData() method.
For example, consider a user creation form:
1 2 3 4 5 6 7 8 9 10 11 12 13 14 15 16 17 18 19 20 21 22 23
// ...
use App\User;
use Symfony\Component\Form\Extension\Core\Type\CheckboxType;
use Symfony\Component\Form\Extension\Core\Type\SubmitType;
use Symfony\Component\Form\FormBuilderInterface;
class UserCreateType extends AbstractType
{
public function buildForm(FormBuilderInterface $builder, array $options): void
{
$builder
->add('username', TextType::class)
->add('email', EmailType::class)
;
}
public function configureOptions(OptionsResolver $resolver)
{
$resolver->setDefaults([
'data_class' => User::class,
]);
}
}You can render an additional input in the template without adding it to the form definition:
1 2 3 4 5 6 7 8 9 10
{# templates/user/create.html.twig #}
{{ form_start(form) }}
{{ form_row(form.username) }}
{{ form_row(form.email) }}
{# hidden field to send an additional referral code #}
<input type="hidden" name="{{ form.vars.full_name ~ '[referralCode]' }}" value="{{ referralCode }}"/>
<button type="submit">Submit</button>
{{ form_end(form) }}In this example, referralCode is submitted as an extra field and you can
read it like this:
1 2
$extraData = $form->getExtraData();
$referralCode = $extraData['referralCode'] ?? null;Note
To accept extra fields, set the allow_extra_fields
option to true. Otherwise, the form will be invalid.
Using a Form without a Data Class
In most applications, a form is tied to an object, and the fields of the form get
and store their data on the properties of that object. This is what you've seen
so far in this article with the Task class.
However, by default, a form actually assumes that you want to work with arrays of data, instead of an object. There are exactly two ways that you can change this behavior and tie the form to an object instead:
- Pass an object when creating the form (as the first argument to
createFormBuilder()or the second argument tocreateForm()); - Declare the
data_classoption on your form.
If you don't do either of these, then the form will return the data as an array.
In this example, since $defaultData is not an object (and no data_class
option is set), $form->getData() ultimately returns an array:
1
2
3
4
5
6
7
8
9
10
11
12
13
14
15
16
17
18
19
20
21
22
23
24
25
26
27
28
29
30
// src/Controller/ContactController.php
namespace App\Controller;
use Symfony\Bundle\FrameworkBundle\Controller\AbstractController;
use Symfony\Component\HttpFoundation\Request;
use Symfony\Component\HttpFoundation\Response;
// ...
class ContactController extends AbstractController
{
public function contact(Request $request): Response
{
$defaultData = ['message' => 'Type your message here'];
$form = $this->createFormBuilder($defaultData)
->add('name', TextType::class)
->add('email', EmailType::class)
->add('message', TextareaType::class)
->add('send', SubmitType::class)
->getForm();
$form->handleRequest($request);
if ($form->isSubmitted() && $form->isValid()) {
// data is an array with "name", "email", and "message" keys
$data = $form->getData();
}
// ... render the form
}
}Tip
You can also access POST values (in this case "name") directly through the request object, like so:
1
$request->getPayload()->get('name');Be advised, however, that in most cases using the getData() method is
a better choice, since it returns the data (usually an object) after
it's been transformed by the Form component.
Adding Validation
Usually, when you call $form->handleRequest($request), the object is validated
by reading the constraints that you applied to that class. If your form is mapped
to an object, this is almost always the approach you want to use. See
Validation for more details.
But if the form is not mapped to an object and you instead want to retrieve an array of your submitted data, there are two ways to add constraints to the form data.
Constraints At Field Level
You can attach constraints to the individual fields. The overall approach is covered a bit more in this validation article, but here's a short example:
1 2 3 4 5 6 7 8 9 10 11 12 13 14 15 16 17 18
use Symfony\Component\Form\Extension\Core\Type\TextType;
use Symfony\Component\Form\FormBuilderInterface;
use Symfony\Component\Validator\Constraints as Assert;
public function buildForm(FormBuilderInterface $builder, array $options): void
{
$builder
->add('firstName', TextType::class, [
'constraints' => new Assert\Length(min: 3),
])
->add('lastName', TextType::class, [
'constraints' => [
new Assert\NotBlank(),
new Assert\Length(min: 3),
],
])
;
}Tip
If you are using validation groups, you need to either reference the
Default group when creating the form, or set the correct group on
the constraint you are adding:
1
new NotBlank(groups: ['create', 'update']);Tip
If the form is not mapped to an object, every object in your array of
submitted data is validated using the Symfony
constraint, unless you disable validation.
Warning
When a form is only partially submitted (for example, in an HTTP PATCH request), only the constraints from the submitted form fields will be evaluated.
Constraints At Class Level
You can also add the constraints at the class level. This can be done by setting
the constraints option in the configureOptions() method:
1 2 3 4 5 6 7 8 9 10 11 12 13 14 15 16 17 18 19 20 21 22 23 24 25
use Symfony\Component\Form\Extension\Core\Type\TextType;
use Symfony\Component\Form\FormBuilderInterface;
use Symfony\Component\OptionsResolver\OptionsResolver;
use Symfony\Component\Validator\Constraints as Assert;
public function buildForm(FormBuilderInterface $builder, array $options): void
{
$builder
->add('firstName', TextType::class)
->add('lastName', TextType::class);
}
public function configureOptions(OptionsResolver $resolver): void
{
$resolver->setDefaults([
'data_class' => null,
'constraints' => new Assert\Collection(
firstName: new Assert\Length(min: 3),
lastName: [
new Assert\NotBlank(),
new Assert\Length(min: 3),
],
),
]);
}This means you can also do this when using the createFormBuilder() method
in your controller:
1 2 3 4 5 6 7 8 9 10 11 12 13 14
use Symfony\Component\Validator\Constraints as Assert;
$form = $this->createFormBuilder($defaultData, [
'constraints' => [
'firstName' => new Assert\Length(min: 3),
'lastName' => [
new Assert\NotBlank(),
new Assert\Length(min: 3),
],
],
])
->add('firstName', TextType::class)
->add('lastName', TextType::class)
->getForm();Conditional Constraints
It's possible to define field constraints that depend on the value of other
fields (e.g. a field must not be blank when another field has a certain value).
To achieve this, use the expression option of the
When constraint to reference the other field:
1 2 3 4 5 6 7 8 9 10 11 12 13 14 15 16 17 18 19 20 21 22 23 24 25 26 27 28 29 30 31
use Symfony\Component\Validator\Constraints as Assert;
$builder
->add('how_did_you_hear', ChoiceType::class, [
'required' => true,
'label' => 'How did you hear about us?',
'choices' => [
'Search engine' => 'search_engine',
'Friends' => 'friends',
'Other' => 'other',
],
'expanded' => true,
'constraints' => [
new Assert\NotBlank(),
]
])
// this field is only required when 'how_did_you_hear' is 'other'
->add('other_text', TextType::class, [
'required' => false,
'label' => 'Please specify',
'constraints' => [
new Assert\When(
expression: 'this.getParent().get("how_did_you_hear").getData() == "other"',
constraints: [
new Assert\NotBlank(),
],
)
],
])
;See also
Another way to implement conditional constraints is to configure the
validation_groups form option with a callable. See
Configuring Validation Groups in Forms.
Using the Form Component in Standalone Applications
In Symfony applications, a fully configured form factory is available as the
form.factory service, so you don't need to set up anything to start using
forms. In any other PHP application, you must create that form factory
yourself, using the factory method Forms::createFormFactory:
1 2 3
use Symfony\Component\Form\Forms;
$formFactory = Forms::createFormFactory();This factory can already be used to create basic forms, but it is lacking support for very important features:
- Request Handling: Support for request handling and file uploads;
- CSRF Protection: Support for protection against Cross-Site-Request-Forgery (CSRF) attacks;
- Templating: Integration with a templating layer that allows you to reuse HTML fragments when rendering a form;
- Translation: Support for translating error messages, field labels and other strings;
- Validation: Integration with a validation library to generate error messages for submitted data.
The Symfony Form component relies on other libraries to solve these problems. Most of the time you will use Twig and the Symfony HttpFoundation, Translation and Validator components, but you can replace any of these with a different library of your choice.
The following sections explain how to plug these libraries into the form factory.
Tip
For a working example, see https://github.com/webmozart/standalone-forms
Request Handling
The code examples of this article pass the current Request object to the handleRequest() method when processing forms. Doing that in standalone applications requires adding the HttpFoundationExtension to your form factory:
1 2 3 4 5 6
use Symfony\Component\Form\Extension\HttpFoundation\HttpFoundationExtension;
use Symfony\Component\Form\Forms;
$formFactory = Forms::createFormFactoryBuilder()
->addExtension(new HttpFoundationExtension())
->getFormFactory();Note
For more information about the HttpFoundation component or how to install it, see The HttpFoundation Component.
If your application does not use the HttpFoundation component, call the handleRequest() method with no arguments:
1
$form->handleRequest();Internally, this uses a NativeRequestHandler
object to read data off of the correct PHP superglobals (i.e. $_POST or
$_GET) based on the HTTP method configured on the form (POST is default).
See also
If you need more control over exactly when your form is submitted or which data is passed to it, use the submit() method to handle form submissions.
CSRF Protection
Protection against CSRF attacks is built into the Form component, but you need to explicitly enable it or replace it with a custom solution. If you want to use the built-in support, first install the Security CSRF component:
1
$ composer require symfony/security-csrfThe following snippet adds CSRF protection to the form factory:
1 2 3 4 5 6 7 8 9 10 11 12 13 14 15 16 17 18
use Symfony\Component\Form\Extension\Csrf\CsrfExtension;
use Symfony\Component\Form\Forms;
use Symfony\Component\HttpFoundation\RequestStack;
use Symfony\Component\Security\Csrf\CsrfTokenManager;
use Symfony\Component\Security\Csrf\TokenGenerator\UriSafeTokenGenerator;
use Symfony\Component\Security\Csrf\TokenStorage\SessionTokenStorage;
// creates a RequestStack object using the current request
$requestStack = new RequestStack([$request]);
$csrfGenerator = new UriSafeTokenGenerator();
$csrfStorage = new SessionTokenStorage($requestStack);
$csrfManager = new CsrfTokenManager($csrfGenerator, $csrfStorage);
$formFactory = Forms::createFormFactoryBuilder()
// ...
->addExtension(new CsrfExtension($csrfManager))
->getFormFactory();Internally, this extension will automatically add a hidden field to every
form (called _token by default) whose value is automatically generated by
the CSRF generator and validated when binding the form.
Tip
If you're not using the HttpFoundation component, you can use NativeSessionTokenStorage instead, which relies on PHP's native session handling:
1 2 3 4
use Symfony\Component\Security\Csrf\TokenStorage\NativeSessionTokenStorage;
$csrfStorage = new NativeSessionTokenStorage();
// ...You can disable CSRF protection per form using the csrf_protection option:
1 2 3 4
use Symfony\Component\Form\Extension\Core\Type\FormType;
$form = $formFactory->createBuilder(FormType::class, null, ['csrf_protection' => false])
->getForm();Twig Templating
If you're using the Form component to process HTML forms, you'll need a way to render your form as HTML form fields (complete with field values, errors, and labels). If you use Twig as your template engine, the Form component offers a rich integration.
To use the integration, you'll need the twig bridge, which provides integration between Twig and several Symfony components:
1
$ composer require symfony/twig-bridgeThe TwigBridge integration provides you with several Twig Functions that help you render the HTML widget, label, help and errors for each field (as well as a few other things). To configure the integration, you'll need to bootstrap or access Twig and add the FormExtension:
1 2 3 4 5 6 7 8 9 10 11 12 13 14 15 16 17 18 19 20 21 22 23 24 25 26 27 28 29 30 31 32 33 34 35 36 37 38 39
use Symfony\Bridge\Twig\Extension\FormExtension;
use Symfony\Bridge\Twig\Form\TwigRendererEngine;
use Symfony\Component\Form\FormRenderer;
use Symfony\Component\Form\Forms;
use Twig\Environment;
use Twig\Loader\FilesystemLoader;
use Twig\RuntimeLoader\FactoryRuntimeLoader;
// the Twig file that holds all the default markup for rendering forms
// this file comes with TwigBridge
$defaultFormTheme = 'form_div_layout.html.twig';
// the path to TwigBridge library so Twig can locate the
// form_div_layout.html.twig file
$appVariableReflection = new \ReflectionClass('\Symfony\Bridge\Twig\AppVariable');
$vendorTwigBridgeDirectory = dirname($appVariableReflection->getFileName());
// the path to your other templates
$viewsDirectory = realpath(__DIR__.'/../views');
$twig = new Environment(new FilesystemLoader([
$viewsDirectory,
$vendorTwigBridgeDirectory.'/Resources/views/Form',
]));
$formEngine = new TwigRendererEngine([$defaultFormTheme], $twig);
$twig->addRuntimeLoader(new FactoryRuntimeLoader([
FormRenderer::class => function () use ($formEngine, $csrfManager): FormRenderer {
return new FormRenderer($formEngine, $csrfManager);
},
]));
// ... (see the previous CSRF Protection section for more information)
// adds the FormExtension to Twig
$twig->addExtension(new FormExtension());
// creates a form factory
$formFactory = Forms::createFormFactoryBuilder()
// ...
->getFormFactory();The exact details of your Twig Configuration will vary, but the goal is always to add the FormExtension to Twig, which gives you access to the Twig functions for rendering forms. To do this, you first need to create a TwigRendererEngine, where you define your form themes (i.e. resources/files that define form HTML markup).
For general details on rendering forms, see How to Customize Form Rendering.
Note
If you use the Twig integration, read the Translation section below for details on the needed translation filters.
Translation
If you're using the Twig integration with one of the default form theme files
(e.g. form_div_layout.html.twig), there is a Twig filter (trans)
that is used for translating form labels, errors, option
text and other strings.
To add the trans Twig filter, you can either use the built-in
TranslationExtension that integrates
with Symfony's Translation component, or add the Twig filter yourself,
via your own Twig extension.
To use the built-in integration, be sure that your project has Symfony's Translation and Config components installed:
1
$ composer require symfony/translation symfony/configNext, add the TranslationExtension
to your Twig\Environment instance:
1 2 3 4 5 6 7 8 9 10 11 12 13 14 15 16 17 18 19 20 21
use Symfony\Bridge\Twig\Extension\TranslationExtension;
use Symfony\Component\Form\Forms;
use Symfony\Component\Translation\Loader\XliffFileLoader;
use Symfony\Component\Translation\Translator;
// creates the Translator
$translator = new Translator('en');
// somehow load some translations into it
$translator->addLoader('xlf', new XliffFileLoader());
$translator->addResource(
'xlf',
__DIR__.'/path/to/translations/messages.en.xlf',
'en'
);
// adds the TranslationExtension (it gives us trans filter)
$twig->addExtension(new TranslationExtension($translator));
$formFactory = Forms::createFormFactoryBuilder()
// ...
->getFormFactory();Depending on how your translations are being loaded, you can now add string keys, such as field labels, and their translations to your translation files.
For more details on translations, see Translations.
Validation
The Form component comes with tight (but optional) integration with Symfony's Validator component. If you're using a different solution for validation, no problem! Take the submitted/bound data of your form (which is an array or object) and pass it through your own validation system.
To use the integration with Symfony's Validator component, first make sure it's installed in your application:
1
$ composer require symfony/validatorIf you're not familiar with Symfony's Validator component, read more about it: Validation. The Form component comes with a ValidatorExtension class, which automatically applies validation to your data on bind. These errors are then mapped to the correct field and rendered.
Your integration with the Validation component will look something like this:
1 2 3 4 5 6 7 8 9 10 11 12 13 14 15 16 17 18 19 20 21 22 23 24 25 26 27 28 29
use Symfony\Component\Form\Extension\Validator\ValidatorExtension;
use Symfony\Component\Form\Forms;
use Symfony\Component\Validator\Validation;

$vendorDirectory = realpath(__DIR__.'/../vendor');
$vendorFormDirectory = $vendorDirectory.'/symfony/form';
$vendorValidatorDirectory = $vendorDirectory.'/symfony/validator';

// creates the validator - details will vary
$validator = Validation::createValidator();

// there are built-in translations for the core error messages
$translator->addResource(
    'xlf',
    $vendorFormDirectory.'/Resources/translations/validators.en.xlf',
    'en',
    'validators'
);
$translator->addResource(
    'xlf',
    $vendorValidatorDirectory.'/Resources/translations/validators.en.xlf',
    'en',
    'validators'
);

$formFactory = Forms::createFormFactoryBuilder()
    // ...
    ->addExtension(new ValidatorExtension($validator))
    ->getFormFactory();
For more information about form validation, see Forms.
Accessing the Form Factory
Your application only needs one form factory, and that one factory object should be used to create any and all form objects in your application. This means that you should create it in some central, bootstrap part of your application and then access it whenever you need to build a form. If you're using a service container (like the one provided by the DependencyInjection component), add the form factory to your container and fetch it from there.
Note
The php-standalone code examples of this article store the form
factory in a local variable called $formFactory. You will probably
need to create this object in some more "global" way so you can access
it from anywhere.
Troubleshooting
Why Doesn't My Field Value Display?
Problem: The form renders, but a field is empty even though the underlying data has a value.
Common causes:
- The property is not readable (missing accessor, wrong name, or not public).
For booleans, Symfony also looks for
is*()andhas*()accessors. - The field name doesn't match the property name. Use property_path if you need to map to a different property.
The data is set after creating the form. Populate your object before passing it to
createForm():1 2 3 4 5 6 7
// wrong: object populated after form creation
$form = $this->createForm(TaskType::class, $task);
$task->setTask('My task');

// correct: object populated before form creation
$task->setTask('My task');
$form = $this->createForm(TaskType::class, $task);
Why Doesn't My Submitted Data Save to the Object?
Problem: The form submits, but the object properties remain unchanged.
Common causes:
- The property is not writable (missing setter, wrong name, or not public).
- It is an unmapped field.
- The form is not synchronized due to a transformation failure. Check
isSynchronized()and inspect field errors.
Why Does getData() Return null After Submission?
Problem: $form->getData() is null after handling the request.
Common causes:
- No initial object (or default data) was provided and the form doesn't create
one. Review the form's
data_classandempty_dataoptions. - A transformation failed and the form is not synchronized. Check
isSynchronized()and field errors. - The form is not submitted or is invalid. Check
isSubmitted()andisValid()before using the data.
Learn more
When building forms, remember that the first goal of a form is to translate
data from an object (Task) to an HTML form so that the user can modify that
data. The second goal of a form is to take the data submitted by the user and to
re-apply it to the object.
There's a lot more to learn and a lot of powerful tricks in the Symfony forms:
Reference:
Advanced Features:
Form Themes and Customization:
Events:
Validation:
Misc.: