Autocomplete <select>
Transform your EntityType, ChoiceType, EnumType or any <select> element
into an Ajax-powered autocomplete smart UI control (leveraging Tom Select):
Installation
Caution
Before you start, make sure you have StimulusBundle configured in your app.
Install the bundle using Composer and Symfony Flex:
1
$ composer require symfony/ux-autocompleteIf you're using WebpackEncore, install your assets and restart Encore (not needed if you're using AssetMapper):
1
2
$ npm install --force
$ npm run watch
Note
For more complex installation scenarios, you can install the JavaScript assets through the @symfony/ux-autocomplete npm package
Usage in a Form (without Ajax)
If you're using Symfony Form, any ChoiceType or EntityType can be
transformed into a Tom Select-powered UI control by adding the autocomplete
option:
1
2
3
4
5
6
7
8
9
10
11
12
13
14
15
16
17
18
19
20
21
22
23
24
25
26
27
28
// src/Form/AnyForm.php
// ...
class AnyForm extends AbstractType
{
public function buildForm(FormBuilderInterface $builder, array $options): void
{
$builder
->add('food', EntityType::class, [
'class' => Food::class,
'placeholder' => 'What should we eat?',
+ 'autocomplete' => true,
])
->add('portionSize', ChoiceType::class, [
'choices' => [
'Choose a portion size' => '',
'small' => 's',
'medium' => 'm',
'large' => 'l',
'extra large' => 'xl',
'all you can eat' => '∞',
],
+ 'autocomplete' => true,
])
;
}
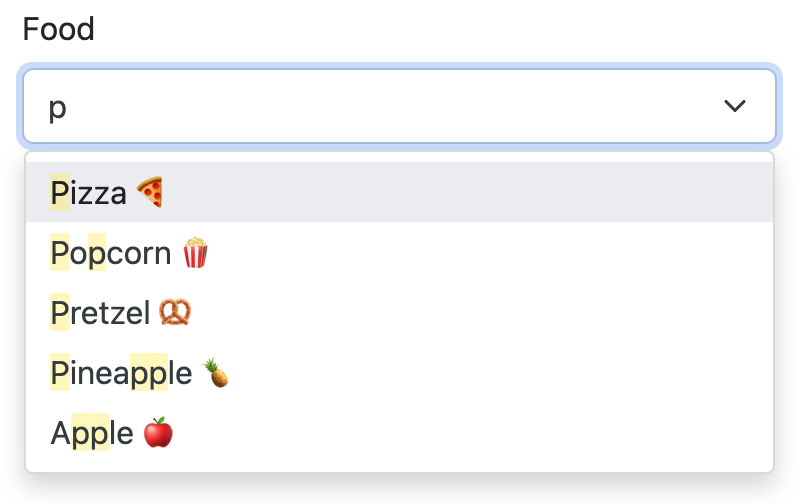
}That's all you need! When you refresh, the Autocomplete Stimulus controller
will transform your <select> element into a smart UI control:
Usage in a Form (with Ajax)
In the previous example, the autocomplete happens "locally": all of the options are loaded onto the page and used for the search.
If you're using an EntityType with many possible options,
a better option is to load the choices via AJAX. This also allows
you to search on more fields than just the "displayed" text.
To transform your field into an Ajax-powered autocomplete, you need to create a new "form type" class to represent your field. If you have MakerBundle installed, you can run:
1
$ php bin/console make:autocomplete-fieldOr, create the field by hand:
1
2
3
4
5
6
7
8
9
10
11
12
13
14
15
16
17
18
19
20
21
22
23
24
25
26
27
28
29
30
31
32
33
34
// src/Form/FoodAutocompleteField.php
// ...

use Symfony\Component\Form\AbstractType;
use Symfony\Component\OptionsResolver\OptionsResolver;
use Symfony\UX\Autocomplete\Form\AsEntityAutocompleteField;
use Symfony\UX\Autocomplete\Form\BaseEntityAutocompleteType;

#[AsEntityAutocompleteField]
class FoodAutocompleteField extends AbstractType
{
    public function configureOptions(OptionsResolver $resolver): void
    {
        $resolver->setDefaults([
            'class' => Food::class,
            'placeholder' => 'What should we eat?',

            // choose which fields to use in the search
            // if not passed, *all* fields are used
            //'searchable_fields' => ['name'],

            // if the autocomplete endpoint needs to be secured
            //'security' => 'ROLE_FOOD_ADMIN',

            // ... any other normal EntityType options
            // e.g. query_builder, choice_label
        ]);
    }

    public function getParent(): string
    {
        return BaseEntityAutocompleteType::class;
    }
}
There are 3 important things:
- The class needs the
#[AsEntityAutocompleteField]attribute so that it's noticed by the autocomplete system. - The
getParent()method must returnBaseEntityAutocompleteType. - Inside
configureOptions(), you can configure your field using whatever normalEntityTypeoptions you need plus a few extra options (see Form Options Reference).
After creating this class, use it in your form:
1
2
3
4
5
6
7
8
9
10
11
12
// src/Form/AnyForm.php
// ...

class AnyForm extends AbstractType
{
    public function buildForm(FormBuilderInterface $builder, array $options): void
    {
        $builder
+            ->add('food', FoodAutocompleteField::class)
        ;
    }
}
Caution
Avoid passing any options to the 3rd argument of the ->add() method as
these won't be used during the Ajax call to fetch results. Instead, include
all options inside the custom class (FoodAutocompleteField) or pass them as
extra options.
Congratulations! Your EntityType is now Ajax-powered!
Styling Tom Select
In your assets/controllers.json file, you should see a line that automatically
includes a CSS file for Tom Select which will give you basic styles.
If you're using Bootstrap, set tom-select.default.css to false
and tom-select.bootstrap5.css to true:
1
2
3
4
"autoimport": {
    "tom-select/dist/css/tom-select.default.css": false,
    "tom-select/dist/css/tom-select.bootstrap5.css": true
}
To further customize things, you can override the classes with your own custom CSS and even control how individual parts of Tom Select render. See Tom Select Render Templates.
Form Options Reference
All ChoiceType, EntityType and TextType fields have the following new
options (these can also be used inside your custom Ajax autocomplete classes,
e.g. FoodAutocompleteField from above):
autocomplete(default:false)-
Set to
trueto activate the Stimulus plugin on yourselectelement. tom_select_options(default:[])- Use this to set custom Tom Select Options. If you need to set an option using JavaScript, see Extending Tom Select. Read also about Managing plugins.
options_as_html(default:false)-
Set to
trueif your options (or your AJAX response'stextfield) contain HTML. By default, values are escaped to prevent XSS. autocomplete_url(default:null)-
Usually you don't need to set this manually. But, you could manually create
an autocomplete-Ajax endpoint (e.g. for a custom
ChoiceType), then set this to change the field into an AJAX-powered select. loading_more_text(default: 'Loading more results...')-
Rendered at the bottom of the list while fetching more results. This message is
automatically translated using the
AutocompleteBundledomain. no_results_found_text(default: 'No results found')-
Rendered when no matching results are found. This message is automatically translated
using the
AutocompleteBundledomain. no_more_results_text(default: 'No more results')-
Rendered at the bottom of the list after showing matching results. This message
is automatically translated using the
AutocompleteBundledomain.
For the Ajax-powered autocomplete field classes (i.e. those whose
getParent() returns BaseEntityAutocompleteType), in addition
to the options above, you can also pass:
searchable_fields(default:null)-
Set this to an array of the fields on your entity that should be used when
searching for matching options. By default (i.e.
null), all fields on your entity will be searched. Relationship fields can also be used - e.g.category.nameif your entity has acategoryrelation property. security(default:false)-
Secures the Ajax endpoint. By default, the endpoint can be accessed by any user. To secure it, pass
securityto a string role (e.g.ROLE_FOOD_ADMIN) that should be required to access the endpoint. Or, pass a callback and returntrueto grant access orfalseto deny access:1 2 3 4 5 6 7
use Symfony\Bundle\SecurityBundle\Security; [ 'security' => function(Security $security): bool { return $security->isGranted('ROLE_FOO'); }, ]; filter_query(default:null)-
If you want to completely control the query made for the "search results", use this option. This is incompatible with
searchable_fieldsandmax_results:1 2 3 4 5 6 7 8 9 10
[ 'filter_query' => function(QueryBuilder $qb, string $query, EntityRepository $repository) { if (!$query) { return; } $qb->andWhere('entity.name LIKE :filter OR entity.description LIKE :filter') ->setParameter('filter', '%'.$query.'%'); }, ]; max_results(default: 10)- Allow you to control the max number of results returned by the automatic autocomplete endpoint.
min_characters(default: 3)- Allow you to control the min number of characters to load results.
preload(default:focus)-
Set to
focusto call theloadfunction when control receives focus. Set totrueto call theloadupon control initialization (with an empty search). Set tofalsenot to call theloadfunction when control receives focus. extra_options(default[])- Allow you to pass extra options for Ajax-based autocomplete fields.
Passing Extra Options to the Ajax-powered Autocomplete
Autocomplete field options are not preserved when the field is rendered on an Ajax call. So, features like exclude some options based on the current form data are not possible by default.
To partially avoid this limitation, the extra_options option was added.
Warning
Only scalar values (string, integer, float, boolean),
null and array (consisted from the same types as mentioned before)
can be passed as extra options.
Considering the following example, when the form type is rendered for the first
time, it will use the query_builder defined while adding a food field
to the FoodForm. However, when the Ajax is used to fetch the results, on
the consequent renders, the default query_builder will be used:
1 2 3 4 5 6 7 8 9 10 11 12 13 14 15 16 17 18 19 20
// src/Form/FoodForm.php
// ...
class FoodForm extends AbstractType
{
public function buildForm(FormBuilderInterface $builder, array $options): void
{
$currentFoodId = $builder->getData()->getId();
$builder
->add('food', FoodAutocompleteField::class, [
'query_builder' => function (EntityRepository $er) {
$qb = $er->createQueryBuilder('o');
return $qb->andWhere($qb->expr()->notIn('o.id', [$currentFoodId]));
};
])
;
}
}If some food can be consisted of other foods, we might want to exclude the
"root" food from the list of available foods. To achieve this, we can remove
the query_builder option from the above example and pass the excluded_foods
extra option to the FoodAutocompleteField:
1 2 3 4 5 6 7 8 9 10 11 12 13 14 15 16 17 18
// src/Form/FoodForm.php
// ...
class FoodForm extends AbstractType
{
public function buildForm(FormBuilderInterface $builder, array $options): void
{
$currentFoodId = $builder->getData()->getId();
$builder
->add('food', FoodAutocompleteField::class, [
'extra_options' => [
'excluded_foods' => [$currentFoodId],
],
)
;
}
}The magic of the extra_options is that it will be passed to the FoodAutocompleteField
every time an Ajax call is made. So now, we can just use the excluded_foods
extra option in the default query_builder of the FoodAutocompleteField:
1 2 3 4 5 6 7 8 9 10 11 12 13 14 15 16 17 18 19 20 21 22 23 24 25 26 27 28 29 30 31 32 33
// src/Form/FoodAutocompleteField.php
// ...
use Symfony\UX\Autocomplete\Form\AsEntityAutocompleteField;
use Symfony\UX\Autocomplete\Form\BaseEntityAutocompleteType;
#[AsEntityAutocompleteField]
class FoodAutocompleteField extends AbstractType
{
public function configureOptions(OptionsResolver $resolver): void
{
$resolver->setDefaults([
// ...
'query_builder' => function (Options $options) {
return function (EntityRepository $er) use ($options) {
$qb = $er->createQueryBuilder('o');
$excludedFoods = $options['extra_options']['excluded_foods'] ?? [];
if ([] !== $excludedFoods) {
$qb->andWhere($qb->expr()->notIn('o.id', $excludedFoods));
}
return $qb;
};
}
]);
}
public function getParent(): string
{
return BaseEntityAutocompleteType::class;
}
}Using with a TextType Field
All of the above options can also be used with a TextType field:
1 2 3 4 5 6 7 8 9 10 11 12
$builder
// ...
->add('tags', TextType::class, [
'autocomplete' => true,
'tom_select_options' => [
'create' => true,
'createOnBlur' => true,
'delimiter' => ',',
],
// 'autocomplete_url' => '... optional: custom endpoint, see below',
])
;This <input> field won't have any autocomplete, but it will allow the
user to enter new options and see them as nice "items" in the box. On submit,
all of the options - separated by the delimiter - will be sent as a string.
You can add autocompletion to this via the autocomplete_url option - but you'll
likely need to create your own custom autocomplete endpoint.
Managing plugins
Tom Select Plugins can be configured through the tom_select_options.plugins option:
1
2
3
4
5
6
7
8
9
10
11
12
13
14
15
16
17
18
$resolver->setDefaults([
'class' => Ingredient::class,
'tom_select_options' => [
'plugins' => [
// Enable Input Autogrow plugin
'input_autogrow',
// Enable Dropdown Header plugin, with custom configuration
'dropdown_header' => [
'title' => 'Select an ingredient',
],
// Force natively-enabled plugins (by UX Autocomplete) to be disabled
'clear_button' => false,
'remove_button' => false,
],
],
]);Note
Some configuration could not be supported through the tom_select_options.plugins option,
for example when a plugin requires a JavaScript function as configuration value.
In that case, you must use the Extending Tom Select approach to configure plugins.
Customizing the AJAX URL/Route
The default route for the Ajax calls used by the Autocomplete component is /autocomplete/{alias}/.
Sometimes it may be useful to customize this URL - e.g. so that the URL lives
under a specific firewall.
To use another route, first declare it:
1 2 3 4
# config/routes/attributes.yaml
ux_entity_autocomplete_admin:
controller: ux.autocomplete.entity_autocomplete_controller
path: '/admin/autocomplete/{alias}'Then specify this new route on the attribute:
1 2 3 4 5 6
// src/Form/FoodAutocompleteField.php
#[AsEntityAutocompleteField(route: 'ux_entity_autocomplete_admin')]
class FoodAutocompleteField
{
// ...
}Extending Tom Select
The easiest way to customize Tom Select is via the tom_select_options
option that you pass to your field. This works great for simple
things like Tom Select's loadingClass option, which is set to a string.
But other options, like onInitialize, must be set via JavaScript.
To do this, create a custom Stimulus controller and listen to one or both events that the core Stimulus controller dispatches:
1 2 3 4 5 6 7 8 9 10 11 12 13 14 15 16 17 18 19 20 21 22 23 24 25 26 27 28 29 30 31 32 33 34
// assets/controllers/custom-autocomplete_controller.js
import { Controller } from '@hotwired/stimulus';
export default class extends Controller {
initialize() {
this._onPreConnect = this._onPreConnect.bind(this);
this._onConnect = this._onConnect.bind(this);
}
connect() {
this.element.addEventListener('autocomplete:pre-connect', this._onPreConnect);
this.element.addEventListener('autocomplete:connect', this._onConnect);
}
disconnect() {
// You should always remove listeners when the controller is disconnected to avoid side-effects
this.element.removeEventListener('autocomplete:connect', this._onConnect);
this.element.removeEventListener('autocomplete:pre-connect', this._onPreConnect);
}
_onPreConnect(event) {
// TomSelect has not been initialized - options can be changed
console.log(event.detail.options); // Options that will be used to initialize TomSelect
event.detail.options.onChange = (value) => {
// ...
};
}
_onConnect(event) {
// TomSelect has just been initialized and you can access details from the event
console.log(event.detail.tomSelect); // TomSelect instance
console.log(event.detail.options); // Options used to initialize TomSelect
}
}Note
The extending controller should be loaded eagerly (remove /* stimulusFetch: 'lazy' */), so
it can listen to events dispatched by the original controller.
Then, update your field configuration to use your new controller (it will be used in addition to the core Autocomplete controller):
1 2 3 4 5 6 7 8
$builder
->add('food', EntityType::class, [
'class' => Food::class,
'autocomplete' => true,
+ 'attr' => [
+ 'data-controller' => 'custom-autocomplete',
+ ],
])Or, if using a custom Ajax class, add the attr option to
your configureOptions() method:
1 2 3 4 5 6 7 8 9
public function configureOptions(OptionsResolver $resolver): void
{
$resolver->setDefaults([
'class' => Food::class,
+ 'attr' => [
+ 'data-controller' => 'custom-autocomplete',
+ ],
]);
}Advanced: Creating an Autocompleter (with no Form)
If you're not using the form system, you can create an Ajax autocomplete endpoint and then initialize the Stimulus controller manually. This only works for Doctrine entities: see Manually using the Stimulus Controller if you're autocompleting something other than an entity.
To expose the endpoint, create a class that implements Symfony\UX\Autocomplete\EntityAutocompleterInterface
and tag this service with ux.entity_autocompleter, including an alias option:
1 2 3 4 5 6 7 8 9 10 11 12 13 14 15 16 17 18 19 20 21 22 23 24 25 26 27 28 29 30 31 32 33 34 35 36 37 38 39 40 41 42 43 44 45 46 47
namespace App\Autocompleter;
use App\Entity\Food;
use Doctrine\ORM\EntityRepository;
use Doctrine\ORM\QueryBuilder;
use Symfony\Bundle\SecurityBundle\Security;
use Symfony\Component\DependencyInjection\Attribute\AutoconfigureTag;
use Symfony\UX\Autocomplete\EntityAutocompleterInterface;
#[AutoconfigureTag('ux.entity_autocompleter', ['alias' => 'food'])]
class FoodAutocompleter implements EntityAutocompleterInterface
{
public function getEntityClass(): string
{
return Food::class;
}
public function createFilteredQueryBuilder(EntityRepository $repository, string $query): QueryBuilder
{
return $repository
// the alias "food" can be anything
->createQueryBuilder('food')
->andWhere('food.name LIKE :search OR food.description LIKE :search')
->setParameter('search', '%'.$query.'%')
// maybe do some custom filtering in all cases
//->andWhere('food.isHealthy = :isHealthy')
//->setParameter('isHealthy', true)
;
}
public function getLabel(object $entity): string
{
return $entity->getName();
}
public function getValue(object $entity): string
{
return $entity->getId();
}
public function isGranted(Security $security): bool
{
// see the "security" option for details
return true;
}
}Thanks to this, your can now autocomplete your Food entity via
the ux_entity_autocomplete route and alias route wildcard:
1
{{ path('ux_entity_autocomplete', { alias: 'food' }) }}Usually, you'll pass this URL to the Stimulus controller, which is discussed in the next section.
Passing Extra Options to the Autocompleter
If you need to pass extra options to the autocompleter, you can do so by
implementing the
Tip
If you want to know why you might need to use the extra_options
feature, see Autocomplete <select>.
1 2 3 4 5 6 7 8 9 10 11 12 13 14 15 16 17 18 19 20 21 22 23 24 25 26 27 28 29 30 31 32 33 34 35 36 37 38 39
use Doctrine\ORM\EntityRepository;
use Doctrine\ORM\QueryBuilder;
use Sylius\Component\Product\Model\ProductAttributeInterface;
use Symfony\Bundle\SecurityBundle\Security;
use Symfony\UX\Autocomplete\OptionsAwareEntityAutocompleterInterface;
#[AutoconfigureTag('ux.entity_autocompleter', ['alias' => 'food'])]
class FoodAutocompleter implements OptionsAwareEntityAutocompleterInterface
{
+ /**
+ * @var array<string, mixed>
+ */
+ private array $options = [];
// ...
+ public function createFilteredQueryBuilder(EntityRepository $repository, string $query): QueryBuilder
+ {
+ $excludedFoods = $this->options['extra_options']['excluded_foods'] ?? [];
+
+ $qb = $repository->createQueryBuilder('o');
+
+ if ($excludedFoods !== []) {
+ $qb
+ ->andWhere($qb->expr()->notIn('o.id', $excludedFoods));
+ ->setParameter('excludedFoods', $excludedFoods)
+ ;
+ }
+
+ return $qb;
+ }
+ /**
+ * @param array<string, mixed> $options
+ */
+ public function setOptions(array $options): void
+ {
+ $this->options = $options;
+ }Manually using the Stimulus Controller
This library comes with a Stimulus controller that can activate
Tom Select on any select or input element. This can be used
outside of the Form component. For example:
1
2
3
4
<select
name="food"
{{ stimulus_controller('symfony/ux-autocomplete/autocomplete') }}
>That's it! If you want the options to be autocompleted via
Ajax, pass a url value, which works well if you create
a custom autocompleter:
1
2
3
4
5
6
<select
name="food"
{{ stimulus_controller('symfony/ux-autocomplete/autocomplete', {
url: path('ux_entity_autocomplete', { alias: 'food' })
}) }}
>Note
If you want to create an AJAX autocomplete endpoint that is not for an entity, you will need to create this manually. The only requirement is that the response returns JSON with this format:
1 2 3 4 5 6
{
"results": [
{ "value": "1", "text": "Pizza" },
{ "value": "2", "text": "Banana"}
]
}for using Tom Select Option Group the format is as follows
1 2 3 4 5 6 7 8 9
{
"results": {
"options": [
{ "value": "1", "text": "Pizza", "group_by": ["food"] },
{ "value": "2", "text": "Banana", "group_by": ["food"] }
],
"optgroups": [{ "value": "food", "label": "food" }]
}
}Once you have this, generate the URL to your controller and
pass it to the url value of the stimulus_controller() Twig
function, or to the autocomplete_url option of your form field.
The search term entered by the user is passed as a query parameter called query.
Beyond url, the Stimulus controller has various other values,
including tomSelectOptions. See the controller.ts file for
the full list.
Unit testing
When writing unit tests for your form, using the TypeTestCase class, you
consider registering the needed type extension AutocompleteChoiceTypeExtension like so:
1 2 3 4 5 6 7 8 9 10 11 12 13 14 15 16 17
// tests/Form/Type/TestedTypeTest.php
namespace App\Tests\Form\Type;

use Symfony\Component\Form\Test\TypeTestCase;
use Symfony\UX\Autocomplete\Form\AutocompleteChoiceTypeExtension;

class TestedTypeTest extends TypeTestCase
{
    protected function getTypeExtensions(): array
    {
        return [
            new AutocompleteChoiceTypeExtension(),
        ];
    }

    // ... your tests
}
Backward Compatibility promise
This bundle aims at following the same Backward Compatibility promise as the Symfony framework: https://symfony.com/doc/current/contributing/code/bc.html