実際の世界の例
この記事ではDoctrineに慣れるためにsymfony 1.2で新規プロジェクトを始めます。 ありふれたコンテンツマネジメントシステムを使います。スキーマは記事、筆者とカテゴリで構成され記事は国際化されています。
プロジェクトを始める
最初に symfony1.2で新規プロジェクトとbackendアプリケーションを初期化する必要があります。 ベータ1版ではDoctrineの機能が含まれていなかったのでSVNから最新のコードを利用していることを確認してください。
プロジェクトを生成する
$ mkdir cms
$ cd cms
$ symfony generate:project cms
データベースを設定する
config/databases.ymlを開きDoctrineのために設定内容を次のように置き換えます:
all:
  doctrine:
    class: sfDoctrineDatabase
    param:
      dsn:      mysql:host=localhost;dbname=dbname
      username: root
      password: secret
backendアプリケーションを生成する
$ symfony generate:app backend
Doctrineを有効にする
Doctrineを有効にしてPropelを無効にする必要があります。
config/ProjectConfiguration.class.phpを編集して次のコードをsetup()関数に追加します。
public function setup()
{
  $this->enablePlugins(array('sfDoctrinePlugin'));
  $this->disablePlugins(array('sfPropelPlugin'));
}
Doctrineが有効になったので利用可能なDoctrineのタスクの一覧を表示できます(訳注:実際には英文が表示されます):
$ ./symfony list doctrine

Available tasks for the "doctrine" namespace:
  :build-all                   Doctrineのモデル、SQLを生成し、データベースを初期化する (doctrine-build-all)
  :build-all-load              Doctrineのモデル、SQLを生成し、データベースを初期化し、データをロードする (doctrine-build-all-load)
  :build-all-reload            Doctrineのモデル、SQLを生成し、データベースを初期化し、データをロードする (doctrine-build-all-reload)
  :build-all-reload-test-all   Doctrineのモデル、SQLを生成し、データベースを初期化し、データをロードしテストスイートを実行する (doctrine-build-all-reload-test-all)
  :build-db                    現在のモデル用のデータベースを作成する (doctrine-build-db)
  :build-filters               現在のモデル用のフィルタクラスを生成する
  :build-forms                 現在のモデル用のフォームクラスを生成する (doctrine-build-forms)
  :build-model                 現在のモデル用のクラスを生成する (doctrine-build-model)
  :build-schema                既存のデータベースからスキーマを作成する (doctrine-build-schema)
  :build-sql                   現在のモデル用にSQLを作成する (doctrine-build-sql)
  :data-dump                   データをフィクスチャディレクトリにダンプする (doctrine-dump-data)
  :data-load                   フィクスチャディレクトリからデータをロードする (doctrine-load-data)
  :dql                         DQLクエリを実行して結果を閲覧する (doctrine-dql)
  :drop-db                     現在のモデル用のデータベースをドロップする (doctrine-drop-db)
  :generate-admin              Doctrineのadminモジュールを生成する
  :generate-migration          マイグレーションクラスを生成する (doctrine-generate-migration)
  :generate-migrations-db      既存のデータベースの接続からマイグレーションクラスを生成する (doctrine-generate-migrations-db, doctrine-gen-migrations-from-db)
  :generate-migrations-models  既存のモデルのセットからマイグレーションクラスを生成する (doctrine-generate-migrations-models, doctrine-gen-migrations-from-models)
  :generate-module             Doctrineモジュールを生成する (doctrine-generate-crud, doctrine:generate-crud)
  :generate-module-for-route   routeの定義用にDoctrineモジュールを生成する
  :insert-sql                  現在のモデルのためにSQLをinsertする (doctrine-insert-sql)
  :migrate                     データベースを現在の/指定されたバージョンにマイグレートする (doctrine-migrate)
  :rebuild-db                  現在のモデル用のデータベースを作成する (doctrine-rebuild-db)
スキーマ
お楽しみはこれからです。最初にすべきことは config/doctrine/schema.yml でCMS用のスキーマを定義することです。
---
Article:
  actAs:
    Timestampable:
    I18n:
      fields: [title, content]
  columns:
    author_id: integer
    status:
      type: enum
      values: [Draft, Published]
      notnull: true
    title:
      type: string(255)
      notnull: true
    content:
      type: clob
      notnull: true
    is_on_homepage: boolean
    published_at: timestamp
  relations:
    Author:
      foreignAlias: Articles
    Categories:
      class: Category
      refClass: ArticleCategory
      foreignAlias: Articles

Category:
  columns:
    name:
      type: string(255)
      notnull: true

Author:
  columns:
    name:
      type: string(255)
      notnull: true
    about: string(1000)

ArticleCategory:
  columns:
    article_id: integer
    category_id: integer
  relations:
    Article:
      foreignAlias: ArticleCategories
    Category:
      foreignAlias: ArticleCategories
データフィクスチャ
スキーマがあり、テストするためのデータが必要なのでdata/fixtures/data.ymlに次のYAMLをにコピーします。
---
Article:
  Article_1:
    Author: jwage
    status: Published
    is_on_homepage: true
    published_at: '<?php echo date("Y-m-d h:i:s"); ?>'
    Categories: [article, ontheedge]
    Translation:
      en:
        title: symfony 1.2 and Doctrine
        content: Article about the new Doctrine integration in symfony 1.2
      fr:
        title: symfony 1.2 et doctrine
        content: Article sur l'intégration de Doctrine dans symfony 1.2

Author:
  jwage:
    name: Jonathan H. Wage
    about: Jonathan is the lead developer of the Doctrine project and is also a core contributor to the symfony project.

Category:
  article:
    name: Article
  tutorial:
    name: Tutorial
  ontheedge:
    name: Living on the edge
ビルドとテスト
スキーマとデータフィクスチャが揃ったので必要なことはデータベース、モデル、フォーム、データその他を初期化することです。これは下記のようなとても簡単なコマンドで実行できます:
   $ ./symfony doctrine:build-all-reload --no-confirmation
>> doctrine  dropping databases
>> doctrine  creating databases
>> doctrine  generating model classes
>> doctrine  generating sql for models
>> doctrine  generating form classes
>> doctrine  generating filter form classes
>> doctrine  created tables successfully
>> doctrine  loading data fixtures from "/Us...ymfony12doctrine/data/fixtures"
簡単でしたよね?データが適切にロードされたかどうかを確認するためにDQLでインスペクションを行いましょう。
$ ./symfony doctrine:dql "FROM Article a, a.Author a2, a.Translation t"
>> doctrine  executing dql query
DQL: FROM Article a, a.Author a2, a.Translation t
found 1 results
-
  id: '1'
  author_id: '1'
  status: Published
  is_on_homepage: true
  published_at: '2008-11-06 04:37:11'
  created_at: '2008-11-06 16:37:11'
  updated_at: '2008-11-06 16:37:11'
  Author:
    id: '1'
    name: 'Jonathan H. Wage'
    about: 'Jonathan is the lead developer of the Doctrine project and is also a core contributor to the symfony project.'
  Translation:
    en:
      id: '1'
      title: 'symfony 1.2 and Doctrine'
      content: 'Article about the new Doctrine integration in symfony 1.2'
      lang: en
    fr:
      id: '1'
      title: 'symfony 1.2 et doctrine'
      content: 'Article sur l''intégration de Doctrine dans symfony 1.2'
      lang: fr
Doctrine Query Language(DQL)を味合うのは初めてかもしれません。 SQLによく似ているでしょ? 口を閉じて。 よだれが垂れてますよ。
生のDQL文字列を書きたくない人へ。
クエリをビルドするための十分な機能を持つDoctrine_Queryオブジェクトがあります。
$q = Doctrine_Query::create()
  ->from('Article a, a.Author a2, a.Translation t');
$articles = $q->execute();
Adminジェネレータ
すべてが組み込まれたので、symfonyでマジックを生成することを始められます。
記事、著者とカテゴリの管理用にrouteのコレクションを定義することから始めましょう。
エディターでapps/backend/config/routing.ymlを開き次のルートのコードをペーストします。
articles:
  class:                    sfDoctrineRouteCollection
  options:
    model:                  Article
    module:                 articles
    prefix_path:            articles
    with_wildcard_routes:   true

categories:
  class:                    sfDoctrineRouteCollection
  options:
    model:                  Category
    module:                 categories
    prefix_path:            categories
    with_wildcard_routes:   true

authors:
  class:                    sfDoctrineRouteCollection
  options:
    model:                  Author
    module:                 authors
    prefix_path:            authors
    with_wildcard_routes:   true
これらのrouteとそれぞれのDoctrineモデルをとおしてデータを管理するadminジェネレータモジュールを生成できます。 3つのモジュールを生成するには次のコマンドを実行します。
$ ./symfony doctrine:generate-admin backend articles
$ ./symfony doctrine:generate-admin backend categories
$ ./symfony doctrine:generate-admin backend authors
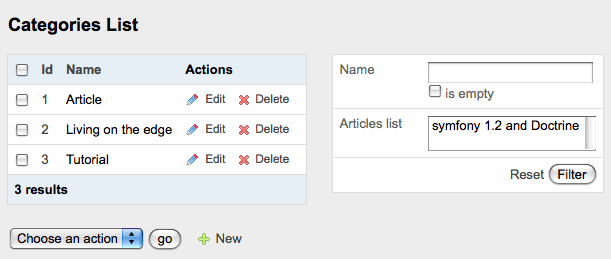
backendから categories モジュールにアクセスすると次の画面が表示されます。

リストとフィルターフォームでフィールドの特定の集合を表示するためにarticles adminジェネレーターを少しカスタマイズすることができます。
apps/backend/modules/articles/config/generator.ymlに設置されたgenerator.ymlを編集することでこれを実現できます。
config:
  list:
    display:  [title, published_at, is_on_homepage, status]
  filter:
    class:    ArticleFormFilter
    display:  [author_id, status, is_on_homepage, published_at, categories_list]
他のモジュールを同じ方法でカスタマイズできます。
URLに?sf_culture=frが含まれるように変更すると、フランス語バージョンのタイトルが表示されます。
articlesモジュールを引き出すときにブラウザで次の内容が表示されます。

翻訳を編集する
では、これらの翻訳を編集する方法は?
古いadminジェネレーターによる方法ではほとんど不可能でした。
しかし今ではArticleFormに1行のコードを追加するだけの話です。
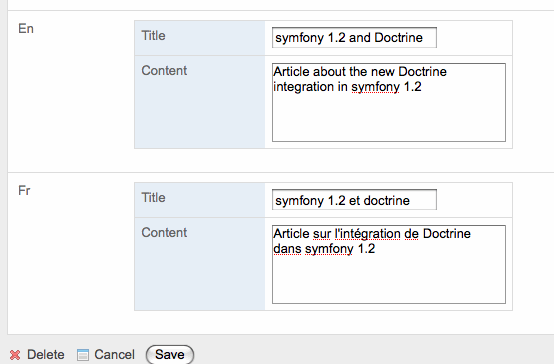
必要なことはArticleTranslationフォームを埋め込むことです。
lib/form/doctrine/ArticleForm.class.phpを編集してconfigure()に次のコードを追加します。
public function configure()
{
  $this->embedI18n(array('en', 'fr'));
}
これで記事を編集するときに記事の内部で翻訳を直接編集する機能を使えます。

これはとてもクールですが、Article内部でAuthorを直接編集したい場合はどうしましょうか?
またはAuthorが存在しない場合に新しいAuthorを作成し、名前が存在しない既存のAuthorレコードを使う場合はどうしましょうか?これも同じようにシンプルにできます。
著者を編集/追加する
上記の機能を追加するために少量のコードを3つの異なる場所に追加する必要があります。
lib/form/doctrine/ArticleForm.class.phpを編集して次のコードを追加することでArticleにAuthorフォームを埋め込みます。
public function configure()
{
  unset($this['author_id']);
  $authorForm = new AuthorForm($this->getObject()->getAuthor());
  unset($authorForm['about']);
  $this->embedForm('Author', $authorForm);

  $this->embedI18n(array('en', 'fr'));
}
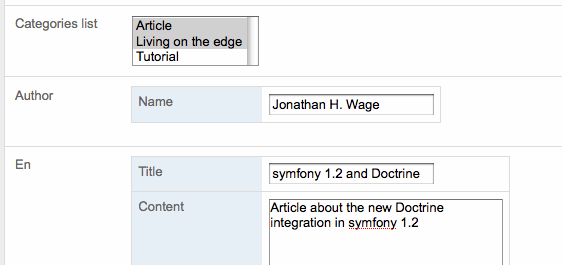
Articleの編集と作成のためにフォームを見るとき既存の情報が入力されたAuthor用の埋め込みフォームが見つかります。

最後のステップはAuthorと重複した名前を作らないようにするために、Doctrineに既存のAuthorオブジェクトを探すように伝指示します。
lib/model/doctrine/Author.class.phpを編集し、次のコードを追加してnameミューテータをオーバーライドします。
public function setName($name)
{
  $name = trim($name);
  $found = Doctrine_Query::create()
    ->select('a.id')
    ->from('Author a')
    ->where('a.name = ?', $name)
    ->fetchOne(array(), Doctrine::HYDRATE_ARRAY);
  if ($found)
  {
    $this->assignIdentifier($found['id']);
  } else {
    $this->_set('name', $name);
  }
}
上記のコードは渡された名前を持つAuthorが既に存在するかチェックし、それを行う場合、レコードで見つかる識別子を割り当て、さもなければ通常通りに名前をオブジェクトに設定します。
note
アクセサーとミューテーターをオーバーライドするときに無限ループを回避するためには_set()と_get()メソッドを使わなければなりません。
This work is licensed under the Creative Commons Attribution-Noncommercial-No Derivative Works 3.0 Unported License license.