A form is made of fields like hidden inputs, text inputs, select boxes, and checkboxes. This chapter introduces you to creating forms and managing form fields using the symfony forms framework.
Symfony 1.1 is required to follow the chapters of this book. You will also need to create a project and a frontend application to keep going. Please refer to the introduction for more information on symfony project creation.
Before we start
We will begin by adding a contact form to a symfony application.
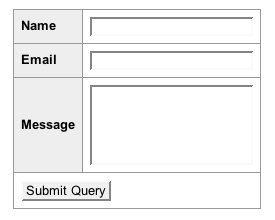
Figure 1-1 shows the contact form as seen by users who want to send a message.
Figure 1-1 - Contact form

We will create three fields for this form: the name of the user, the email of the user, and the message the user wants to send. We will simply display the information submitted in the form for the purpose of this exercise as shown in Figure 1-2.
Figure 1-2 - Thank you Page

Figure 1-3 - Interaction between the application and the user

Widgets
sfForm and sfWidget Classes
Users input information into fields which make up forms. In symfony, a form is an object inheriting from the sfForm class. In our example, we will create a ContactForm class inheriting from the sfForm class.
note
sfForm is the base class of all forms and makes it easy to manage the configuration and life cycle of your forms.
You can start configuring your form by adding widgets using the configure() method.
A widget represents a form field. For our form example, we need to add three widgets representing our three fields: name, email, and message. Listing 1-1 shows the first implementation of the ContactForm class.
Listing 1-1 - ContactForm class with three fields
// lib/form/ContactForm.class.php
class ContactForm extends sfForm
{
  public function configure()
  {
    $this->setWidgets(array(
      'name'    => new sfWidgetFormInput(),
      'email'   => new sfWidgetFormInput(),
      'message' => new sfWidgetFormTextarea(),
    ));
  }
}
note
In this book, we never show the opening <?php statement in the code
examples that only contain pure PHP code to optimize space and save
some trees. You should obviously remember to add it whenever you create
a new PHP file.
The widgets are defined in the configure() method. This method is automatically called by the sfForm class constructor.
The setWidgets() method is used to define the widgets used in the form. The setWidgets() method accepts an associative array where the keys are the field names and the values are the widget objects. Each widget is an object inheriting from the sfWidget class. For this example we used two types of widgets:
sfWidgetFormInput: This widget represents theinputfieldsfWidgetFormTextarea: This widget represents thetextareafield
note
As a convention, we store the form classes in a lib/form/ directory. You can store them in any directory managed by the symfony autoloading mechanism but as we will see later, symfony uses the lib/form/ directory to generate forms from model objects.
Displaying the Form
Our form is now ready to be used. We can now create a symfony module to display the form:
$ cd ~/PATH/TO/THE/PROJECT
$ php symfony generate:module frontend contact
In the contact module, let's modify the index action to pass a form instance to the template as shown in Listing 1-2.
Listing 1-2 - Actions class from the contact Module
// apps/frontend/modules/contact/actions/actions.class.php
class contactActions extends sfActions
{
  public function executeIndex()
  {
    $this->form = new ContactForm();
  }
}
When creating a form, the configure() method, defined earlier, will be called automatically.
We just need to create a template now to display the form as shown in Listing 1-3.
Listing 1-3 - Template displaying the form
// apps/frontend/modules/contact/templates/indexSuccess.php
<form action="<?php echo url_for('contact/submit') ?>" method="POST">
  <table>
    <?php echo $form ?>
    <tr>
      <td colspan="2">
        <input type="submit" />
      </td>
    </tr>
  </table>
</form>
A symfony form only handles widgets displaying information to users. In the indexSuccess template, the <?php echo $form ?> line only displays three fields. The other elements such as the form tag and the submit button will need to be added by the developer. This might not look obvious at first, but we will see later how useful and easy it is to embed forms.
Using the construction <?php echo $form ?> is very useful when creating prototypes and defining forms. It allows developers to concentrate on the business logic without worrying about visual aspects. Chapter three will explain how to personalize the template and form layout.
note
When displaying an object using the <?php echo $form ?>, the PHP engine will actually display the text representation of the $form object. To convert the object into a string, PHP tries to execute the magic method __toString(). Each widget implements this magic method to convert the object into HTML code. Calling <?php echo $form ?> is then equivalent to calling <?php echo $form->__toString() ?>.
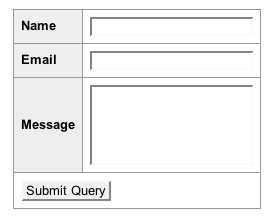
We can now see the form in a browser (Figure 1-4) and check the result by typing the address of the action contact/index (/frontend_dev.php/contact).
Figure 1-4 - Generated Contact Form

Listing 1-4 Shows the generated code by the template.
<form action="/frontend_dev.php/contact/submit" method="POST">
  <table>

    <!-- Beginning of generated code by <?php echo $form ?>
 -->
    <tr>
      <th><label for="name">Name</label></th>
      <td><input type="text" name="name" id="name" /></td>
    </tr>
    <tr>
      <th><label for="email">Email</label></th>
      <td><input type="text" name="email" id="email" /></td>
    </tr>
    <tr>
      <th><label for="message">Message</label></th>
      <td><textarea rows="4" cols="30" name="message" id="message"></textarea></td>
    </tr>
    <!-- End of generated code by <?php echo $form ?>
 -->

    <tr>
      <td colspan="2">
        <input type="submit" />
      </td>
    </tr>
  </table>
</form>
We can see that the form is displayed with three <tr> lines of an HTML table. That is why we had to enclose it in a <table> tag. Each line includes a <label> tag and a form tag (<input> or <textarea>).
Labels
The labels of each field are automatically generated. By default, labels are a transformation of the field name following the two following rules: a capital first letter and underscores replaced by spaces. Example:
$this->setWidgets(array(
  'first_name' => new sfWidgetFormInput(), // generated label: "First name"
  'last_name'  => new sfWidgetFormInput(), // generated label: "Last name"
));
Even if the automatic generation of labels is very useful, the framework allows you to define personalized labels with the setLabels() method :
$this->widgetSchema->setLabels(array(
  'name'    => 'Your name',
  'email'   => 'Your email address',
  'message' => 'Your message',
));
You can also only modify a single label using the setLabel() method:
$this->widgetSchema->setLabel('email', 'Your email address');
Finally, we will see in Chapter three that you can extend labels from the template to further customize the form.
Beyond generated tables
Even if the form display is an HTML table by default, the layout format can be changed. These different types of layout formats are defined in classes inheriting from sfWidgetFormSchemaFormatter. By default, a form uses the table format as defined in the sfWidgetFormSchemaFormatterTable class. You can also use the list format:
class ContactForm extends sfForm
{
  public function configure()
  {
    $this->setWidgets(array(
      'name'    => new sfWidgetFormInput(),
      'email'   => new sfWidgetFormInput(),
      'message' => new sfWidgetFormTextarea(),
    ));

    $this->widgetSchema->setFormFormatterName('list');
  }
}
Those two formats come by default and we will see in Chapter 5 how to create your own format classes. Now that we know how to display a form, let's see how to manage the submission.
Submitting the Form
When we created a template to display a form, we used the internal URL contact/submit in the form tag to submit the form. We now need to add the submit action in the contact module. Listing 1-5 shows how an action can get the information from the user and redirect to the thank you page where we just display this information back to the user.
Listing 1-5 - Use of the submit action in the contact module
public function executeSubmit($request)
{
  $this->forward404Unless($request->isMethod('post'));

  $params = array(
    'name'    => $request->getParameter('name'),
    'email'   => $request->getParameter('email'),
    'message' => $request->getParameter('message'),
  );

  $this->redirect('contact/thankyou?'.http_build_query($params));
}

public function executeThankyou()
{
}

// apps/frontend/modules/contact/templates/thankyouSuccess.php
<ul>
  <li>Name:    <?php echo $sf_params->get('name') ?></li>
  <li>Email:   <?php echo $sf_params->get('email') ?></li>
  <li>Message: <?php echo $sf_params->get('message') ?></li>
</ul>
note
http_build_query is a built-in PHP function that generates a URL-encoded query string from an array of parameters.
executeSubmit() method executes three actions:
For security reasons, we check that the page has been submitted using the HTTP method
POST. If not sent using thePOSTmethod then the user is redirected to a 404 page. In theindexSuccesstemplate, we declared the submit method asPOST(<form ... method="POST">):$this->forward404Unless($request->isMethod('post'));
Next we get the values from the user input to store them in the
paramstable:$params = array( 'name' => $request->getParameter('name'), 'email' => $request->getParameter('email'), 'message' => $request->getParameter('message'), );
Finally, we redirect the user to a Thank you page (
contact/thankyou) to display his information:$this->redirect('contact/thankyou?'.http_build_query($params));
Instead of redirecting the user to another page, we could have created a submitSuccess.php template. While it is possible, it is better practice to always redirect the user after a request with the POST method:
This prevents the form from being submitted again if the user reloads the Thank you page.
The user can also click on the back button without getting the pop-up to submit the form again.
tip
You might have noticed that executeSubmit() is different from executeIndex(). When calling these methods symfony passes the current sfRequest object as the first argument to the executeXXX() methods. With PHP, you do not have to collect all parameters, that is why we did not define the request variable in executeIndex() since we do not need it.
Figure 1-5 shows the workflow of methods when interacting with the user.
Figure 1-5 - Methods workflow

note
When redisplaying the user input in the template, we run the risk of a XSS (Cross-Site Scripting) attack. You can find further information on how to prevent the XSS risk by implementing an escaping strategy in the Inside the View Layer chapter of "The Definitive Guide to symfony" book.
After you submit the form you should now see the page from Figure 1-6.
Figure 1-6 - Page displayed after submitting the form

Instead of creating the params array, it would be easier to get the information from the user directly in an array. Listing 1-6 modifies the name HTML attribute from widgets to store the field values in the contact array.
Listing 1-6 - Modification of the name HTML attribute from widgets
class ContactForm extends sfForm
{
  public function configure()
  {
    $this->setWidgets(array(
      'name'    => new sfWidgetFormInput(),
      'email'   => new sfWidgetFormInput(),
      'message' => new sfWidgetFormTextarea(),
    ));

    $this->widgetSchema->setNameFormat('contact[%s]');
  }
}
Calling setNameFormat() allows us to modify the name HTML attribute for all widgets. %s will automatically be replaced by the name of the field when generating the form. For example, the name attribute will then be contact[email] for the email field. PHP automatically creates an array with the values of a request including a contact[email] format. This way the field values will be available in the contact array.
We can now directly get the contact array from the request object as shown in Listing 1-7.
Listing 1-7 - New format of the name attributes in the action widgets
public function executeSubmit($request)
{
  $this->forward404Unless($request->isMethod('post'));

  $this->redirect('contact/thankyou?'.http_build_query($request->getParameter('contact')));
}
When displaying the HTML source of the form, you can see that symfony has generated a name attribute depending not only on the field name and format, but also an id attribute. The id attribute is automatically created from the name attribute by replacing the forbidden characters by underscores (_):
| Name | Attribute name |
Attribute id |
|---|---|---|
| name | contact[name] | contact_name |
| contact[email] | contact_email | |
| message | contact[message] | contact_message |
Another solution
In this example, we used two actions to manage the form: index for the display, submit for the submit. Since the form is displayed with the GET method and submitted with the POST method, we can also merge the two methods in the index method as shown in Listing 1-8.
Listing 1-8 - Merging of the two actions used in the form
class contactActions extends sfActions
{
  public function executeIndex($request)
  {
    $this->form = new ContactForm();

    if ($request->isMethod('post'))
    {
      $this->redirect('contact/thankyou?'.http_build_query($request->getParameter('contact')));
    }
  }
}
You also need to change the form action attribute in the indexSuccess.php template:
<form action="<?php echo url_for('contact/index') ?>" method="POST">
As we will see later, we prefer to use this syntax since it is shorter and makes the code more coherent and understandable.
Configuring the Widgets
Widgets options
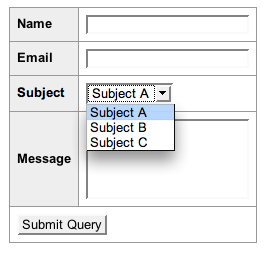
If a website is managed by several webmasters, we would certainly like to add a drop-down list with themes in order to redirect the message according to what is asked (Figure 1-7). Listing 1-9 adds a subject with a drop-down list using the sfWidgetFormSelect widget.
Figure 1-7 - Adding a subject Field to the Form

Listing 1-9 - Adding a subject Field to the Form
class ContactForm extends sfForm
{
  protected static $subjects = array('Subject A', 'Subject B', 'Subject C');

  public function configure()
  {
    $this->setWidgets(array(
      'name'    => new sfWidgetFormInput(),
      'email'   => new sfWidgetFormInput(),
      'subject' => new sfWidgetFormSelect(array('choices' => self::$subjects)),
      'message' => new sfWidgetFormTextarea(),
    ));

    $this->widgetSchema->setNameFormat('contact[%s]');
  }
}
The sfWidgetFormSelect widget, like all widgets, takes a list of options as the first argument. An option may be mandatory or optional. The sfWidgetFormSelect widget has a mandatory option, choices. Here are the available options for the widgets we already used:
| Widget | Mandatory Options | Additional Options |
|---|---|---|
sfWidgetFormInput |
- | type (default to text) |
is_hidden (default to false) |
||
sfWidgetFormSelect |
choices |
multiple (default to false) |
sfWidgetFormTextarea |
- | - |
tip
If you want to know all of the options for a widget, you can refer to the complete API documentation available online at (/api/1_2/). All of the options are explained, as well as the additional options default values. For instance, all of the options for the sfWidgetFormSelect are available here: (/api/1_2/sfWidgetFormSelect).
The Widgets HTML Attributes
Each widget also takes a list of HTML attributes as second optional argument. This is very helpful to define default HTML attributes for the generated form tag. Listing 1-10 shows how to add a class attribute to the email field.
Listing 1-10 - Defining Attributes for a Widget
$emailWidget = new sfWidgetFormInput(array(), array('class' => 'email'));

// Generated HTML
<input type="text" name="contact[email]" class="email" id="contact_email" />
HTML attributes also allow us to override the automatically generated identifier, as shown in Listing 1-11.
Listing 1-11 - Overriding the id Attribute
$emailWidget = new sfWidgetFormInput(array(), array('class' => 'email', 'id' => 'email'));

// Generated HTML
<input type="text" name="contact[email]" class="email" id="email" />
It is even possible to set default values to the fields using the value attribute as Listing 1-12 shows.
Listing 1-12 - Widgets Default Values via HTML Attributes
$emailWidget = new sfWidgetFormInput(array(), array('value' => 'Your Email Here'));

// Generated HTML
<input type="text" name="contact[email]" value="Your Email Here" id="contact_email" />
This option works for input widgets, but is hard to carry through with checkbox or radio widgets, and even impossible with a textarea widget. The sfForm class offers specific methods to define default values for each field in a uniform way for any type of widget.
note
We recommend to define HTML attributes inside the template and not in the form itself (even if it is possible) to preserve the layers of separation as we will see in Chapter three.
Defining Default Values For Fields
It is often useful to define a default value for each field. For instance, when we display a help message in the field that disappears when the user focuses on the field. Listing 1-13 shows how to define default values via the setDefault() and setDefaults() methods.
Listing 1-13 - Default Values of the Widgets via the setDefault() and setDefaults() Methods
class ContactForm extends sfForm
{
  public function configure()
  {
    // ...

    $this->setDefault('email', 'Your Email Here');

    $this->setDefaults(array('email' => 'Your Email Here', 'name' => 'Your Name Here'));
  }
}
The setDefault() and setDefaults() methods are very helpful to define
identical default values for every instance of the same form class. If we
want to modify an existing object using a form, the default values will
depend on the instance, therefore they must be dynamic. Listing 1-14 shows
the sfForm constructor has a first argument that sets default values
dynamically.
Listing 1-14 - Default Values of the Widgets via the Constructor of sfForm
public function executeIndex($request)
{
  $this->form = new ContactForm(array('email' => 'Your Email Here', 'name' => 'Your Name Here'));

  // ...
}
This work is licensed under the Creative Commons Attribution-Share Alike 3.0 Unported License license.