We observed in Chapter 1 and Chapter 2 how to create forms using widgets and validation rules. We used the <?php echo $form ?> statement to display them. This statement allows developers to code the application logic without thinking about how it will look in the end. Changing the template every time you modify a field (name, widget...) or even add one is not necessary. This statement is well suited for prototyping and the initial development phase, when the developer has to focus on the model and the business logic.
Once the object model is stabilized and the style guidelines are in place, the web designer can go back and format the various application forms.
Before starting this chapter, you should be well acquainted with symfony's templating system and view layer. To do so, you can read the Inside the View Layer chapter of the "The Definitive Guide to symfony" book.
note
Symfony's form system is built according to the MVC model. The MVC pattern helps decouple every task of a development team: The developers create the forms and handle their life cycles, and the Web designers format and style them. The separation of concerns will never be a replacement for the communication within the project team.
Before we start
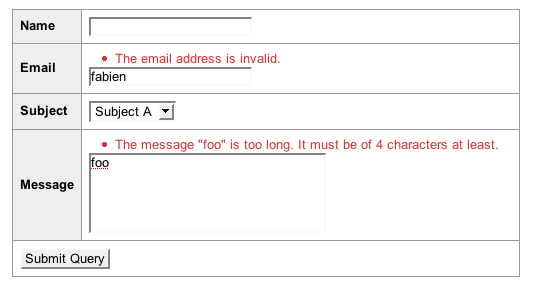
We will now go over the contact form elaborated in Chapters 1 and 2 (Figure 3-1). Here is a technical overview for Web Designers who will only read this chapter:
The form is made of four fields:
name,email,subject, andmessage.The form is handled by the
contactmodule.The
indexaction passes on to the template aformvariable representing the form.
This chapter aims to show the available possibilities to customize the prototype template we used to display the form (Listing 3-1).
Figure 3-1 - The Contact Form
Listing 3-1 - The Prototype Template diplaying the Contact Form
// apps/frontend/modules/contact/templates/indexSuccess.php
<form action="<?php echo url_for('contact/index') ?>" method="POST">
  <table>
    <?php echo $form ?>
    <tr>
      <td colspan="2">
        <input type="submit" />
      </td>
    </tr>
  </table>
</form>
The Prototype Template
As of now, we have used the <?php echo $form ?> statement in the prototype template in order to automatically generate the HTML needed to display the form.
A form is made of fields. At the template level, each field is made of three elements:
The label
The form tag
The potential error messages
The <?php echo $form ?> statement automatically generates all these elements, as Listing 3-2 shows in the case of an invalid submission.
Listing 3-2 - Generated Template in case of invalid Submission
<form action="/frontend_dev.php/contact" method="POST">
  <table>
    <tr>
      <th><label for="contact_name">Name</label></th>
      <td><input type="text" name="contact[name]" id="contact_name" /></td>
    </tr>
    <tr>
      <th><label for="contact_email">Email</label></th>
      <td>
        <ul class="error_list">
          <li>This email address is invalid.</li>
        </ul>
        <input type="text" name="contact[email]" value="fabien" id="contact_email" />
      </td>
    </tr>
    <tr>
      <th><label for="contact_subject">Subject</label></th>
      <td>
        <select name="contact[subject]" id="contact_subject">
          <option value="0" selected="selected">Subject A</option>
          <option value="1">Subject B</option>
          <option value="2">Subject C</option>
        </select>
      </td>
    </tr>
    <tr>
      <th><label for="contact_message">Message</label></th>
      <td>
        <ul class="error_list">
          <li>The message "foo" is too short. It must be of 4 characters at least.</li>
        </ul>
        <textarea rows="4" cols="30" name="contact[message]" id="contact_message">foo</textarea>
      </td>
    </tr>
    <tr>
      <td colspan="2">
        <input type="submit" />
      </td>
    </tr>
  </table>
</form>
tip
There is an additional shortcut to generate the opening form tag for the form: echo $form->renderFormTag(url_for('contact/index')).
It also allows passing any number of additional attributes to the form tag more easily by proving an array.
The downside of using this shortcut is that design tools will have more troubles detecting the form properly.
Let's break this code down. Figure 3-2 underlines the <tr> rows produced for each field.
Figure 3-2 - The Form Split by Field
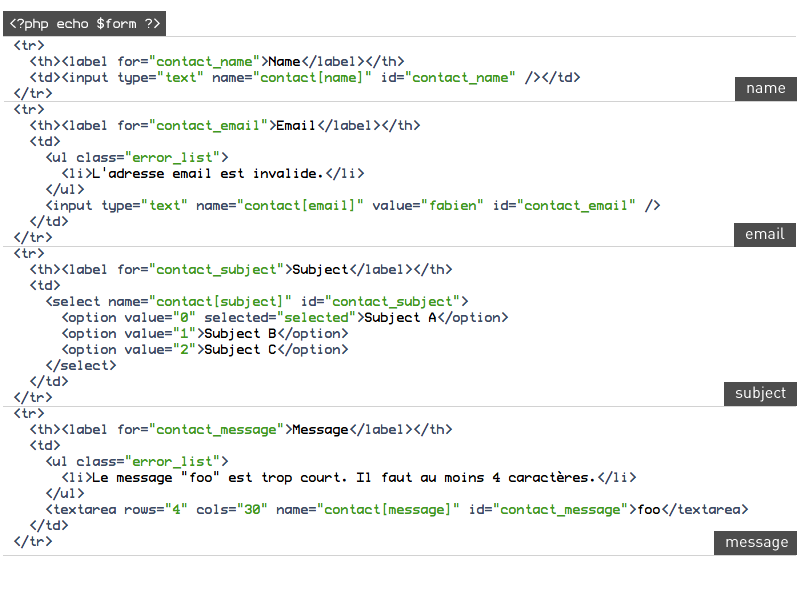
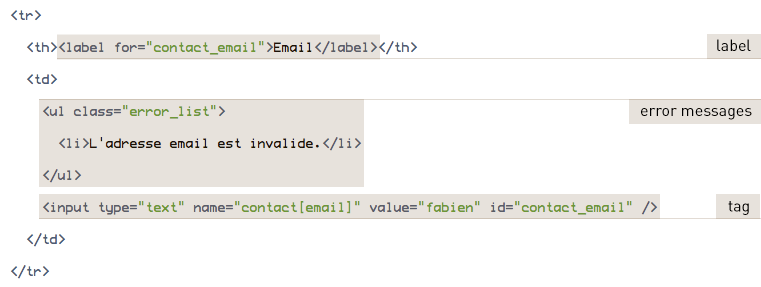
Three pieces of HTML code have been generated for each field (Figure 3-3), matching the three elements of the field. Here is the HTML code generated for the email field:
The label
<label for="contact_email">Email</label>
The form tag
<input type="text" name="contact[email]" value="fabien" id="contact_email" />
The error messages
<ul class="error_list">
  <li>The email address is invalid.</li>
</ul>
Figure 3-3 - Decomposition of the email Field
tip
Every field has a generated id attribute which allows developers to add styles or JavaScript behaviors very easily.
The Prototype Template Customization
The <?php echo $form ?> statement can be enough for simple forms like the contact form. And, as a matter of fact, it is just a shortcut for the <?php echo $form->render() ?> statement.
The usage of the render() method allows to pass on HTML attributes as an argument for each field. Listing 3-3 shows how to add a class to the email field.
Listing 3-3 - Customization of the HTML Attributes using the render() Method
<?php echo $form->render(array('email' => array('class' => 'email'))) ?>

// Generated HTML
<input type="text" name="contact[email]" value="" id="contact_email" class="email" />
This allows to customize the form styles but does not provide the level of flexibility needed to customize the organization of the fields in the page.
The Display Customization
Beyond the global customization allowed by the render() method, let's see now how to break the display of each field down to gain in flexibility.
Using the renderRow() method on a field
The first way to do it is to generate every field individually. In fact, the <?php echo $form ?> statement is equivalent to calling the renderRow() method four times on the form, as shown in Listing 3-4.
Listing 3-4 - renderRow() Usage
<form action="<?php echo url_for('contact/index') ?>" method="POST">
  <table>
    <?php echo $form['name']->renderRow() ?>
    <?php echo $form['email']->renderRow() ?>
    <?php echo $form['subject']->renderRow() ?>
    <?php echo $form['message']->renderRow() ?>
    <tr>
      <td colspan="2">
        <input type="submit" />
      </td>
    </tr>
  </table>
</form>
We access each field using the form object as a PHP array. The email field can then be accessed via $form['email']. The renderRow() method displays the field as an HTML table row. The expression $form['email']->renderRow() generates a row for the email field. By repeating the same kind of code for the three other fields subject, email, and message, we complete the display of the form.
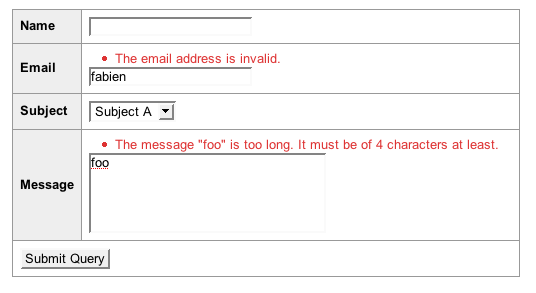
This current template and the original template we started with are functionally identical. However, if the display is the same, the customization is now easier. The renderRow() method takes two arguments: an HTML attributes array and a label name. Listing 3-5 uses those two arguments to customize the form (Figure 3-4 shows the rendering).
Listing 3-5 - Using the renderRow() Method's Arguments to customize the display
<form action="<?php echo url_for('contact/index') ?>" method="POST">
  <table>
    <?php echo $form['name']->renderRow() ?>
    <?php echo $form['email']->renderRow(array('class' => 'email')) ?>
    <?php echo $form['subject']->renderRow() ?>
    <?php echo $form['message']->renderRow(array(), 'Your message') ?>
    <tr>
      <td colspan="2">
        <input type="submit" />
      </td>
    </tr>
  </table>
</form>
Figure 3-4 - Customization of the Form display using the renderRow() Method
Let's have a closer look at the arguments sent to renderRow() in order to generate the email field:
array('class' => 'email')adds theemailclass to the<input>tag
It works the same way with the message field:
array()means that we do not want to add any HTML attributes to the<textarea>tag'Your message'replaces the default label name
Every renderRow() method argument is optional, so none of them are required as we did for the name and subject fields.
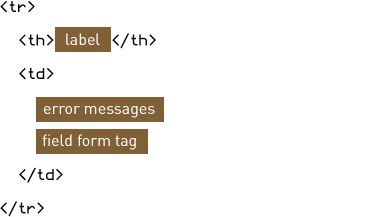
Even if the renderRow() method helps customizing the elements of each field, the rendering is limited by the HTML code decorating these elements as shown in Figure 3-5.
Figure 3-5 - HTML Structure used by renderRow() and render()
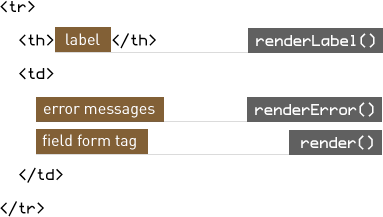
In order to break free from this structure, each field has methods generating its elements, as shown in Figure 3-6:
renderLabel(): the label (the<label>tag tied to the field)render(): the field tag itself (the<input>tag for instance)renderError(): error messages (as a<ul class="error_list">list)
Figure 3-6 - Methods available to customize a Field
These methods will be explained at the end of this chapter.
Using the render() method on a field
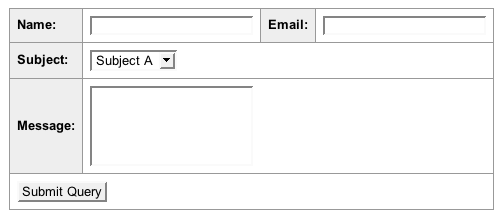
Suppose we want to display the form with two columns. As shown in Figure 3-7, the name and email fields stand on the same row, when the subject and message fields stand on their own row.
Figure 3-7 - Displaying the Form with several Rows
We have to be able to generate each element of a field separately to do so. We already observed that we could use the form object as an associative array to access a field, using the field name as key. For example, the email field can be accessed with $form['email']. Listing 3-6 shows how to implement the form with two rows.
Listing 3-6 - Customizing the Display with two Columns
<form action="<?php echo url_for('contact/index') ?>" method="POST">
  <table>
    <tr>
      <th>Name:</th>
      <td><?php echo $form['name']->render() ?></td>
      <th>Email:</th>
      <td><?php echo $form['email']->render() ?></td>
    </tr>
    <tr>
      <th>Subject:</th>
      <td colspan="3"><?php echo $form['subject']->render() ?></td>
    </tr>
    <tr>
      <th>Message:</th>
      <td colspan="3"><?php echo $form['message']->render() ?></td>
    </tr>
    <tr>
      <td colspan="4">
        <input type="submit" />
      </td>
    </tr>
  </table>
</form>
Just like the explicit use of the render() method on a field is not mandatory when using <?php echo $form ?>, we can rewrite the template as in Listing 3-7.
Listing 3-7 - Simplifying the two Columns customization
<form action="<?php echo url_for('contact/index') ?>" method="POST">
  <table>
    <tr>
      <th>Name:</th>
      <td><?php echo $form['name'] ?></td>
      <th>Email:</th>
      <td><?php echo $form['email'] ?></td>
    </tr>
    <tr>
      <th>Subject:</th>
      <td colspan="3"><?php echo $form['subject'] ?></td>
    </tr>
    <tr>
      <th>Message:</th>
      <td colspan="3"><?php echo $form['message'] ?></td>
    </tr>
    <tr>
      <td colspan="4">
        <input type="submit" />
      </td>
    </tr>
  </table>
</form>
Like with the form, each field can be customized by passing an HTML attribute array to the render() method. Listing 3-8 shows how to modify the HTML class of the email field.
Listing 3-8 - Modifying the HTML Attributes using the render() Method
<?php echo $form['email']->render(array('class' => 'email')) ?>

// Generated HTML
<input type="text" name="contact[email]" class="email" id="contact_email" />
Using the renderLabel() method on a field
We did not generate labels during the customization in the previous paragraph. Listing 3-9 uses the renderLabel() method in order to generate a label for each field.
Listing 3-9 - Using renderLabel()
<form action="<?php echo url_for('contact/index') ?>" method="POST">
  <table>
    <tr>
      <th><?php echo $form['name']->renderLabel() ?>:</th>
      <td><?php echo $form['name'] ?></td>
      <th><?php echo $form['email']->renderLabel() ?>:</th>
      <td><?php echo $form['email'] ?></td>
    </tr>
    <tr>
      <th><?php echo $form['subject']->renderLabel() ?>:</th>
      <td colspan="3"><?php echo $form['subject'] ?></td>
    </tr>
    <tr>
      <th><?php echo $form['message']->renderLabel() ?>:</th>
      <td colspan="3"><?php echo $form['message'] ?></td>
    </tr>
    <tr>
      <td colspan="4">
        <input type="submit" />
      </td>
    </tr>
  </table>
</form>
The label name is automatically generated from the field name. It can be customized by passing an argument to the renderLabel() method as shown in Listing 3-10.
Listing 3-10 - Modifying the Label Name
<?php echo $form['message']->renderLabel('Your message') ?>

// Generated HTML
<label for="contact_message">Your message</label>
What's the point of the renderLabel() method if we send the label name as an
argument? Why don't we simply use an HTML label tag? That is because the
renderLabel() method generates the label tag and automatically adds a for
attribute set to the identifier of the linked field (id). This ensures that
the field will be accessible; when clicking on the label, the field is
automatically focused:
<label for="contact_email">Email</label>
<input type="text" name="contact[email]" id="contact_email" />
Moreover, HTML attributes can be added by passing a second argument to the renderLabel() method:
<?php echo $form['send_notification']->renderLabel(null, array('class' => 'inline')) ?>

// Generated HTML
<label for="contact_send_notification" class="inline">Send notification</label>
In this example, the first argument is null so that the automatic generation of the label text is preserved.
Using the renderError() method on a field
The current template does not handle error messages. Listing 3-11 restores them using the renderError() method.
Listing 3-11 - Displaying Error Messages using the renderError() Method
<form action="<?php echo url_for('contact/index') ?>" method="POST">
  <table>
    <tr>
      <th><?php echo $form['name']->renderLabel() ?>:</th>
      <td>
        <?php echo $form['name']->renderError() ?>
        <?php echo $form['name'] ?>
      </td>
      <th><?php echo $form['email']->renderLabel() ?>:</th>
      <td>
        <?php echo $form['email']->renderError() ?>
        <?php echo $form['email'] ?>
      </td>
    </tr>
    <tr>
      <th><?php echo $form['subject']->renderLabel() ?>:</th>
      <td colspan="3">
        <?php echo $form['subject']->renderError() ?>
        <?php echo $form['subject'] ?>
      </td>
    </tr>
    <tr>
      <th><?php echo $form['message']->renderLabel() ?>:</th>
      <td colspan="3">
        <?php echo $form['message']->renderError() ?>
        <?php echo $form['message'] ?>
      </td>
    </tr>
    <tr>
      <td colspan="4">
        <input type="submit" />
      </td>
    </tr>
  </table>
</form>
Fine-grained customization of error messages
The renderError() method generates the list of the errors associated with a field. It generates HTML code only if the field has some error. By default, the list is generated as an unordered HTML list (<ul>).
Even if this behavior suits most of the common cases, the hasError() and getError() methods allow us to access the errors directly. Listing 3-12 shows how to customize the error messages for the email field.
Listing 3-12 - Accessing Error Messages
<?php if ($form['email']->hasError()): ?>
  <ul class="error_list">
    <?php foreach ($form['email']->getError() as $error): ?>
      <li><?php echo $error ?></li>
    <?php endforeach; ?>
  </ul>
<?php endif; ?>
In this example, the generated code is exactly the same as the code generated by the renderError() method.
Handling hidden fields
Suppose now there is a mandatory hidden field referrer in the form. This field stores the referrer page of the user when accessing the form. The <?php echo $form ?> statement generates the HTML code for hidden fields and adds it when generating the last visible field, as shown in Listing 3-13.
Listing 3-13 - Generating the Hidden Fields Code
<tr>
  <th><label for="contact_message">Message</label></th>
  <td>
    <textarea rows="4" cols="30" name="contact[message]" id="contact_message"></textarea>
    <input type="hidden" name="contact[referrer]" id="contact_referrer" />
  </td>
</tr>
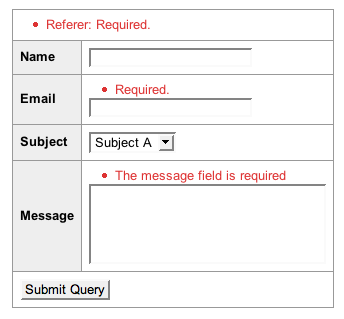
As you can notice in the generated code for the referrer hidden field, only the tag element has been added to the output. It makes sense not to generate a label. What about the potential errors that could occur with this field? Even if the field is hidden, it can be corrupted during the processing either on purpose, or because there is an error in the code. These errors are not directly connected to the referrer field, but are summed up with the global errors. We will see in Chapter 5 that the notion of global errors is extended also to other cases. Figure 3-8 shows how the error message is displayed when an error occurs on the referrer field, and Listing 3-14 shows the code generated for those errors.
You can render all hidden fields at once (including the CSRF's one) using the method renderHiddenFields().
Figure 3-8 - Displaying the Global Error Messages
Listing 3-14 - Generating Global Error Messages
<tr>
  <td colspan="2">
    <ul class="error_list">
      <li>Referrer: Required.</li>
    </ul>
  </td>
</tr>
caution
Whenever you customize a form, do not forget to implement hidden fields (remember CSRF's one if you have activated the protection for your forms) and global error messages.
Handling global errors
There are three kinds of error for a form:
- Errors associated to a specific field
- Global errors
- Errors from hidden fields or fields that are not actually displayed in the form. Those are summed up with the global errors.
We already went over the implementation of error messages associated with a field, and Listing 3-15 shows the implementation of global error messages.
Listing 3-15 - Implementing global error messages
<form action="<?php echo url_for('contact/index') ?>" method="POST">
  <table>
    <tr>
      <td colspan="4">
        <?php echo $form->renderGlobalErrors() ?>
      </td>
    </tr>

    // ...
  </table>
The call to the renderGlobalErrors() method displays the global error list. It is also possible to access the global errors using the hasGlobalErrors() and getGlobalErrors() methods, as shown in Listing 3-16.
Listing 3-16 - Global Errors customization with the hasGlobalErrors() and getGlobalErrors() Methods
<?php if ($form->hasGlobalErrors()): ?>
  <tr>
    <td colspan="4">
      <ul class="error_list">
        <?php foreach ($form->getGlobalErrors() as $name => $error): ?>
          <li><?php echo $name.': '.$error ?></li>
        <?php endforeach; ?>
      </ul>
    </td>
  </tr>
<?php endif; ?>
Each global error has a name (name) and a message (error). The name is empty when there is a "real" global error, but when there is an error for a hidden field or a field that is not displayed, the name is the field label name.
Even if the template is now technically equivalent to the template we started with (Figure 3-8), the new one is now customizable.
Figure 3-8 - customized Form using the Field Methods

Internationalization
Every form element, such as labels and error messages, are automatically handled by the symfony internationalization system. This means that the web designer has nothing special to do if they want to internationalize forms, even when they explicitly override a label with the renderLabel() method. Translation is automatically taken into consideration. For further information about form internationalization, please see Chapter 9.
Interacting with the Developer
Let's end this chapter with a description of a typical form development scenario using symfony:
The development team starts with implementing the form class and its action. The template is basically nothing more than the
<?php echo $form ?>prototyping statement.In the meantime, designers design the style guidelines and the display rules that apply to the forms: global structure, error message displaying rules, ...
Once the business logic is set and the style guidelines confirmed, the web designer team can modify the form templates and customize them. The team just need to know the name of the fields and the action required to handle the form's life cycle.
When this first cycle is over, both business rule modifications and template modifications can be done at the same time.
Without impacting the templates, therefore without any designer team intervention needed, the development team is able to:
- Modify the widgets of the form
- Customize error messages
- Edit, add, or delete validation rules
Likewise, the designer team is free to perform any ergonomic or graphic changes without falling back on the development team.
But the following actions involve coordination between the teams:
- Renaming a field
- Adding or deleting a field
This cooperation makes sense as it involves changes in both business rules and form display. Like we stated at the beginning of this chapter, even if the form system cleanly separates the tasks, there is nothing like communication between the teams.
This work is licensed under the Creative Commons Attribution-Share Alike 3.0 Unported License license.