Tóm tắt
Với tính năng feed được thêm vào hôm qua, người dùng bây giờ đã có thể theo dõi được công việc ngay khi nó được đưa lên.
Đối với nhà tuyển dụng, khi đưa một tuyển dụng lên, họ luôn muốn càng nhiều người biết đến càng tốt. Nếu công việc đó được đăng trên nhiều website, thì họ sẽ có nhiều cơ hội hơn để tìm đúng người. Đó chính là sức mạnh của long tail. Affiliates có thể đưa những tuyển dụng mới nhất lên websites của họ nhờ tính năng web service chúng ta sẽ phát triển trong ngày hôm nay.
Affiliates
Yêu cầu trong ngày 2:
"Story F7: Một affiliate có thể nhận danh sách các công việc mới nhất"
Fixture
Ta tạo một file fixture mới cho affiliates:
// data/fixtures/030_affiliates.yml
JobeetAffiliate:
  sensio_labs:
    url:       http://www.sensio-labs.com/
    email:     fabien.potencier@example.com
    is_active: true
    token:     sensio_labs
    JobeetCategories: [programming]

  symfony:
    url:       /
    email:     fabien.potencier@example.org
    is_active: false
    token:     symfony
    JobeetCategories: [design, programming]
Tạo record cho quan hệ nhiều-nhiều đơn giản là xác định một mảng các tên của mối quan hệ.
Trong file fixture, giá trị của token được định sẵn để thuận tiện cho việc test, nhưng trong thực tế, ta cần tạo token:
// lib/model/JobeetAffiliate.php
class JobeetAffiliate extends BaseJobeetAffiliate
{
  public function preValidate($event)
  {
    $object = $event->getInvoker();

    if (!$object->getToken())
    {
      $object->setToken(sha1($object->getEmail().rand(11111, 99999)));
    }
  }

  // ...
}
Bây giờ, bạn có thể nạp lại dữ liệu:
$ php symfony doctrine:data-load
Job Web Service
Khi bạn tạo một resource mới, đầu tiên hãy xác định URL (đó là một thói quen tốt):
// apps/frontend/config/routing.yml
api_jobs:
  url:     /api/:token/jobs.:sf_format
  class:   sfDoctrineRoute
  param:   { module: api, action: list }
  options: { model: JobeetJob, type: list, method: getForToken }
  requirements:
    sf_format: (?:xml|json|yaml)
Với route này, biến sf_format ở cuối URL và nhận một trong các giá trị xml, json, hoặc yaml.
Phương thức getForToken() sẽ được gọi khi action nhận tập các object dựa vào route:
// lib/model/doctrine/JobeetJobTable.class.php
class JobeetJobTable extends Doctrine_Table
{
  public function getForToken(array $parameters)
  {
    $affiliate = Doctrine::getTable('JobeetAffiliate')->findOneByToken($parameters['token']);
    if (!$affiliate || !$affiliate->getIsActive())
    {
      throw new sfError404Exception(sprintf('Affiliate with token "%s" does not exist or is not activated.', $parameters['token']));
    }

    return $affiliate->getActiveJobs();
  }

  // ...
}
Nếu token không tồn tại trong database, bạn sẽ được chuyển sang sfError404Exception
exception. Lớp exception này tự động trả về một trang 404. Đó là cách đơn giản nhất để tạo một trang 404 từ một model class.
Phương thức getForToken() sử dụng phương thức getActiveJobs() để lấy danh sách các công việc mới nhất:
// lib/model/doctrine/JobeetAffiliate.class.php
class JobeetAffiliate extends BaseJobeetAffiliate
{
  public function getActiveJobs()
  {
    $q = Doctrine_Query::create()
      ->select('j.*')
      ->from('JobeetJob j')
      ->leftJoin('j.JobeetCategory c')
      ->leftJoin('c.JobeetAffiliates a')
      ->where('a.id = ?', $this->getId());

    $q = Doctrine::getTable('JobeetJob')->addActiveJobsQuery($q);

    return $q->execute();
  }

  // ...
}
Cuối cùng, tạo module api với lệnh generate:module:
$ php symfony generate:module frontend api
Action
Tất cả các format đều dùng chung action list:
// apps/frontend/modules/api/actions/actions.class.php
public function executeList(sfWebRequest $request)
{
  $this->jobs = array();
  foreach ($this->getRoute()->getObjects() as $job)
  {
    $this->jobs[$this->generateUrl('job_show_user', $job, true)] = $job->asArray($request->getHost());
  }
}
Thay vì cung cấp mảng các object JobeetJob cho template, chúng ta cung cấp mảng các string. Do chúng ta có 3 template khác nhau cho cùng một action, nên quá trình lấy giá trị được đưa riêng vào phương thức JobeetJob::asArray():
// lib/model/doctrine/JobeetJob.class.php
class JobeetJob extends BaseJobeetJob
{
  public function asArray($host)
  {
    return array(
      'category'     => $this->getJobeetCategory()->getName(),
      'type'         => $this->getType(),
      'company'      => $this->getCompany(),
      'logo'         => $this->getLogo() ? 'http://'.$host.'/uploads/jobs/'.$this->getLogo() : null,
      'url'          => $this->getUrl(),
      'position'     => $this->getPosition(),
      'location'     => $this->getLocation(),
      'description'  => $this->getDescription(),
      'how_to_apply' => $this->getHowToApply(),
      'expires_at'   => $this->getCreatedAt(),
    );
  }
xml Format
Việc hỗ trợ xml format đơn giản là tạo một template:
<!-- apps/frontend/modules/api/templates/listSuccess.xml.php -->
<?xml version="1.0" encoding="utf-8"?>
<jobs>
<?php foreach ($jobs as $url => $job): ?>
  <job url="<?php echo $url ?>">
<?php foreach ($job as $key => $value): ?>
    <<?php echo $key ?>><?php echo $value ?></<?php echo $key ?>>
<?php endforeach; ?>
  </job>
<?php endforeach; ?>
</jobs>
json Format
JSON format cũng tương tự:
<!-- apps/frontend/modules/api/templates/listSuccess.json.php -->
[
<?php $nb = count($jobs); $i = 0; foreach ($jobs as $url => $job): ++$i ?>
{
  "url": "<?php echo $url ?>",
<?php $nb1 = count($job); $j = 0; foreach ($job as $key => $value): ++$j ?>
  "<?php echo $key ?>": <?php echo json_encode($value).($nb1 == $j ? '' : ',') ?>

<?php endforeach; ?>
}<?php echo $nb == $i ? '' : ',' ?>

<?php endforeach; ?>
]
yaml Format
Với những format được hỗ trợ, symfony tự động thực hiện một số cấu hình như thay đổi content type, hay disable layout.
Do YAML format không nằm trong số đó, nên ta cần đổi content type trả về và disable layout trong action:
class apiActions extends sfActions
{
  public function executeList(sfWebRequest $request)
  {
    $this->jobs = array();
    foreach ($this->getRoute()->getObjects() as $job)
    {
      $this->jobs[$this->generateUrl('job_show_user', $job, true)] = $job->asArray($request->getHost());
    }

    switch ($request->getRequestFormat())
    {
      case 'yaml':
        $this->setLayout(false);
        $this->getResponse()->setContentType('text/yaml');
        break;
    }
  }
}
Trong một action, phương thức setLayout() thay đổi layout mặc định hoặc disable nó khi được set là false.
Template cho YAML như sau:
<!-- apps/frontend/modules/api/templates/listSuccess.yaml.php -->
<?php foreach ($jobs as $url => $job): ?>
-
  url: <?php echo $url ?>

<?php foreach ($job as $key => $value): ?>
  <?php echo $key ?>: <?php echo sfYaml::dump($value) ?>

<?php endforeach; ?>
<?php endforeach; ?>
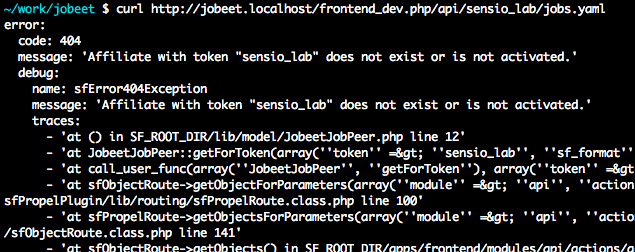
Nếu bạn thử gọi một web service với token không hợp lệ, bạn sẽ nhận được trang 404 XML với XML format, và trang 404 JSON với JSON format. Nhưng với YAML format, symfony không biết cách render trang này như thế nào.
Mỗi khi tạo một format, bạn cần tạo một error template. Template này sẽ được dùng cho trang 404, và tất cả các exception khác.
Do exception có thể khác nhau trong môi trường production và development, nên ta cần 2 file (config/error/exception.yaml.php để debug, và config/error/error.yaml.php cho production):
// config/error/exception.yaml.php
<?php echo sfYaml::dump(array(
  'error'       => array(
    'code'      => $code,
    'message'   => $message,
    'debug'     => array(
      'name'    => $name,
      'message' => $message,
      'traces'  => $traces,
    ),
)), 4) ?>

// config/error/error.yaml.php
<?php echo sfYaml::dump(array(
  'error'       => array(
    'code'      => $code,
    'message'   => $message,
))) ?>
Trước khi chạy thử, bạn cần tạo một layout cho YAML format:
// apps/frontend/templates/layout.yaml.php
<?php echo $sf_content ?>
tip
Thay thế trang 404 error và exception có sẵn bằng cách tạo file trong thư mục config/error/.
Web Service Test
Để test web service, copy affiliate fixture từ data/fixtures/ vào thư mục test/fixtures/ và thay thế nội dung của file apiActionsTest.php bằng đoạn sau:
// test/functional/frontend/apiActionsTest.php
include(dirname(__FILE__).'/../../bootstrap/functional.php');

$browser = new JobeetTestFunctional(new sfBrowser());
$browser->loadData();

$browser->
  info('1 - Web service security')->

  info('  1.1 - A token is needed to access the service')->
  get('/api/foo/jobs.xml')->
  with('response')->isStatusCode(404)->

  info('  1.2 - An inactive account cannot access the web service')->
  get('/api/symfony/jobs.xml')->
  with('response')->isStatusCode(404)->

  info('2 - The jobs returned are limited to the categories configured for the affiliate')->
  get('/api/sensio_labs/jobs.xml')->
  with('request')->isFormat('xml')->
  with('response')->checkElement('job', 33)->

  info('3 - The web service supports the JSON format')->
  get('/api/sensio_labs/jobs.json')->
  with('request')->isFormat('json')->
  with('response')->contains('"category": "Programming"')->

  info('4 - The web service supports the YAML format')->
  get('/api/sensio_labs/jobs.yaml')->
  with('response')->begin()->
    isHeader('content-type', 'text/yaml; charset=utf-8')->
    contains('category: Programming')->
  end()
;
Trong test này, có 2 phương thức mới:
isFormat(): kiểm tra format của requestcontains(): với format không phải HTML, nó kiểm tra xem nội dung trả về có chứa đúng đoạn dữ liệu yêu cầu.
Affiliate Application Form
Bây giờ web service đã có thể sử dụng, ta cần form để tạo account cho affiliates. Chúng ta sẽ lặp lại các bước để thêm một tính năng mới cho ứng dụng.
Routing
Đầu tiên, chúng ta tạo Route:
// apps/frontend/config/routing.yml
affiliate:
  class:   sfDoctrineRouteCollection
  options:
    model: JobeetAffiliate
    actions: [new, create]
    object_actions: { wait: GET }
Đây là một Doctrine collection route quen thuộc với một option cấu hình mới:
actions. Do chúng ta không cần cả 7 action tạo ra bởi route, optioon actions chỉ cho route biết chỉ dùng 2 action new và create. Route wait được thêm vào dùng để thông báo cho affiliate sau khi anh ta đăng kí.
Bootstrapping
Bước tiếp theo là tạo module:
$ php symfony doctrine:generate-module frontend affiliate JobeetAffiliate --non-verbose-templates
Template
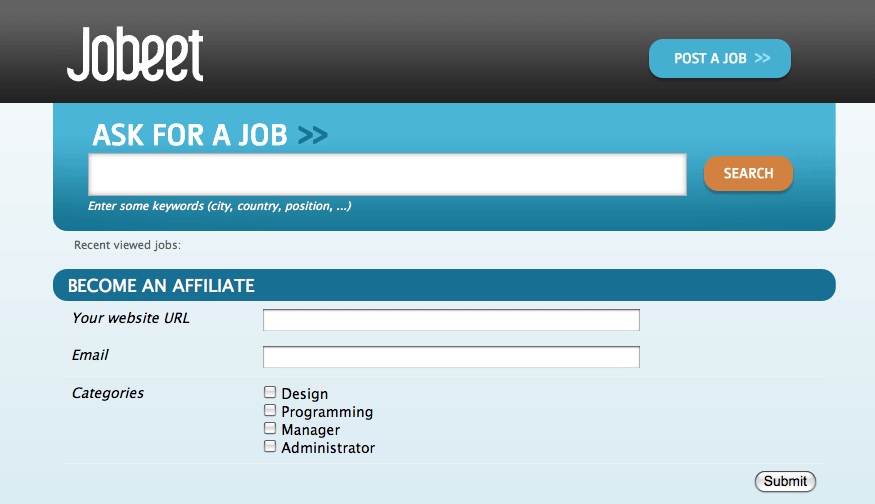
Lệnh doctrine:generate-module tạo 7 action cơ bản và các template tương ứng. Trong thư mục templates/, ta xóa tất cả các file chỉ giữ lại _form.php và newSuccess.php. Và với những file giữ lại, thay thế nội dung của nó bằng đoạn code sau:
<!-- apps/frontend/modules/affiliate/templates/newSuccess.php -->
<?php use_stylesheet('job.css') ?>

<h1>Become an Affiliate</h1>

<?php include_partial('form', array('form' => $form)) ?>

<!-- apps/frontend/modules/affiliate/templates/_form.php -->
<?php include_stylesheets_for_form($form) ?>
<?php include_javascripts_for_form($form) ?>

<?php echo form_tag_for($form, 'affiliate') ?>
  <table id="job_form">
    <tfoot>
      <tr>
        <td colspan="2">
          <input type="submit" value="Submit" />
        </td>
      </tr>
    </tfoot>
    <tbody>
      <?php echo $form ?>
    </tbody>
  </table>
</form>
Tạo waitSuccess.php template:
<!-- apps/frontend/modules/affiliate/templates/waitSuccess.php -->
<h1>Your affiliate account has been created</h1>

<div style="padding: 20px">
  Thank you!
  You will receive an email with your affiliate token
  as soon as your account will be activated.
</div>
Cuối cùng, sửa lại link ở footer để chỉ đến module affiliate:
// apps/frontend/templates/layout.php
<li class="last"><a href="<?php echo url_for('@affiliate_new') ?>">Become an affiliate</a></li>
Action
Ở đây, chúng ta chỉ sử dụng form để tạo account, do đó trong file actions.class.php chúng ta xóa hết các phương thức khác, chỉ để lại executeNew(), executeCreate(), và processForm().
Với action processForm(), sửa lại redirect URL tới action wait:
// apps/frontend/modules/affiliate/actions/actions.class.php
$this->redirect($this->generateUrl('affiliate_wait', $jobeet_affiliate));
Action wait không có gì do chúng ta không cần cung cấp gì cho template:
// apps/frontend/modules/affiliate/actions/actions.class.php
public function executeWait()
{
}
Affiliate không được tạo token, hay tự kích hoạt tài khoản của mình. Do đó chúng ta cần thêm cấu hình vào file JobeetAffiliateForm:
// lib/form/JobeetAffiliateForm.class.php
class JobeetAffiliateForm extends BaseJobeetAffiliateForm
{
  public function configure()
  {
    unset($this['is_active'], $this['token'], $this['created_at'], $this['updated_at']);

    $this->widgetSchema['jobeet_categories_list']->setOption('expanded', true);
    $this->widgetSchema['jobeet_categories_list']->setLabel('Categories');

    $this->validatorSchema['jobeet_categories_list']->setOption('required', true);

    $this->widgetSchema['url']->setLabel('Your website URL');
    $this->widgetSchema['url']->setAttribute('size', 50);

    $this->widgetSchema['email']->setAttribute('size', 50);

    $this->validatorSchema['email'] = new sfValidatorEmail(array('required' => true));
  }
}
Form framework hỗ trợ quan hệ nhiều-nhiều.
Mặc định, một quan hệ được renderer ở dạng drop-down box nhờ có sfWidgetFormChoice widget. Trong ngày 10, chúng ta đã biết cách thay đổi rendered tag thông qua option expanded.
Do emails và URLs có thể dài hơn kích thước mặc định của input tag, nên ta set HTML attributes thông qua phương thức setAttribute().
Test
Cuối cùng, ta viết một số functional test cho tính năng mới:
// test/functional/frontend/affiliateActionsTest.php
include(dirname(__FILE__).'/../../bootstrap/functional.php');

$browser = new JobeetTestFunctional(new sfBrowser());
$browser->loadData();

$browser->
  info('1 - An affiliate can create an account')->

  get('/affiliate/new')->
  click('Submit', array('jobeet_affiliate' => array(
    'url'                            => 'http://www.example.com/',
    'email'                          => 'foo@example.com',
    'jobeet_categories_list'         => array(Doctrine::getTable('JobeetCategory')->findOneBySlug('programming')->getId()),
  )))->
  isRedirected()->
  followRedirect()->
  with('response')->checkElement('#content h1', 'Your affiliate account has been created')->

  info('2 - An affiliate must at leat select one category')->

  get('/affiliate/new')->
  click('Submit', array('jobeet_affiliate' => array(
    'url'   => 'http://www.example.com/',
    'email' => 'foo@example.com',
  )))->
  with('form')->isError('jobeet_categories_list')
;
Affiliate Backend
Với backend, ta cần tạo một module affiliate để admin kích hoạt các tài khoản affiliate:
$ php symfony doctrine:generate-admin backend JobeetAffiliate --module=affiliate
Để truy cập module vừa tạo, thêm một link vào main menu kèm với số affiliate cần kích hoạt:
<!-- apps/backend/templates/layout.php -->
<li>
  <a href="<?php echo url_for('@jobeet_affiliate') ?>">
    Affiliates - <strong><?php echo Doctrine::getTable('JobeetAffiliate')->countToBeActivated() ?></strong>
  </a>
</li>

// lib/model/doctrine/JobeetAffiliateTable.class.php
class JobeetAffiliateTable extends Doctrine_Table
{
  public function countToBeActivated()
  {
    $q = $this->createQuery('a')
      ->where('a.is_active = ?', 0);

    return $q->count();
  }
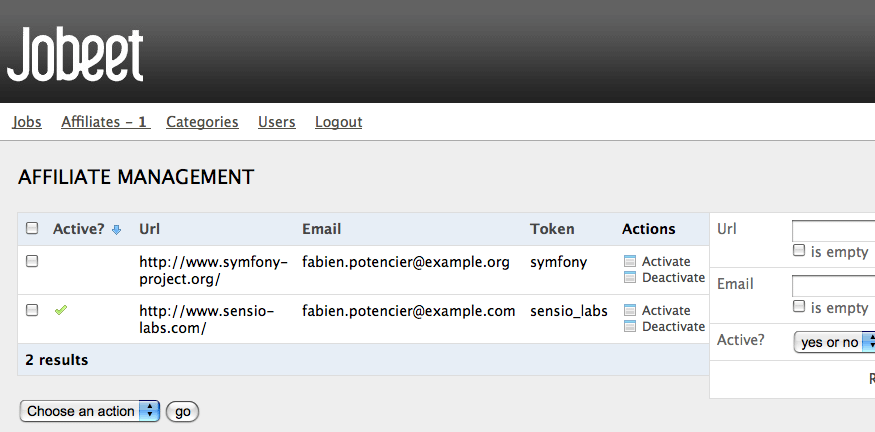
Do chỉ có một action trong backend là kích hoạt hoặc tạm dừng hoạt động của tài khoản, do đó ta cần sửa lại một chút trong mục config và thêm một link để kích hoạt tài khoản trực tiếp từ danh sách các tài khoản:
# apps/backend/modules/affiliate/config/generator.yml
config:
  fields:
    is_active: { label: Active? }
  list:
    title:   Affiliate Management
    display: [is_active, url, email, token]
    sort:    [is_active]
    object_actions:
      activate:   ~
      deactivate: ~
    batch_actions:
      activate:   ~
      deactivate: ~
    actions: {}
  filter:
    display: [url, email, is_active]
Sửa lại filter mặc định:
// apps/backend/modules/affiliate/lib/affiliateGeneratorConfiguration.class.php
class affiliateGeneratorConfiguration extends BaseAffiliateGeneratorConfiguration
{
  public function getFilterDefaults()
  {
    return array('is_active' => '0');
  }
}
Ta chỉ phải viết code cho action activate, deactivate:
// apps/backend/modules/affiliate/actions/actions.class.php
class affiliateActions extends autoAffiliateActions
{
  public function executeListActivate()
  {
    $this->getRoute()->getObject()->activate();

    $this->redirect('@jobeet_affiliate');
  }

  public function executeListDeactivate()
  {
    $this->getRoute()->getObject()->deactivate();

    $this->redirect('@jobeet_affiliate');
  }

  public function executeBatchActivate(sfWebRequest $request)
  {
    $q = Doctrine_Query::create()
      ->from('JobeetAffiliate a')
      ->whereIn('a.id', $request->getParameter('ids'));

    $affiliates = $q->execute();

    foreach ($affiliates as $affiliate)
    {
      $affiliate->activate();
    }

    $this->redirect('@jobeet_affiliate');
  }

  public function executeBatchDeactivate(sfWebRequest $request)
  {
    $q = Doctrine_Query::create()
      ->from('JobeetAffiliate a')
      ->whereIn('a.id', $request->getParameter('ids'));

    $affiliates = $q->execute();

    foreach ($affiliates as $affiliate)
    {
      $affiliate->deactivate();
    }

    $this->redirect('@jobeet_affiliate');
  }
}

// lib/model/doctrine/JobeetAffiliate.class.php
class JobeetAffiliate extends BaseJobeetAffiliate
{
  public function activate()
  {
    $this->setIsActive(true);

    return $this->save();
  }

  public function deactivate()
  {
    $this->setIsActive(false);

    return $this->save();
  }

  // ...
}
Gửi Email
Khi một tài khoản affiliate được kích hoạt bởi administrator, một email sẽ được gửi tới affiliate để xác nhận và gửi cho anh ta token.
PHP có một số thư viện thực hiện việc gửi email như
SwiftMailer,
Zend_Mail, và
ezcMail. Do chúng ta sẽ sử dụng một thư viện khác của Zend Framework trong những ngày tới, nên chúng ta sẽ sử dụng Zend_Mail để gửi email.
Cài đặt và cấu hình Zend Framework
Thư viện Zend Mail là một phần của Zend Framework. Do chúng ta không cần tất cả mọi thứ của Zend Framework, nên chúng ta chỉ cài đặt những thứ cần thiết trong thư mục lib/vendor/, nằm cùng với symfony framework.
Đầu tiên, download Zend Framework và giải nén ta được thư mục lib/vendor/Zend/. Bạn có thể xóa mọi file và thư mục không liên quan, chỉ giữ lại:
Exception.phpLoader/Loader.phpMail/Mail.phpMime/Mime.phpSearch/
note
Thư mục Search/ không cần thiết cho việc gửi email nhưng sẽ cần cho hướng dẫn ngày mai.
Sau đó, thêm đoạn code sau vào lớp ProjectConfiguration để đăng kí Zend autoloader:
// config/ProjectConfiguration.class.php
class ProjectConfiguration extends sfProjectConfiguration
{
  static protected $zendLoaded = false;

  static public function registerZend()
  {
    if (self::$zendLoaded)
    {
      return;
    }

    set_include_path(sfConfig::get('sf_lib_dir').'/vendor'.PATH_SEPARATOR.get_include_path());
    require_once sfConfig::get('sf_lib_dir').'/vendor/Zend/Loader.php';
    Zend_Loader::registerAutoload();
    self::$zendLoaded = true;
  }

  // ...
}
Gửi Email
Sửa lại action activate:
// apps/backend/modules/affiliate/actions/actions.class.php
class affiliateActions extends autoAffiliateActions
{
  public function executeListActivate()
  {
    $affiliate = $this->getRoute()->getObject();
    $affiliate->activate();

    // send an email to the affiliate
    ProjectConfiguration::registerZend();
    $mail = new Zend_Mail();
    $mail->setBodyText(<<<EOF
Your Jobeet affiliate account has been activated.

Your token is {$affiliate->getToken()}.

The Jobeet Bot.
EOF
);
    $mail->setFrom('jobeet@example.com', 'Jobeet Bot');
    $mail->addTo($affiliate->getEmail());
    $mail->setSubject('Jobeet affiliate token');
    $mail->send();

    $this->redirect('@jobeet_affiliate');
  }

  // ...
}
Để code có thể hoạt động, bạn cần sửa jobeet@example.com thành một địa chỉ email thật.
note
Hướng dẫn đầy đủ về thư viện Zend_Mail có thể tìm ở
Zend Framework website.
Hẹn gặp lại ngày mai
Nhờ có kiến trúc REST của symfony, việc tạo một web service cho project của bạn trở nên đơn giản. Mặc dù hôm nay chúng ta chỉ tạo ra một read-only web service, nhưng bạn cũng đã đủ kiến thức về symfony để tạo ra một read-write web service.
Việc tạo tài khoản affiliate ở frontend và quản lý ở backend giờ đây trở nên thật dễ dàng do bạn đã quen với cách tạo một tính năng mới cho project của mình.
Nếu bạn còn nhớ yêu cầu ở ngày 2:
"Affiliate có thể giới hạn số công việc trả về, và chỉ lấy về một category nào đó."
Việc thực hiện yêu cầu này thật đơn giản và chúng tôi sẽ dành việc này cho bạn.
Ngày mai, chúng ta sẽ xây dựng tính năng duy nhất còn thiếu của Jobeet website, đó là search engine.
This work is licensed under the Creative Commons Attribution-Share Alike 3.0 Unported License license.