Before we start
On day six when we defined the route for viewing jobs named job_show_user in
apps/frontend/config/routing.yml we had a slight mistake in the definition.
The route should be the following:
job_show_user:
  url:     /job/:company_slug/:location_slug/:id/:position_slug
  class:   sfDoctrineRoute
  options:
    model: JobeetJob
    type:  object
    method_for_query: retrieveActiveJob
  param:   { module: job, action: show }
  requirements:
    id: \d+
Notice the change from using method to method_for_query. This was a small
bug in symfony and a mistake in the tutorial so you will need to upgrade your
project.
We also need to make a small change to the JobAffiliate schema to include the
many-to-many relationship to JobeetCategory to complete this day. You can see
the full schema by looking at day three or just look at what needs to be added
below.
JobeetAffiliate:
  # ...
  relations:
    JobeetCategories:
      class: JobeetCategory
      refClass: JobeetCategoryAffiliate
      local: affiliate_id
      foreign: category_id
      foreignAlias: JobeetAffiliates
Be sure to rebuild your model after making the change:
$ php symfony doctrine:build-model
增加了feed后,找工作的人现在可以实时获得最新的招聘信息。
另一方面,当你发布一条工作信息,你会希望有更多人可以看到它。如果你的工作信息同时 出现在一些小网站上,你将更有机会找打合适的人选。这就是长尾 (long tail)的力量。 今天要做的web services就可以实现这个功能,让Jobeet的上最新的工作信息, 同时出现在成员(Affiliate)网站上。
Affiliates
第2天的需求指出:
“Story F7:成员网站可以取得当前激活工作的列表”
The Fixtures
为成员表添加一些测试信息:
# data/fixtures/affiliates.yml
JobeetAffiliate:
  sensio_labs:
    url:       http://www.sensio-labs.com/
    email:     fabien.potencier@example.com
    is_active: true
    token:     sensio_labs
    JobeetCategories: [programming]

  symfony:
    url:       /
    email:     fabien.potencier@example.org
    is_active: false
    token:     symfony
    JobeetCategories: [design, programming]
Creating records for many-to-many relationships is as simple as defining an array with the key which is the name of the relationship. 数组的内容是定义在fixture文件中对象名。你可以从不同的文件中引用对象,但名称必须已经定义。
在fixture文件中,token使用硬编码简化测试,但当实际上用户是通过帐户登陆的,生成token:
// lib/model/doctrine/JobeetAffiliate.php
class JobeetAffiliate extends BaseJobeetAffiliate
{
  public function preValidate($event)
  {
    $object = $event->getInvoker();

    if (!$object->getToken())
    {
      $object->setToken(sha1($object->getEmail().rand(11111, 99999)));
    }
  }

  // ...
}
现在重写载入测试数据:
$ php symfony doctrine:data-load
The Job Web Service
一如往常,当你创建一个新资源,首先定义URL总是个好习惯:
# apps/frontend/config/routing.yml
api_jobs:
  url:     /api/:token/jobs.:sf_format
  class:   sfDoctrineRoute
  param:   { module: api, action: list }
  options: { model: JobeetJob, type: list, method: getForToken }
  requirements:
    sf_format: (?:xml|json|yaml)
这个路由规则中,特殊的sf_format变量放在URL结尾,允许的值是xml, json,
和 yaml。
当动作检索与路由关联的对象集合时,将调用getForToken(),As we need to check
that the affiliate is activated, we need to override the default behavior of the route:
// lib/model/doctrine/JobeetJobTable.class.php
class JobeetJobTable extends Doctrine_Table
{
  public function getForToken(array $parameters)
  {
    $affiliate = Doctrine::getTable('JobeetAffiliate') ->findOneByToken($parameters['token']);
    if (!$affiliate || !$affiliate->getIsActive())
    {
      throw new sfError404Exception(sprintf('Affiliate with token "%s" does not exist or is not activated.', $parameters['token']));
    }

    return $affiliate->getActiveJobs();
  }

  // ...
}
如果token不存在于数据库中,我们抛出sfError404Exception异常。这个异常类会自动转而变为404响应。
这是从model类生成404页面的最简单的方式。
getForToken()方法用一个叫getActiveJobs()的方法返回当前激活的工作:
// lib/model/doctrine/JobeetAffiliate.class.php
class JobeetAffiliate extends BaseJobeetAffiliate
{
  public function getActiveJobs()
  {
    $q = Doctrine_Query::create()
      ->select('j.*')
      ->from('JobeetJob j')
      ->leftJoin('j.JobeetCategory c')
      ->leftJoin('c.JobeetAffiliates a')
      ->where('a.id = ?', $this->getId());

    $q = Doctrine::getTable('JobeetJob')->addActiveJobsQuery($q);

    return $q->execute();
  }

  // ...
}
最后创建api动作和模板。使用generate:module引导生成模块:
$ php symfony generate:module frontend api
note
As we won't use the default index action, you can remove it from the
action class, and remove the associated template indexSucess.php.
The Action
所有格式都共享相同list动作:
// apps/frontend/modules/api/actions/actions.class.php
public function executeList(sfWebRequest $request)
{
  $this->jobs = array();
  foreach ($this->getRoute()->getObjects() as $job)
  {
    $this->jobs[$this->generateUrl('job_show_user', $job, true)] = $job->asArray($request->getHost());
  }
}
在list动作中,我们没有直接将JobeetJob对象数组传递给模板,而是传递一个字符串数组。
这个动作对应3个不同的模板, JobeetJob::asArray()完成生成字符串数组的工作:
// lib/model/doctrine/JobeetJob.class.php
class JobeetJob extends BaseJobeetJob
{
  public function asArray($host)
  {
    return array(
      'category'     => $this->getJobeetCategory()->getName(),
      'type'         => $this->getType(),
      'company'      => $this->getCompany(),
      'logo'         => $this->getLogo() ? 'http://'.$host.'/uploads/jobs/'.$this->getLogo() : null,
      'url'          => $this->getUrl(),
      'position'     => $this->getPosition(),
      'location'     => $this->getLocation(),
      'description'  => $this->getDescription(),
      'how_to_apply' => $this->getHowToApply(),
      'expires_at'   => $this->getCreatedAt(),
    );
  }

  // ...
}
The xml Format
创建xml格式模板和创建普通模板一样:
<!-- apps/frontend/modules/api/templates/listSuccess.xml.php -->
<?xml version="1.0" encoding="utf-8"?>
<jobs>
<?php foreach ($jobs as $url => $job): ?>
  <job url="<?php echo $url ?>">
<?php foreach ($job as $key => $value): ?>
    <<?php echo $key ?>><?php echo $value ?></<?php echo $key ?>>
<?php endforeach; ?>
  </job>
<?php endforeach; ?>
</jobs>
The json Format
JSON格式也类似:
<!-- apps/frontend/modules/api/templates/listSuccess.json.php -->
[
<?php $nb = count($jobs); $i = 0; foreach ($jobs as $url => $job): ++$i ?>
{
  "url": "<?php echo $url ?>",
<?php $nb1 = count($job); $j = 0; foreach ($job as $key => $value): ++$j ?>
  "<?php echo $key ?>": <?php echo json_encode($value).($nb1 == $j ? '' : ',') ?>

<?php endforeach; ?>
}<?php echo $nb == $i ? '' : ',' ?>

<?php endforeach; ?>
]
The yaml Format
对于内置格式,symfony会自动为它们进行配置,如修改content-type,或禁用layout。
因为YAML格式不是内置请求格式,响应的content-type和禁用layout的工作,需要我们在动作中手动更改:
class apiActions extends sfActions
{
  public function executeList(sfWebRequest $request)
  {
    $this->jobs = array();
    foreach ($this->getRoute()->getObjects() as $job)
    {
      $this->jobs[$this->generateUrl('job_show_user', $job, true)] = $job->asArray($request->getHost());
    }

    switch ($request->getRequestFormat())
    {
      case 'yaml':
        $this->setLayout(false);
        $this->getResponse()->setContentType('text/yaml');
        break;
    }
  }
}
在动作里,setLayout()方法用来改变默认layout ,也可以用false来禁用layout。
YAML模板:
<!-- apps/frontend/modules/api/templates/listSuccess.yaml.php -->
<?php foreach ($jobs as $url => $job): ?>
-
  url: <?php echo $url ?>

<?php foreach ($job as $key => $value): ?>
  <?php echo $key ?>: <?php echo sfYaml::dump($value) ?>

<?php endforeach; ?>
<?php endforeach; ?>
如果你试图通过一个无效token调用web service,服务器会发送给你一个XML或JOSN格式的404页。 对于YAML格式,symfony不知道如何展示。
无论你何时创建一个格式,必须创建一个自定义错误模板。模板将用于404页面和其它所有异常。
因为异常在开发和生成环境中可能不同,所以需要两套模板(config/error/exception.yaml.php
用于调试, config/error/error.yaml.php用于生产):
// config/error/exception.yaml.php
<?php echo sfYaml::dump(array(
  'error'       => array(
    'code'      => $code,
    'message'   => $message,
    'debug'     => array(
      'name'    => $name,
      'message' => $message,
      'traces'  => $traces,
    ),
)), 4) ?>

// config/error/error.yaml.php
<?php echo sfYaml::dump(array(
  'error'       => array(
    'code'      => $code,
    'message'   => $message,
))) ?>
试验它之前,你必须创建YAML格式的layout:
// apps/frontend/templates/layout.yaml.php
<?php echo $sf_content ?>

tip
覆盖内建的404错误和异常模板,只需要在config/error/目录下创建一个文件。
Web Service Tests
要测试web service,需要复制data/fixtures/目录中affiliate数据文件到test/fixtures/目录,
用下面代码替换apiActionsTest. php里自动生成的内容:
// test/functional/frontend/apiActionsTest.php
include(dirname(__FILE__).'/../../bootstrap/functional.php');

$browser = new JobeetTestFunctional(new sfBrowser());
$browser->loadData();

$browser->
  info('1 - Web service security')->

  info('  1.1 - A token is needed to access the service')->
  get('/api/foo/jobs.xml')->
  with('response')->isStatusCode(404)->

  info('  1.2 - An inactive account cannot access the web service')->
  get('/api/symfony/jobs.xml')->
  with('response')->isStatusCode(404)->

  info('2 - The jobs returned are limited to the categories configured for the affiliate')->
  get('/api/sensio_labs/jobs.xml')->
  with('request')->isFormat('xml')->
  with('response')->checkElement('job', 32)->

  info('3 - The web service supports the JSON format')->
  get('/api/sensio_labs/jobs.json')->
  with('request')->isFormat('json')->
  with('response')->contains('"category": "Programming"')->

  info('4 - The web service supports the YAML format')->
  get('/api/sensio_labs/jobs.yaml')->
  with('response')->begin()->
    isHeader('content-type', 'text/yaml; charset=utf-8')->
    contains('category: Programming')->
  end()
;
在这个测试中,我们要注意2个新方法:
isFormat(): 测试一个请求格式contains(): 对于非HTML格式,它检查响应包含预期的代码片段
The Affiliate Application Form
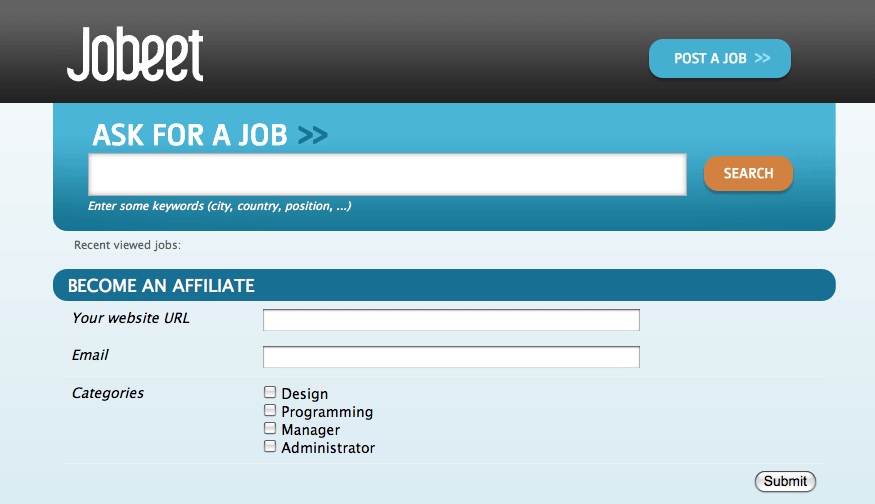
现在web service已经可以使用了,让我们为affiliate创建表单。我们将再一次 演示为程序添加功能的经典过程。
Routing
第一步,创建路由规则:
# apps/frontend/config/routing.yml
affiliate:
  class:   sfDoctrineRouteCollection
  options:
    model: JobeetAffiliate
    actions: [new, create]
    object_actions: { wait: get }
这是一个典型的Doctrine路由集,我们看到一个新出现的选项:actions。因为我们
不需要路由定义的全部7个默认动作,actions选项指示路由只匹配new和create动作。
附加的wait路由将用来提供注册帐号时反馈信息。
Bootstrapping
第二步,生成模块:
$ php symfony doctrine:generate-module frontend affiliate JobeetAffiliate --non-verbose-templates
Templates
doctrine:generate-module生成7个常用动作和相应的模板。删除templates/目录下除_form.php和
newSuccess.php之外,其它所有模板。并用下面的内容替换两文件中内容:
<!-- apps/frontend/modules/affiliate/templates/newSuccess.php -->
<?php use_stylesheet('job.css') ?>

<h1>Become an Affiliate</h1>

<?php include_partial('form', array('form' => $form)) ?>

<!-- apps/frontend/modules/affiliate/templates/_form.php -->
<?php include_stylesheets_for_form($form) ?>
<?php include_javascripts_for_form($form) ?>

<?php echo form_tag_for($form, 'affiliate') ?>
  <table id="job_form">
    <tfoot>
      <tr>
        <td colspan="2">
          <input type="submit" value="Submit" />
        </td>
      </tr>
    </tfoot>
    <tbody>
      <?php echo $form ?>
    </tbody>
  </table>
</form>
创建waitSuccess.php模板:
<!-- apps/frontend/modules/affiliate/templates/waitSuccess.php -->
<h1>Your affiliate account has been created</h1>

<div style="padding: 20px">
  Thank you!
  You will receive an email with your affiliate token
  as soon as your account will be activated.
</div>
最后,修改layout底部链接指向affiliate模块:
// apps/frontend/templates/layout.php
<li class="last">
  <a href="<?php echo url_for('@affiliate_new') ?>">Become an affiliate</a>
</li>
Actions
同样,因为我们只需要创建帐号用的表单,所以我们删除actions.class.php文件中,
除executeNew(), executeCreate()和processForm()方法之外全部动作。
将processForm()动作的重定向URL改为wait动作:
// apps/frontend/modules/affiliate/actions/actions.class.php
$this->redirect($this->generateUrl('affiliate_wait', $jobeet_affiliate));
wait动作非常简单,因为它不需要给模板传递任何东西,所以它是空的:
// apps/frontend/modules/affiliate/actions/actions.class.php
public function executeWait()
{
}
成员不能自己选择它token,也不能在注册后马上激活帐户。打开JobeetAffiliateForm文件,
自定义表单:
// lib/form/doctrine/JobeetAffiliateForm.class.php
class JobeetAffiliateForm extends BaseJobeetAffiliateForm
{
  public function configure()
  {
    unset($this['is_active'], $this['token'], $this['created_at'], $this['updated_at']);

    $this->widgetSchema['jobeet_categories_list']->setOption('expanded', true);
    $this->widgetSchema['jobeet_categories_list']->setLabel('Categories');

    $this->validatorSchema['jobeet_categories_list']->setOption('required', true);

    $this->widgetSchema['url']->setLabel('Your website URL');
    $this->widgetSchema['url']->setAttribute('size', 50);

    $this->widgetSchema['email']->setAttribute('size', 50);

    $this->validatorSchema['email'] = new sfValidatorEmail(array('required' => true));
  }
}
和其它列一样,表单框架支持多对多关系(many-to-many relationship)。
默认的情况下,这种关系默认显示为一个下拉框,感谢sfWidgetFormChoice。
我们第10天时候,已经已经学习过如何通过expanded选项来配置使用哪种HTML标记。
因为email和URL通常比input标签的默认长度要长, HTML属性可以使用setAttribute()方法设定。

Tests
最后一步,功能测试:
Replace the generated tests for the affiliate module by the following code:
// test/functional/frontend/affiliateActionsTest.php
include(dirname(__FILE__).'/../../bootstrap/functional.php');

$browser = new JobeetTestFunctional(new sfBrowser());
$browser->loadData();

$browser->
  info('1 - An affiliate can create an account')->

  get('/affiliate/new')->
  click('Submit', array('jobeet_affiliate' => array(
    'url'                            => 'http://www.example.com/',
    'email'                          => 'foo@example.com',
    'jobeet_categories_list'         => array(Doctrine::getTable('JobeetCategory')->findOneBySlug('programming')->getId()),
  )))->
  isRedirected()->
  followRedirect()->
  with('response')->checkElement('#content h1', 'Your affiliate account has been created')->

  info('2 - An affiliate must at least select one category')->

  get('/affiliate/new')->
  click('Submit', array('jobeet_affiliate' => array(
    'url'   => 'http://www.example.com/',
    'email' => 'foo@example.com',
  )))->
  with('form')->isError('jobeet_categories_list')
;
The Affiliate Backend
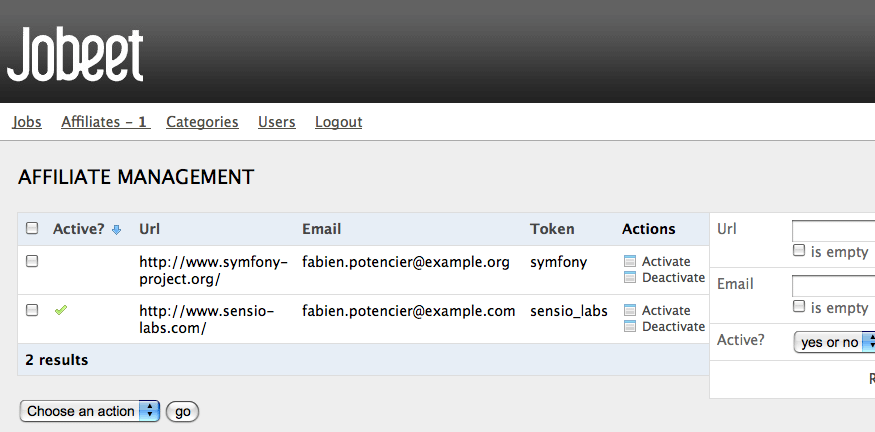
在后台,affiliate模块中,成员必须由管理员激活:
$ php symfony doctrine:generate-admin backend JobeetAffiliate --module=affiliate
访问新模块,在主菜单中添加链接和需要激活成员的数目:
<!-- apps/backend/templates/layout.php -->
<li>
  <a href="<?php echo url_for('@jobeet_affiliate_affiliate') ?>">
    Affiliates - <strong><?php echo Doctrine::getTable('JobeetAffiliate')->countToBeActivated() ?></strong>
  </a>
</li>

// lib/model/doctrine/JobeetAffiliateTable.class.php
class JobeetAffiliateTable extends Doctrine_Table
{
  public function countToBeActivated()
  {
    $q = $this->createQuery('a')
      ->where('a.is_active = ?', 0);

    return $q->count();
  }

  // ...

}
因为后台的只需要激活和停止帐户的动作,所以改变默认生成的config部分,简化界面,
并添加从列表直接激活帐户的链接:
# apps/backend/modules/affiliate/config/generator.yml
config:
  fields:
    is_active: { label: Active? }
  list:
    title:   Affiliate Management
    display: [is_active, url, email, token]
    sort:    [is_active]
    object_actions:
      activate:   ~
      deactivate: ~
    batch_actions:
      activate:   ~
      deactivate: ~
    actions: {}
  filter:
    display: [url, email, is_active]
为了使管理更有效,我们只保留过滤设置中的“已激活”过滤选项:
// apps/backend/modules/affiliate/lib/affiliateGeneratorConfiguration.class.php
class affiliateGeneratorConfiguration extends BaseAffiliateGeneratorConfiguration
{
  public function getFilterDefaults()
  {
    return array('is_active' => '0');
  }
}
将下面的代码加入到activate, deactivate动作中:
// apps/backend/modules/affiliate/actions/actions.class.php
class affiliateActions extends autoAffiliateActions
{
  public function executeListActivate()
  {
    $this->getRoute()->getObject()->activate();

    $this->redirect('@jobeet_affiliate_affiliate');
  }

  public function executeListDeactivate()
  {
    $this->getRoute()->getObject()->deactivate();

    $this->redirect('@jobeet_affiliate_affiliate');
  }

  public function executeBatchActivate(sfWebRequest $request)
  {
    $q = Doctrine_Query::create()
      ->from('JobeetAffiliate a')
      ->whereIn('a.id', $request->getParameter('ids'));

    $affiliates = $q->execute();

    foreach ($affiliates as $affiliate)
    {
      $affiliate->activate();
    }

    $this->redirect('@jobeet_affiliate_affiliate');
  }

  public function executeBatchDeactivate(sfWebRequest $request)
  {
    $q = Doctrine_Query::create()
      ->from('JobeetAffiliate a')
      ->whereIn('a.id', $request->getParameter('ids'));

    $affiliates = $q->execute();

    foreach ($affiliates as $affiliate)
    {
      $affiliate->deactivate();
    }

    $this->redirect('@jobeet_affiliate_affiliate');
  }
}

// lib/model/doctrine/JobeetAffiliate.class.php
class JobeetAffiliate extends BaseJobeetAffiliate
{
  public function activate()
  {
    $this->setIsActive(true);

    return $this->save();
  }

  public function deactivate()
  {
    $this->setIsActive(false);

    return $this->save();
  }

  // ...
}

Sending Emails
Whenever an affiliate account is activated by the administrator, an email should be sent to the affiliate to confirm his subscription and give him his token.
无论什么时候管理员激活帐户,都会给请求人发送一封确认邮件和他的认证码。
PHP有几个好的用来发送邮件的库,如SwiftMailer, Zend_Mail和ezcMail。 因为我们以后要用到Zend框架,所以我们选择Zend_Mail来发送邮件。
安装配置Zend Framework
Zend Mail库是Zend Framework的一部分。我们不需要全部的Zend Framework的功能,
所以我们只安装需要的部分到lib/vendor/目录下,同symfony框架放在一起。
首先,下载Zend Framework解压缩文件,
找到lib/vendor/Zend/目录,保留下面的目录及文件:
note
The following explanations have been tested with the 1.8.0 version of the Zend Framework.
You can clean up the directory by removing everything but the following files and directories:
Exception.phpLoader/Loader.phpMail/Mail.phpMime/Mime.phpSearch/
note
发送邮件并不需要Search/目录下的文件,但明天我们要用到。
然后,添加下面的代码到ProjectConfiguration类中,提供了注册到Zend自动加载器的简单方法:
// config/ProjectConfiguration.class.php
class ProjectConfiguration extends sfProjectConfiguration
{
  static protected $zendLoaded = false;

  static public function registerZend()
  {
    if (self::$zendLoaded)
    {
      return;
    }

    set_include_path(sfConfig::get('sf_lib_dir').'/vendor'.PATH_SEPARATOR.get_include_path());
    require_once sfConfig::get('sf_lib_dir').'/vendor/Zend/Loader.php';
    Zend_Loader_Autoloader::getInstance();
    self::$zendLoaded = true;
  }

  // ...
}
发送邮件
编辑activate动作,当管理员激活一个成员帐号时,方法邮件
// apps/backend/modules/affiliate/actions/actions.class.php
class affiliateActions extends autoAffiliateActions
{
  public function executeListActivate()
  {
    $affiliate = $this->getRoute()->getObject();
    $affiliate->activate();

    // send an email to the affiliate
    ProjectConfiguration::registerZend();
    $mail = new Zend_Mail();
    $mail->setBodyText(<<<EOF
Your Jobeet affiliate account has been activated.

Your token is {$affiliate->getToken()}.

The Jobeet Bot.
EOF
);
    $mail->setFrom('jobeet@example.com', 'Jobeet Bot');
    $mail->addTo($affiliate->getEmail());
    $mail->setSubject('Jobeet affiliate token');
    $mail->send();

    $this->redirect('@jobeet_affiliate_affiliate');
  }

  // ...
}
为了让代码工作,你需要将jobeet@example.com修改为真实的邮件地址。
note
Zend_Mail库完整的教程在Zend Framework website 上可以找到。
明天见
感谢symfony的REST体系,它可以非常容易为你的项目实现web service功能。虽然我们 今天演示的知识只读的web service,但你已经有足够的知识实现可读写的web Service。
The implementation of the affiliate account creation form in the frontend and its backend counterpart was really easy as you are now familiar with the process of adding new features to your project.
如果你还记得第2天的要求:
“成员可以控制返回招聘信息的数量,并能通过指定类别完善他的查询。”
实现这个功能非常简单,我们希望你今晚能够自己完成它。
明天,我们将实现最后一个遗漏的功能——搜索引擎。
This work is licensed under the Creative Commons Attribution-Share Alike 3.0 Unported License license.