- Install symfony and initialize the project
- Initialize the data model
- Create the application scaffolding
- Modify the layout
- Pass data from the action to the template
- Add a record relative to another table
- Form Validation
- Change the URL aspect
- Cleanup in the frontend
- Generation of the backend
- Restrict access to the backend
- Conclusion
So, you want to try it on? Let's build together a fully-functional web app in one hour. You name it. A bookseller application? Ok, another idea. A weblog! That's a good one. Let's go.
We'll assume that you are working with apache/PHP5 installed and launched on your localhost. You will also need the SQLite extension, which is bundled and compiled by default in PHP5. However, since PHP 5.1.0 you need to manually activate the extension in php.ini (see how here).
Install symfony and initialize the project
To go fast, we will use the symfony sandbox (you can also download the final source code). It is an empty symfony project where all the required libraries are already included, and where the basic configuration is already done. The great advantage of the sandbox over other types of installation is that you can start experimenting with symfony immediately.
Get it here: sf_sandbox_1_0.tgz or here: sf_sandbox_1_0.zip, and unpack it in your root web directory. On Linux systems, it is recommended to keep the permissions as they are in the tar file (for example by using -p with tar command). Refer to the included README file for more information. The resulting file structure should look like:
www/
  sf_sandbox/
    apps/
      frontend/
    batch/
    cache/
    config/
    data/
      sql/
    doc/
    lib/
      model/
    log/
    plugins/
    test/
    web/
      css/
      images/
      js/
This shows a sf_sandbox project containing a frontend application. Test the sandbox by requesting the following URL:
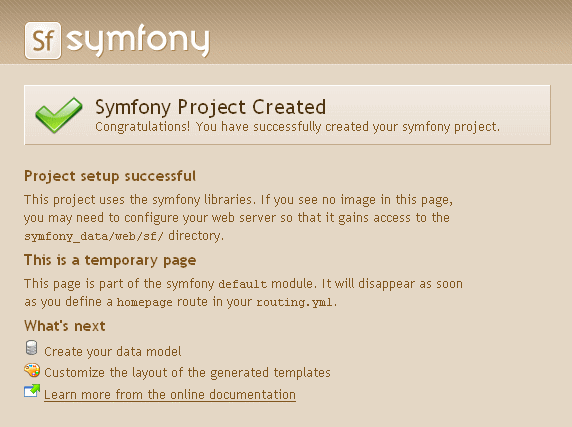
http://localhost/sf_sandbox/web/index.php/
You should see a congratulations page.
You can also install symfony in a custom folder and setup your web server with a Virtual Host or an Alias. The symfony book contains detailed chapters about symfony installation and the symfony directory structure.
Initialize the data model
So, the weblog will handle posts, and you will enable comments on them. Create a schema.yml file in sf_sandbox/config/ and paste the following data model:
propel:
  weblog_post:
    _attributes: { phpName: Post }
    id:
    title:       varchar(255)
    excerpt:     longvarchar
    body:        longvarchar
    created_at:
  weblog_comment:
    _attributes: { phpName: Comment }
    id:
    post_id:
    author:      varchar(255)
    email:       varchar(255)
    body:        longvarchar
    created_at:
This configuration file uses the YAML syntax. It's a very simple language that allows XML-like tree structures described by indentation. Furthermore, it is faster to read and write than XML. The only thing is, the indentation has a meaning and tabulations are forbidden, so remember to use spaces for indentation. You will find more about YAML and the symfony configuration in the configuration chapter.
This schema describes the structure of two of the tables needed for the weblog. Post and Comment are the names of the related classes to be generated. Save the file, open a command line, browse to the sf_sandbox/ directory and type:
$ php symfony propel-build-model
note
Make sure your command line folder is set to the root of your project
(sf_sandbox/) when you call the symfony command.
If you receive the error 'Could not perform XLST transformation', check that you have the php_xsl extension enabled in your php.ini file.
A few classes are created in the sf_sandbox/lib/model/ directory. These are the classes of the object-relational mapping, who allow us to have access to a relational database from within an object-oriented code without writing a single SQL query. Symfony uses the Propel library for this purpose. We will call theses objects the model (find more in the model chapter).
Now type in the command line:
$ php symfony propel-build-sql
A lib.model.schema.sql file is created in sf_sandbox/data/sql/. This SQL query can be used to initialize a database with the same table structure. You could create a database in MySQL with the command line or a web interface (as described in the model chapter). Luckily, the symfony sandbox is configured to work out of the box with a simple SQLite file, so no database initialization is required. By default, the sf_sandbox project will use a database called sandbox.db located in sf_sandbox/data/. To build the table structure based on the the SQL file, type:
$ php symfony propel-insert-sql
note
Don't worry if there is a warning at that point, it is normal. The insert-sql command removes existing tables before adding the ones of your lib.model.schema.sql, and there is no table to remove at that time.
Create the application scaffolding
The basic features of a weblog are to be able to Create, Retrieve, Update and Delete (CRUD) posts and comments. As you are new to symfony, you will not create symfony code from scratch, but rather let it create a scaffolding that you may use and modify as needed. Symfony can interpret the data model to generate the CRUD interface automatically:
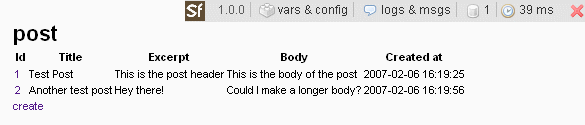
$ php symfony propel-generate-crud frontend post Post
$ php symfony propel-generate-crud frontend comment Comment
$ php symfony clear-cache

# On *nix systems, you will have to change some rights:
$ chmod 777 data
$ chmod 777 data/sandbox.db
You now have two modules (post and comment) that will let you manipulate objects of the Post and Comment classes. A module usually represents a page or a group of pages with a similar purpose. Your new modules are located in the sf_sandbox/apps/frontend/modules/ directory, and they are accessible by the URLs:
http://localhost/sf_sandbox/web/frontend_dev.php/post
http://localhost/sf_sandbox/web/frontend_dev.php/comment
Feel free to create a new post to make the weblog look less empty.
Find more about scaffolding and the explanation of symfony projects structure (project, application, module).
note
In the URLs above, the name of the main script - called front controller in symfony - was changed from index.php to frontend_dev.php. The two scripts access the same application (frontend), but in different environments. With frontend_dev.php, you access the application in the development environment, which provides handy development tools like the debug toolbar on the top right of the screen and the live configuration engine. That's why the processing of each page is slower than when using index.php, which is the front controller of the production environment, optimized for speed. If you want to keep on using the production environment, replace frontend_dev.php/ by index.php/ in the following URLs, but don't forget to clear the cache before watching the changes:
$ php symfony clear-cache

http://localhost/sf_sandbox/web/index.php/
Find more about environments.
Modify the layout
In order to navigate between the two new modules, the weblog needs some global navigation.
Edit the global template sf_sandbox/apps/frontend/templates/layout.php and change the content of the <body> tag to:
<div id="container" style="width:600px;margin:0 auto;border:1px solid grey;padding:10px">
  <div id="navigation" style="display:inline;float:right">
    <ul>
      <li><?php echo link_to('List of posts', 'post/list') ?></li>
      <li><?php echo link_to('List of comments', 'comment/list') ?></li>
    </ul>
  </div>
  <div id="title">
    <h1><?php echo link_to('My first symfony project', '@homepage') ?></h1>
  </div>

  <div id="content" style="clear:right">
    <?php echo $sf_data->getRaw('sf_content') ?>
  </div>
</div>
Please be forgiving for the poor design and the use of inner-tag css, but one hour is a short time.
While you are at it, you can change the title of your pages. Edit the view configuration file of the application (sf_sandbox/apps/frontend/config/view.yml), locate the line showing the title key and change it to:
default:
  http_metas:
    content-type: text/html

metas:
  title:        The best weblog ever
  robots:       index, follow
  description:  symfony project
  keywords:     symfony, project
  language:     en
The home page itself needs to be changed. It uses the default template of the default module, which is kept in the framework but not in your application directory. To override it, you have to create a custom main module:
$ php symfony init-module frontend main
By default, the index action shows a default congratulations screen. To remove it, edit the sf_sandbox/apps/frontend/modules/main/actions/actions.class.php and remove the content of the executeIndex() method as follows:
public function executeIndex()
{
}
Edit the sf_sandbox/apps/frontend/modules/main/templates/indexSuccess.php file to show a nice welcome message:
<h1>Welcome to my swell weblog</h1>
<p>You are the <?php echo rand(1000,5000) ?>th visitor today.</p>
Now, you must tell symfony which action to execute when the homepage is requested. To that extend, edit the sf_sandbox/apps/frontend/config/routing.yml and change the homepage rule as follows:
homepage:
  url:   /
  param: { module: main, action: index }
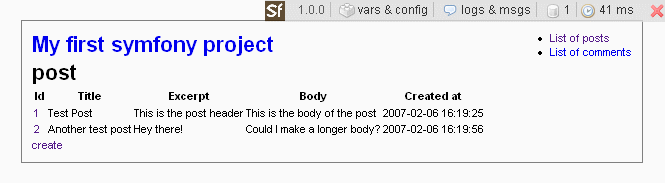
Check the result by requesting the home page again:
http://localhost/sf_sandbox/web/frontend_dev.php/

Go ahead, start using your new web app: Create a new test post, and a test comment for this post.
Find more about views and templates.
Pass data from the action to the template
That was fast, wasn't it? Now it is time to mix the comment module into the post one to get comments displayed below posts.
First, you need to make the post comments available for the post display template. In symfony, this kind of logic is kept in actions. Edit the actions file sf_sandbox/apps/frontend/modules/post/actions/actions.class.php and change the executeShow() method by adding the 4 last lines:
public function executeShow()
{
  $this->post = PostPeer::retrieveByPk($this->getRequestParameter('id'));
  $this->forward404Unless($this->post);

  $c = new Criteria();
  $c->add(CommentPeer::POST_ID, $this->getRequestParameter('id'));
  $c->addAscendingOrderByColumn(CommentPeer::CREATED_AT);
  $this->comments = CommentPeer::doSelect($c);
}
The Criteria and -Peer objects are part of Propel's object-relational mapping. Basically, these four lines will handle a SQL query to the Comment table to get the comments related to the current Post (the one designated by the URL parameter id). The $this->comments line in the action will give access to a $comments variable in the corresponding template. Now, modify the post display template sf_sandbox/apps/frontend/modules/post/templates/showSuccess.php by adding at the end:
...
<?php use_helper('Text', 'Date') ?>

<hr />
<?php if ($comments) : ?>
  <p><?php echo count($comments) ?> comment<?php if (count($comments) > 1) : ?>s<?php endif; ?> to this post.</p>
  <?php foreach ($comments as $comment): ?>
    <p><em>posted by <?php echo $comment->getAuthor() ?> on <?php echo format_date($comment->getCreatedAt()) ?></em></p>
    <div class="comment" style="margin-bottom:10px;">
      <?php echo simple_format_text($comment->getBody()) ?>
    </div>
  <?php endforeach; ?>
<?php endif; ?>
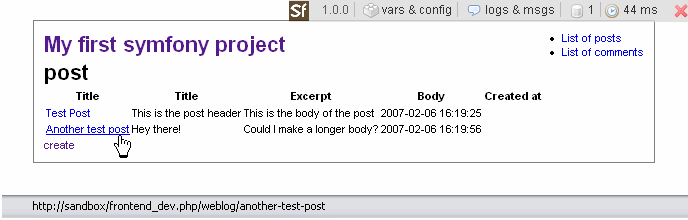
This page uses new PHP functions (format_date() and simple_format_text()) provided by symfony, and called 'helpers' because they do some tasks for you that would normally require more time and code. Create a new comment for your first post, then check again the first post, either by clicking on its number in the list, or by typing directly:
http://localhost/sf_sandbox/web/frontend_dev.php/post/show?id=1
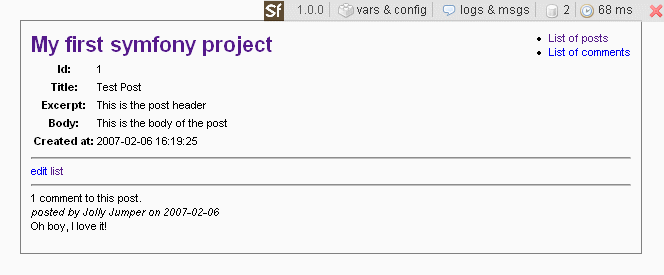
This is getting good.
Find more about the naming conventions linking an action to a template.
Add a record relative to another table
When adding a comment, you can choose the id of the related post. That's not very user-friendly. Let's change this, and make sure that the user comes back to the post he was looking at after adding a comment.
First, in the still fresh modules/post/templates/showSuccess.php template, add a line at the bottom:
<?php echo link_to('Add a comment', 'comment/create?post_id='.$post->getId()) ?>
The link_to() helper creates a hyperlink pointing to the create action of the comment module, so you can add a comment directly from the post details page. Next, open the modules/comment/templates/editSuccess.php and replace the following lines:
<tr>
  <th>Post:</th>
  <td><?php echo object_select_tag($comment, 'getPostId', array (
  'related_class' => 'Post',
)) ?></td>
</tr>
By:
<?php if ($sf_params->has('post_id')): ?>
  <?php echo input_hidden_tag('post_id',$sf_params->get('post_id')) ?>
<?php else: ?>
  <tr>
    <th>Post*:</th>
    <td><?php echo object_select_tag($comment, 'getPostId', array('related_class' => 'Post')) ?></td>
  </tr>
<?php endif; ?>
The form in the comment/create page points to a comment/update action, which redirects to comment/show when submitted (this is the default behaviour in generated CRUDs). For the weblog, that means that after adding a comment to a post, the detail of the comment is displayed. It is better to display the post with the comments at that point. So open the modules/comment/actions/actions.class.php and look for the executeUpdate() method. Note that the created_at field is not defined by the action: symfony knows that a field named created_at has to be set to the system time when a record is created. The final redirect of the action has to be modified to point to the correct action. Change it to:
public function executeUpdate ()
{
  if (!$this->getRequestParameter('id', 0))
  {
    $comment = new Comment();
  }
  else
  {
    $comment = CommentPeer::retrieveByPk($this->getRequestParameter('id'));
    $this->forward404Unless($comment);
  }

  $comment->setId($this->getRequestParameter('id'));
  $comment->setPostId($this->getRequestParameter('post_id'));
  $comment->setAuthor($this->getRequestParameter('author'));
  $comment->setEmail($this->getRequestParameter('email'));
  $comment->setBody($this->getRequestParameter('body'));

  $comment->save();

  return $this->redirect('post/show?id='.$comment->getPostId());
}
Users can now add comments to a post and come back to the post afterwards. You wanted a weblog? You have a weblog.
Find more about actions.
Form Validation
Visitors can enter comments, but what if they submit the form without any data in it? You will have a dirty database. To avoid that, create a file called update.yml in the sf_sandbox/apps/frontend/modules/comment/validate/ directory (you also have to create the directory) and write in:
methods:
  post:           [author, email, body]
  get:            [author, email, body]

fillin:
  enabled:       on

names:
  author:
    required:     Yes
      msg:        The name field cannot be left blank

  email:
    required:     No
    validators:   emailValidator

  body:
    required:     Yes
      msg:        The text field cannot be left blank

emailValidator:
  class:          sfEmailValidator
  param:
    email_error:  The email address is not valid.
note
Beware that you don't copy 4 extra spaces at the beginning of each line, since the YAML parser would fail in that case. The first letter of this file must be the 'm' of 'methods'.
The fillin activation enables the repopulation of the form with the value previously entered by the user in case of failed validation. The names declarations set the validation rules for each input of the form.
By itself, the controller will redirect the user to a updateError.php template if an error is detected. It would be better to display the form again with an error message. To do that, add a handleErrorUpdate method to the action class of the modules/comment/actions/actions.class.php file:
public function handleErrorUpdate()
{
  // forward it to edit if the id exists
  if (!$this->getRequestParameter('id'))
  {
    $this->forward('comment', 'create');
  }
  else
  {
    $this->forward('comment', 'edit');
  }
}
Now to finish, open again the modules/comment/templates/editSuccess.php template and insert at the top:
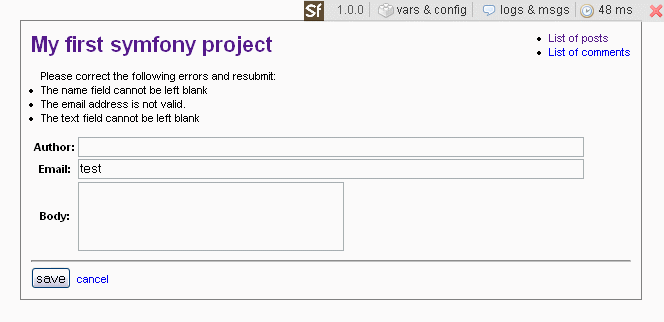
<?php if ($sf_request->hasErrors()): ?>
  <div id="errors" style="padding:10px;">
    Please correct the following errors and resubmit:
    <ul>
    <?php foreach ($sf_request->getErrors() as $error): ?>
      <li><?php echo $error ?></li>
    <?php endforeach; ?>
    </ul>
  </div>
<?php endif; ?>
You now have a robust form.
Find more about form validation.
Change the URL aspect
Did you notice the way the URLs are rendered? You can make them more user and search engine-friendly. Let's use the post title as an URL for posts.
The problem is that post titles can contain special characters like spaces. If you just escape them, the URL will show some ugly %20 kind of things, so you'd better extend the model to add a new method to the Post object to get a clean, stripped title. To do that, edit the file Post.php located in the sf_sandbox/lib/model/ directory, and add the following method:
public function getStrippedTitle()
{
  $result = strtolower($this->getTitle());

  // strip all non word chars
  $result = preg_replace('/\W/', ' ', $result);

  // replace all white space sections with a dash
  $result = preg_replace('/\ +/', '-', $result);

  // trim dashes
  $result = preg_replace('/\-$/', '', $result);
  $result = preg_replace('/^\-/', '', $result);

  return $result;
}
Now you can create a permalink action for the post module. Add the following method to the modules/post/actions/actions.class.php:
public function executePermalink()
{
  $posts = PostPeer::doSelect(new Criteria());
  $title = $this->getRequestParameter('title');
  foreach ($posts as $post)
  {
    if ($post->getStrippedTitle() == $title)
    {
      $this->getRequest()->setParameter('id', $post->getId());

      return $this->forward('post', 'show');
    }
  }

  $this->forward404();
}
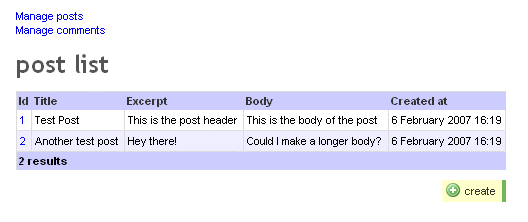
The post list can call this permalink action instead of the show one for each post. In modules/post/templates/listSuccess.php, delete the id table header and cell, and change the Title cell from:
<td><?php echo $post->getTitle() ?></td>
To a link using a named rule we will create in a second:
<td><?php echo link_to($post->getTitle(), '@post?title='.$post->getStrippedTitle()) ?></td>
Just one more step: Edit the routing.yml located in the sf_sandbox/apps/frontend/config/ directory and add these rules at the top:
list_of_posts:
  url:   /latest_posts
  param: { module: post, action: list }

post:
  url:   /weblog/:title
  param: { module: post, action: permalink }
Now navigate again in your application and watch the URLs.
Find more about smart URLs.
Cleanup in the frontend
Well, if this is a weblog, then everybody has the right to post. This isn't exactly what you thought about, right? Ok, let's clean up our templates a bit.
In the template modules/post/templates/showSuccess.php, get rid of the 'edit' link by removing the line:
<?php echo link_to('edit', 'post/edit?id='.$post->getId()) ?>
Do the same for the modules/post/templates/listSuccess.php template and remove:
<?php echo link_to('create', 'post/create') ?>
You also have to remove the following methods from the modules/post/actions/actions.class.php:
* executeCreate
* executeEdit
* executeUpdate
* executeDelete
All right, readers cannot post anymore.
Generation of the backend
For you to write posts, let's create a backend application by typing in the command line (still from the sf_sandbox project directory):
$ php symfony init-app backend
$ php symfony propel-init-admin backend post Post
$ php symfony propel-init-admin backend comment Comment
This time, we use the admin generator. It offers much more features and customization than the very basic CRUD generator.
Just like you did for the frontend application, edit the layout (apps/backend/templates/layout.php) to add global navigation:
<div id="navigation">
  <ul style="list-style:none;">
    <li><?php echo link_to('Manage posts', 'post/list') ?></li>
    <li><?php echo link_to('Manage comments', 'comment/list') ?></li>
  </ul>
</div>
<div id="content">
  <?php echo $sf_data->getRaw('sf_content') ?>
</div>
You can access your new back-office application in the development environment by calling:
http://localhost/sf_sandbox/web/backend_dev.php/post
The great advantage of the generated admin is that you can easily customize it by editing a configuration file.
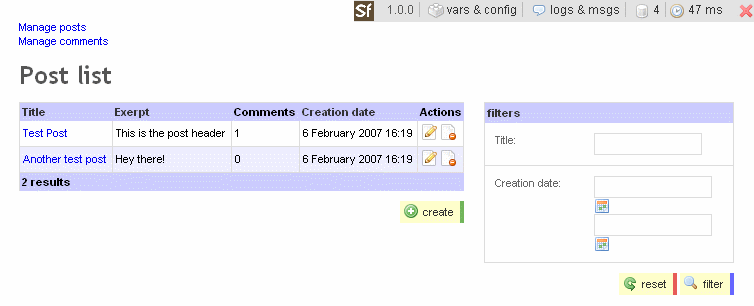
Change the backend/modules/post/config/generator.yml to:
generator:
  class:              sfPropelAdminGenerator
  param:
    model_class:      Post
    theme:            default
    fields:
      title:          { name: Title }
      excerpt:        { name: Exerpt }
      body:           { name: Body }
      nb_comments:    { name: Comments }
      created_at:     { name: Creation date }
    list:
      title:          Post list
      layout:         tabular
      display:        [=title, excerpt, nb_comments, created_at]
      object_actions:
        _edit:        ~
        _delete:      ~
      max_per_page:   5
      filters:        [title, created_at]
    edit:
      title:          Post detail
      fields:
        title:        { type: input_tag, params: size=53 }
        excerpt:      { type: textarea_tag, params: size=50x2 }
        body:         { type: textarea_tag, params: size=50x10 }
        created_at:   { type: input_date_tag, params: rich=on }
Note that among the existing columns of the Post table, the admin will look for a nb_comments. There is no associated getter yet, but it is simple to add to the sf_sandbox/lib/model/Post.php:
public function getNbComments()
{
  return count($this->getComments());
}
Now refresh the Post administration an see the changes:
Restrict access to the backend
The backend can be accessed by everybody. You have to add access restriction.
In apps/backend/modules/post/config/, add a security.yml with the following content:
all:
  is_secure: on
Repeat the operation for the comment module. Now you can't access these modules anymore unless you are logged.
But the login action doesn't exist! Ok, so you can easily add it. First, create the security module skeleton:
$ php symfony init-module backend security
This new module will be used to handle the login form and the request. Edit the apps/backend/modules/security/templates/indexSuccess.php to create the login form:
<h2>Authentication</h2>

<?php if ($sf_request->hasErrors()): ?>
  Identification failed - please try again
<?php endif; ?>

<?php echo form_tag('security/login') ?>
  <label for="login">login:</label>
  <?php echo input_tag('login', $sf_params->get('login')) ?>

  <label for="password">password:</label>
  <?php echo input_password_tag('password') ?>

  <?php echo submit_tag('submit', 'class=default') ?>
</form>
Add the login action that is called by the form to the security module (in the apps/backend/modules/security/actions/actions.class.php file):
public function executeLogin()
{
  if ($this->getRequestParameter('login') == 'admin' && $this->getRequestParameter('password') == 'password')
  {
    $this->getUser()->setAuthenticated(true);

    return $this->redirect('post/list');
  }
  else
  {
    $this->getRequest()->setError('login', 'incorrect entry');

    return $this->forward('security', 'index');
  }
}
Like for the main module, remove the default code in the index action:
public function executeIndex()
{
}
The last thing to do is to set the security module as the default module to handle login actions. To do that, open the apps/backend/config/settings.yml configuration file and add:
all:
  .actions:
    login_module:           security
    login_action:           index
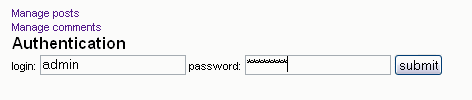
At that point, if you try to access the Posts management, you will have to enter a login and a password:
Find more about security.
Conclusion
Ok, the hour is out. You made it. Now you can use both applications in the production environment and play with them:
frontend:   http://localhost/sf_sandbox/web/index.php/
backend:    http://localhost/sf_sandbox/web/backend.php/
At this point, if you meet an error, it might be because you changed the model after some actions were put in cache (cache isn't activated in the development environment). To clear the cache, simply type:
$ php symfony cc
See, the application is fast and runs smoothly. Pretty darn cool, isn't it? Feel free to explore the code, add new modules, and change the design of pages.
And don't forget to mention your working symfony applications in the symfony Wiki!
This work is licensed under the Creative Commons Attribution-Noncommercial-No Derivative Works 3.0 Unported License license.