With the addition we made in day 11 on Jobeet, the frontend application is now fully useable by job seekers and job posters. It's time to talk a bit about the backend application. Today, thanks to the admin generator functionality of symfony, we will develop a complete backend interface for Jobeet in just one hour.
Backend Creation
The very first step is to create the backend application. If your
memory serves you well, you should remember how to do it with the generate:app
task:
$ php symfony generate:app backend
The backend application is now available at
http://jobeet.localhost/backend.php/ for the prod environment, and at
http://jobeet.localhost/backend_dev.php/ for the dev environment.
note
When you created the frontend application, the production front controller was
named index.php. As you can only have one index.php file per directory,
symfony creates an index.php file for the very first production front
controller and names the others after the application name.
If you try to reload the data fixtures with the propel:data-load task, it
won't work as expected. That's because the JobeetJob::save() method needs
access to the app.yml configuration file from the frontend application. As
we have now two applications, symfony uses the first it finds, which is now the
backend one.
But as seen during day 8, the settings can be configured at different
levels. By moving the content of the apps/frontend/config/app.yml file to
config/app.yml, the settings will be shared among all applications and the
problem will be fixed. Do the change now as we will use the model classes quite
extensively in the admin generator, and so we will need the variables defined in
app.yml in the backend application.
tip
The propel:data-load task also takes a --application option. So, if you
need some specific settings from one application or another,
this is the way to go:
$ php symfony propel:data-load --application=frontend
Backend Modules
For the frontend application, the propel:generate-module task has been used to
bootstrap a basic CRUD module based on a model class. For the backend, the
propel:generate-admin task will be used as it generates a full working backend
interface for a model class:
$ php symfony propel:generate-admin backend JobeetJob --module=job
$ php symfony propel:generate-admin backend JobeetCategory --module=category
These two commands create a job and a category module for the
JobeetJob and the JobeetCategory model classes respectively.
The optional --module option overrides the module name generated by default
by the task (which would have been otherwise jobeet_job for the JobeetJob
class).
Behind the scenes, the task has also created a custom route for each module:
# apps/backend/config/routing.yml
jobeet_job:
  class: sfPropelRouteCollection
  options:
    model:                JobeetJob
    module:               job
    prefix_path:          job
    column:               id
    with_wildcard_routes: true
It should come as no surprise that the route class used by the admin
generator|Admin Generator is sfPropelRouteCollection, as the main goal of an
admin interface is the management of the life-cycle of model objects.
The route definition also defines some options we have not seen before:
prefix_path: Defines the prefix path for the generated route (for instance, the edit page will be something like/job/1/edit).column: Defines the table column to use in the URL for links that references an object.with_wildcard_routes: As the admin interface will have more than the classic CRUD operations, this option allows to define more object and collection actions without editing the route.
tip
As always, it is a good idea to read the help before using a new task.
$ php symfony help propel:generate-admin
It will give you all the task's arguments and options as well as some classic usage examples.
Backend Look and Feel
Right off the bat, you can use the generated modules:
http://jobeet.localhost/backend_dev.php/job
http://jobeet.localhost/backend_dev.php/category
The admin modules have many more features than the simple modules we have generated in previous days. Without writing a single line of PHP, each module provides these great features:
- The list of objects is paginated
- The list is sortable
- The list can be filtered
- Objects can be created, edited, and deleted
- Selected objects can be deleted in a batch
- The form validation is enabled
- Flash messages give immediate feedback to the user
- ... and much much more
The admin generator provides all the features you need to create a backend interface in a simple to configure package.
If you have a look at our two generated modules, you will notice there is no
activated webdesign whereas the symfony built-in admin generator feature has a
basic graphic interface by default. For now, assets from the sfPropelPlugin
are not located under the web/ folder. We need to publish them under the
web/ folder thanks to the plugin:publish-assets task:
$ php symfony plugin:publish-assets
To make the user experience a bit better, we need to customize the default backend. We will also add a simple menu to make it easy to navigate between the different modules.
Replace the default layout file content with the code below:
// apps/backend/templates/layout.php
<!DOCTYPE html PUBLIC "-//W3C//DTD XHTML 1.0 Transitional//EN"
  "http://www.w3.org/TR/xhtml1/DTD/xhtml1-transitional.dtd">
<html xmlns="http://www.w3.org/1999/xhtml" xml:lang="en" lang="en">
  <head>
    <title>Jobeet Admin Interface</title>
    <link rel="shortcut icon" href="/favicon.ico" />
    <?php use_stylesheet('admin.css') ?>
    <?php include_javascripts() ?>
    <?php include_stylesheets() ?>
  </head>
  <body>
    <div id="container">
      <div id="header">
        <h1>
          <a href="<?php echo url_for('homepage') ?>">
            <img src="/legacy/images/logo.jpg" alt="Jobeet Job Board" />
          </a>
        </h1>
      </div>

      <div id="menu">
        <ul>
          <li>
            <?php echo link_to('Jobs', 'jobeet_job') ?>
          </li>
          <li>
            <?php echo link_to('Categories', 'jobeet_category') ?>
          </li>
        </ul>
      </div>

      <div id="content">
        <?php echo $sf_content ?>
      </div>

      <div id="footer">
        <img src="/legacy/images/jobeet-mini.png" />
        powered by <a href="/">
        <img src="/legacy/images/symfony.gif" alt="symfony framework" /></a>
      </div>
    </div>
  </body>
</html>
This layout uses an admin.css stylesheet. This file must already be present in
web/css/ as it was installed with the other stylesheets during day 4.
Eventually, change the default symfony homepage in routing.yml:
# apps/backend/config/routing.yml
homepage:
  url:   /
  param: { module: job, action: index }
The symfony Cache
If you are curious enough, you have probably already opened the files generated
by the task under the apps/backend/modules/ directory. If not, please open
them now. Surprise! The templates directories are empty, and the
actions.class.php files are quite empty as well:
// apps/backend/modules/job/actions/actions.class.php
require_once dirname(__FILE__).'/../lib/jobGeneratorConfiguration.class.php';
require_once dirname(__FILE__).'/../lib/jobGeneratorHelper.class.php';

class jobActions extends autoJobActions
{
}
How can it possibly work? If you have a closer look, you will notice that the
jobActions class extends autoJobActions. The autoJobActions class is
automatically generated by symfony if it does not exist. It is to be found in
the cache/backend/dev/modules/autoJob/ directory, which contains the "real"
module:
// cache/backend/dev/modules/autoJob/actions/actions.class.php
class autoJobActions extends sfActions
{
  public function preExecute()
  {
    $this->configuration = new jobGeneratorConfiguration();

    if (!$this->getUser()->hasCredential(
      $this->configuration->getCredentials($this->getActionName())
    ))
    {

// ...
The way the admin generator works should remind you of some known behavior. In
fact, it is quite similar to what we have already learned about the model and
form classes. Based on the model schema definition, symfony generates the model
and form classes. For the admin generator, the generated module can be
configured by editing the config/generator.yml file found in the module:
# apps/backend/modules/job/config/generator.yml
generator:
  class: sfPropelGenerator
  param:
    model_class:           JobeetJob
    theme:                 admin
    non_verbose_templates: true
    with_show:             false
    singular:              ~
    plural:                ~
    route_prefix:          jobeet_job
    with_propel_route:     true

    config:
      actions: ~
      fields:  ~
      list:    ~
      filter:  ~
      form:    ~
      edit:    ~
      new:     ~
Each time you update the generator.yml file, symfony regenerates the cache. As
we will see later, customizing the admin generated modules is easy, fast, and
fun.
note
The automatic re-generation of cache files only occurs in the
development environment. In the production one, you will need to clear the
cache manually with the cache:clear task.
--
note
The with_show parameter has no effect. This parameter is only meaningful
when generating "standard" modules with the propel:generate-module task.
Backend Configuration
An admin module can be customized by editing the config key of the
generator.yml file. The configuration is organized in seven sections:
actions: Default configuration for the actions found on the list and on the formsfields: Default configuration for the fieldslist: Configuration for the listfilter: Configuration for filtersform: Configuration for new and edit formsedit: Specific configuration for the edit pagenew: Specific configuration for the new page
Let's start the customization.
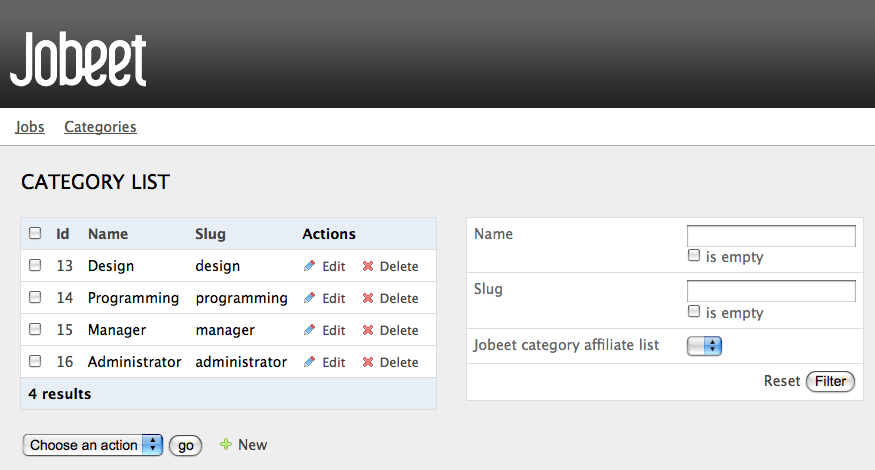
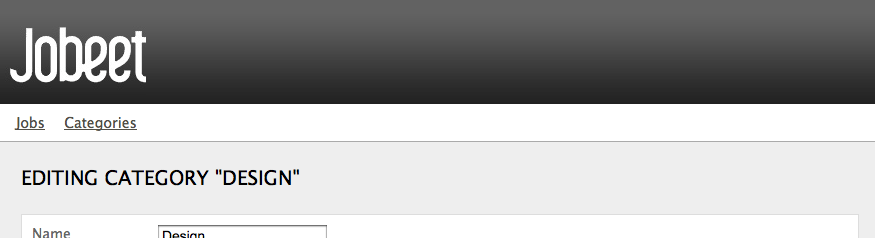
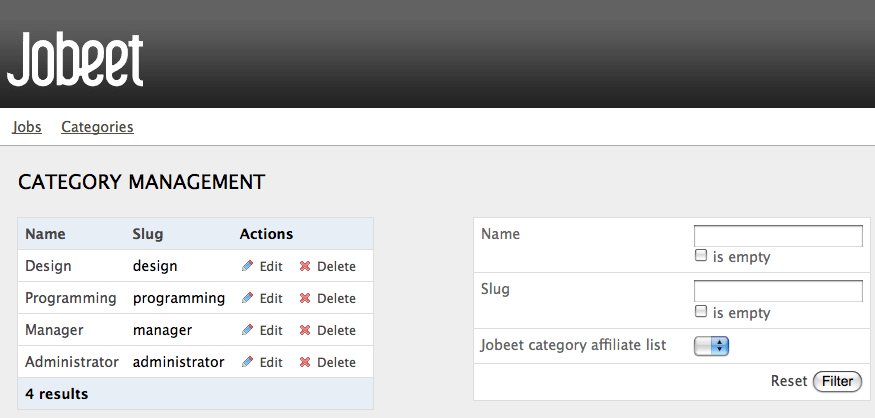
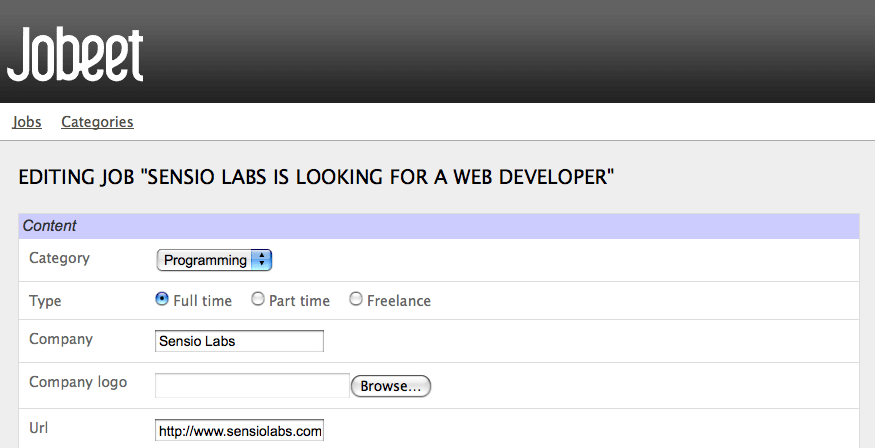
Title Configuration
The list, edit, and new section titles of category module can be
customized by defining a title option:
# apps/backend/modules/category/config/generator.yml
config:
  actions: ~
  fields:  ~
  list:
    title: Category Management
  filter:  ~
  form:    ~
  edit:
    title: Editing Category "%%name%%"
  new:
    title: New Category
The title for the edit section contains dynamic values: all strings enclosed
between %% are replaced by their corresponding object column values.
The configuration for the job module is quite similar:
# apps/backend/modules/job/config/generator.yml
config:
  actions: ~
  fields:  ~
  list:
    title: Job Management
  filter:  ~
  form:    ~
  edit:
    title: Editing Job "%%company%% is looking for a %%position%%"
  new:
    title: Job Creation
Fields Configuration
The different views (list, new, and edit) are composed of fields.
A field can be a column of the model class, or a virtual column as we will see
later on.
The default fields configuration can be customized with the fields section:
# apps/backend/modules/job/config/generator.yml
config:
  fields:
    is_activated: { label: Activated?, help: Whether the user has activated the job, or not }
    is_public:    { label: Public?, help: Whether the job can also be published on affiliate websites, or not }

The fields section overrides the fields configuration for all views, which
means the label for the is_activated field will be changed for the list,
edit, and new views.
The admin generator configuration is based on a configuration cascade principle.
For instance, if you want to change a label for the list view
only, define a fields option under the list section:
# apps/backend/modules/job/config/generator.yml
config:
  list:
    fields:
      is_public:    { label: "Public? (label for the list)" }
Any configuration that is set under the main fields section can be overridden
by view-specific configuration. The overriding rules are the following:
newandeditinherit fromformwhich inherits fromfieldslistinherits fromfieldsfilterinherits fromfields
note
For form sections (form, edit, and new), the label and help options
override the ones defined in the form classes.
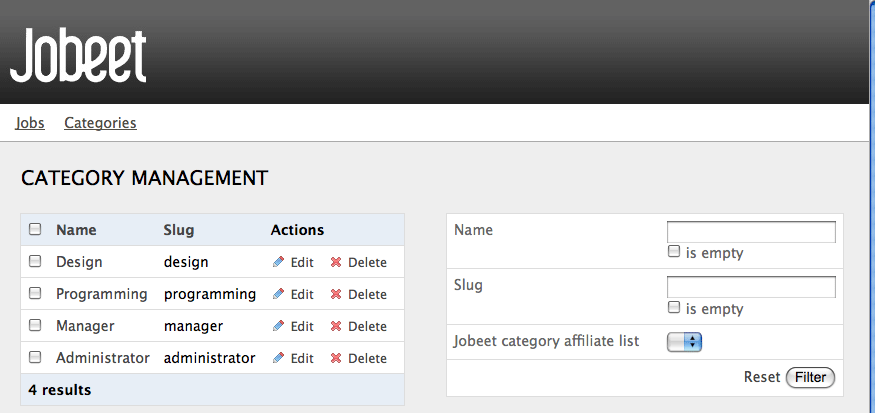
List View Configuration
display
By default, the columns of the list view are all the columns of the model, in
the order of the schema file. The display option overrides the default by
defining the ordered columns to be displayed:
# apps/backend/modules/category/config/generator.yml
config:
  list:
    title:   Category Management
    display: [=name, slug]
The = sign before the name column is a convention to convert the string to a
link.
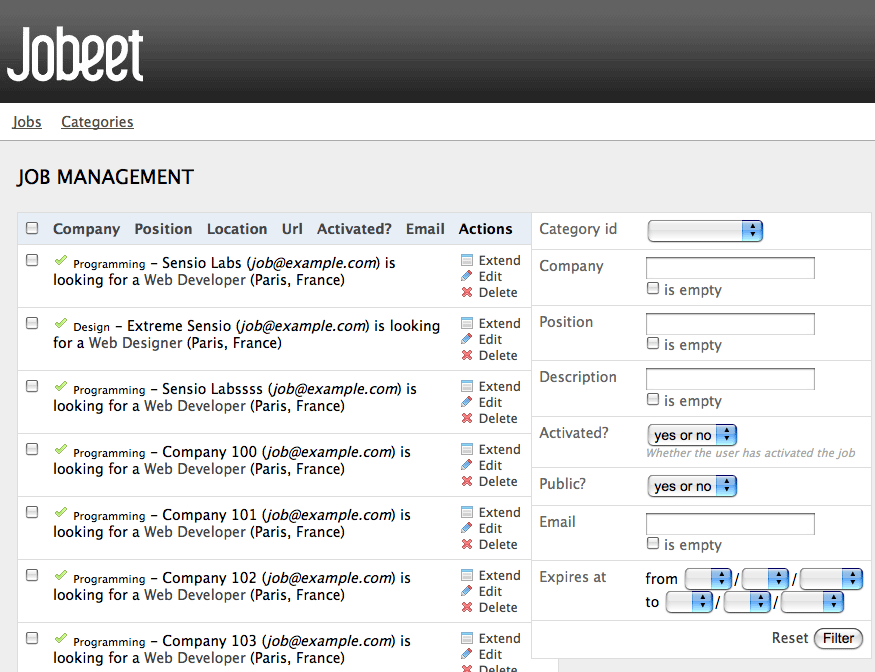
Let's do the same for the job module to make it more readable:
# apps/backend/modules/job/config/generator.yml
config:
  list:
    title:   Job Management
    display: [company, position, location, url, is_activated, email]
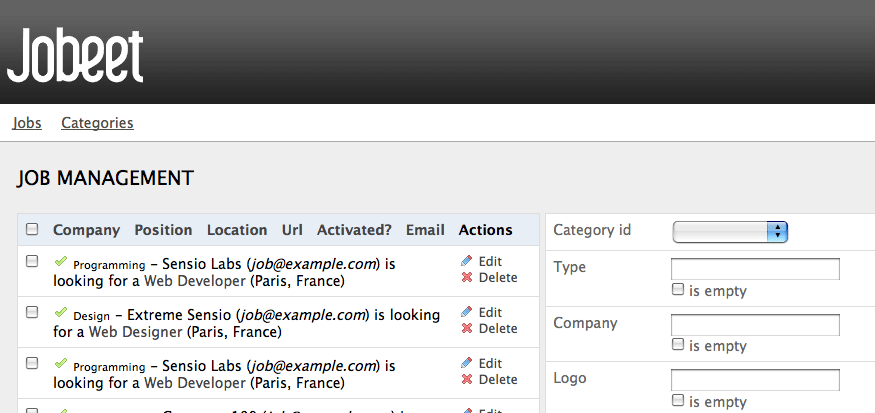
layout
The list can be displayed with different layouts. By default, the
layout is tabular, which means that each column value is in
its own table column. But for the job module, it would be better to use the
stacked layout, which is the other built-in layout:
# apps/backend/modules/job/config/generator.yml
config:
list:
title: Job Management
layout: stacked
display: [company, position, location, url, is_activated, email]
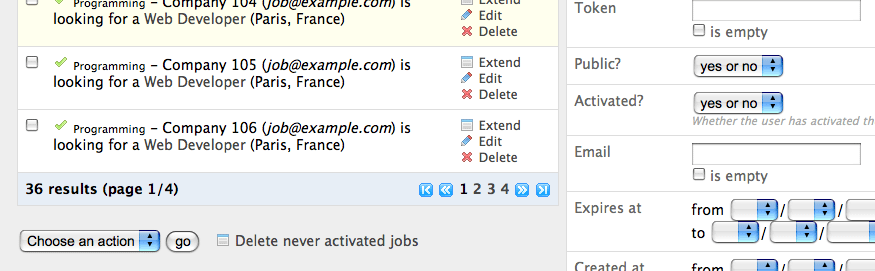
params: |
%%is_activated%% <small>%%category_id%%</small> - %%company%%
(<em>%%email%%</em>) is looking for a %%=position%% (%%location%%)
In a stacked layout, each object is represented by a single string, which is
defined by the params option.
note
The display option is still needed as it defines the columns that will be
sortable by the user.
"Virtual" columns
With this configuration, the %%category_id%% segment will be replaced by the
category primary key. But it would be more meaningful to display the name of the
category.
Whenever you use the %% notation, the variable does not need to correspond to
an actual column in the database schema. The admin generator only need to find a
related getter in the model class.
To display the category name, we can define a getCategoryName() method in the
JobeetJob model class and replace %%category_id%% by %%category_name%%.
But the JobeetJob class already has a getJobeetCategory() method that
returns the related category object. And if you use %%jobeet_category%%, it
works as the JobeetCategory class has a magic __toString() method that
converts the object to a string.
# apps/backend/modules/job/config/generator.yml
%%is_activated%% <small>%%jobeet_category%%</small> - %%company%%
 (<em>%%email%%</em>) is looking for a %%=position%% (%%location%%)
sort
As an administrator, you will be probably more interested in seeing the latest
posted jobs. You can configure the default sort column by adding a sort
option:
# apps/backend/modules/job/config/generator.yml
config:
  list:
    sort: [expires_at, desc]
max_per_page
By default, the list is paginated and each page contains 20 items.
This can be changed with the max_per_page option:
# apps/backend/modules/job/config/generator.yml
config:
  list:
    max_per_page: 10
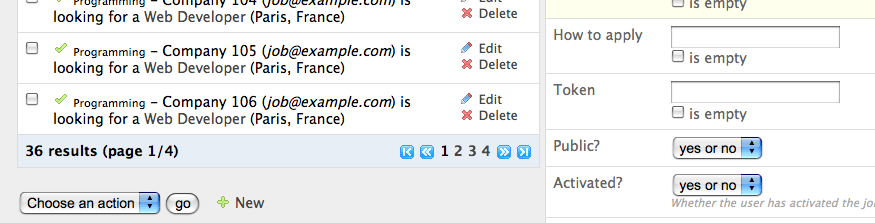
batch_actions
On a list, an action can be run on several objects. These batch actions are not
needed for the category module, so, let's remove them:
# apps/backend/modules/category/config/generator.yml
config:
  list:
    batch_actions: {}
The batch_actions option defines the list of batch actions. The empty array
allows the removal of the feature.
By default, each module has a delete batch action defined by the framework,
but for the job module, let's pretend we need a way to extend the validity of
some selected jobs for another 30 days:
# apps/backend/modules/job/config/generator.yml
config:
  list:
    batch_actions:
      _delete:    ~
      extend:     ~
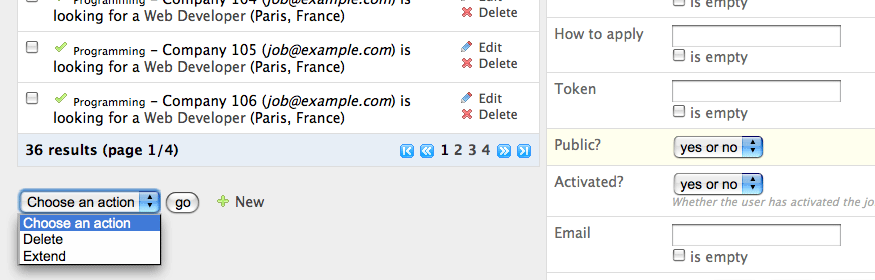
All actions beginning with a _ are built-in actions provided by the framework.
If you refresh your browser and select the extend batch actions, symfony will
throw an exception telling you to create an executeBatchExtend() method:
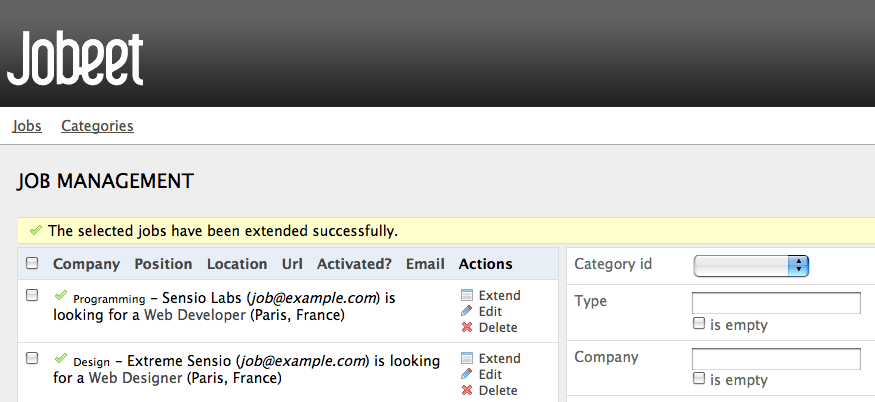
// apps/backend/modules/job/actions/actions.class.php
class jobActions extends autoJobActions
{
  public function executeBatchExtend(sfWebRequest $request)
  {
    $ids = $request->getParameter('ids');

    $jobs = JobeetJobPeer::retrieveByPks($ids);

    foreach ($jobs as $job)
    {
      $job->extend(true);
    }

    $this->getUser()->setFlash('notice', 'The selected jobs have been extended successfully.');

    $this->redirect('jobeet_job');
  }
}
The selected primary keys are stored in the ids request
parameter. For each selected job, the JobeetJob::extend() method is called
with an extra argument to bypass the expiration check.
Update the extend() method to take this new argument into account:
// lib/model/JobeetJob.php
class JobeetJob extends BaseJobeetJob
{
  public function extend($force = false)
  {
    if (!$force && !$this->expiresSoon())
    {
      return false;
    }

    $this->setExpiresAt(time() + 86400 * sfConfig::get('app_active_days'));
    $this->save();

    return true;
  }

  // ...
}
After all jobs have been extended, the user is redirected to the job module
homepage.
object_actions
In the list, there is an additional column for actions you can run on a single
object. For the category module, let's remove them as we have a link on the
category name to edit it, and we don't really need to be able to delete one
directly from the list:
# apps/backend/modules/category/config/generator.yml
config:
  list:
    object_actions: {}
For the job module, let's keep the existing actions and add a new extend
action similar to the one we have added as a batch action:
# apps/backend/modules/job/config/generator.yml
config:
  list:
    object_actions:
      extend:     ~
      _edit:      ~
      _delete:    ~
As for batch actions, the _delete and _edit actions are the ones defined by
the framework. We need to define the listExtend() action to make the extend
link work:
// apps/backend/modules/job/actions/actions.class.php
class jobActions extends autoJobActions
{
  public function executeListExtend(sfWebRequest $request)
  {
    $job = $this->getRoute()->getObject();
    $job->extend(true);

    $this->getUser()->setFlash('notice', 'The selected jobs have been extended successfully.');

    $this->redirect('jobeet_job');
  }

  // ...
}
actions
We have already seen how to link an action to a list of objects or a single
object. The actions option defines actions that take no object at all, like
the creation of a new object. Let's remove the default new action and add a
new action that deletes all jobs that have not been activated by the poster for
more than 60 days:
# apps/backend/modules/job/config/generator.yml
config:
  list:
    actions:
      deleteNeverActivated: { label: Delete never activated jobs }
Until now, all actions we have defined had ~, which means that symfony
automatically configures the action. Each action can be customized by defining
an array of parameters. The label option overrides the default label
generated by symfony.
By default, the action executed when you click on the link is the name of the
action prefixed with list.
Create the listDeleteNeverActivated action in the job module:
// apps/backend/modules/job/actions/actions.class.php
class jobActions extends autoJobActions
{
  public function executeListDeleteNeverActivated(sfWebRequest $request)
  {
    $nb = JobeetJobPeer::cleanup(60);

    if ($nb)
    {
      $this->getUser()->setFlash('notice', sprintf('%d never activated jobs have been deleted successfully.', $nb));
    }
    else
    {
      $this->getUser()->setFlash('notice', 'No job to delete.');
    }

    $this->redirect('jobeet_job');
  }

  // ...
}
We have reused the JobeetJobPeer::cleanup() method defined yesterday. That's
another great example of the reusability provided by the MVC pattern.
note
You can also change the action to execute by passing an action parameter:
deleteNeverActivated: { label: Delete never activated jobs, action: foo }
peer_method
The number of database requests needed to display the job list page is 14, as shown by the web debug toolbar.
If you click on that number, you will see that most requests are to retrieve the category name for each job:
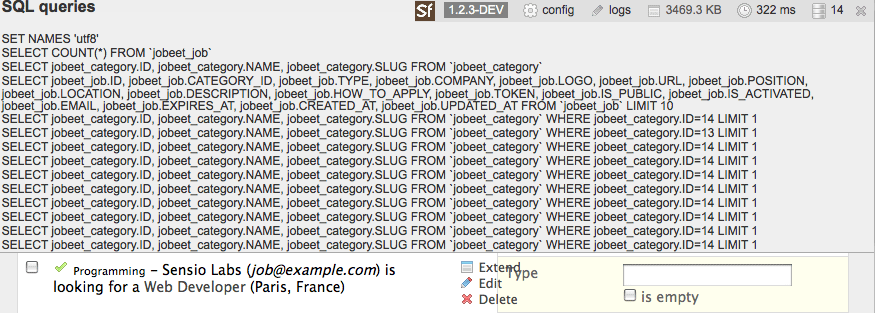
To reduce the number of queries, we can change the default method used to get
the jobs by using the peer_method option:
# apps/backend/modules/job/config/generator.yml
config:
  list:
    peer_method: doSelectJoinJobeetCategory
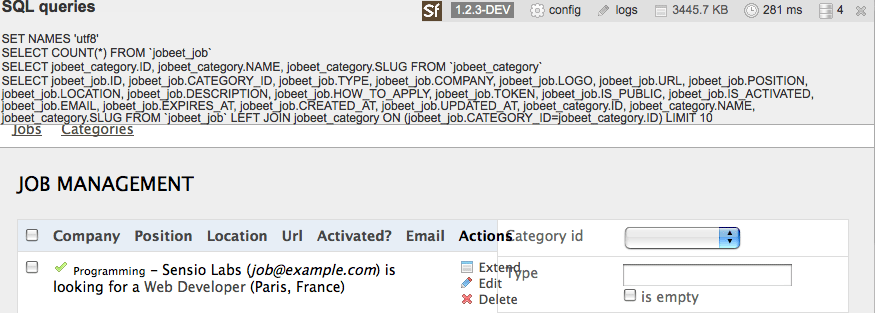
The doSelectJoinJobeetCategory() method adds a join between the job and the
category tables and automatically creates the category object related to each
job.
The number of requests is now down to four:
Form Views Configuration
The form views configuration is done in three sections: form, edit, and
new. They all have the same configuration capabilities and the form section
only exists as a fallback for the edit and new sections.
display
As for the list, you can change the order of the displayed fields with the
display option. But as the displayed form is defined by a class, don't try to
remove a field as it could lead to unexpected validation errors.
The display option for form views can also be used to arrange fields into
groups:
# apps/backend/modules/job/config/generator.yml
config:
  form:
    display:
      Content: [category_id, type, company, logo, url, position, location, description, how_to_apply, is_public, email]
      Admin:   [_generated_token, is_activated, expires_at]
The above configuration defines two groups (Content and Admin), each
containing a subset of the form fields.
note
The columns in the Admin group do not show up in the browser yet because
they have been unset in the job form definition. They will appear in a few
sections when we define a custom job form class for the admin application.
The admin generator has built-in support for many to many relationship. On the category form, you have an input for the name, one for the slug, and a drop-down box for the related affiliates. As it does not make sense to edit this relation on this page, let's remove it:
// lib/form/JobeetCategoryForm.class.php
class JobeetCategoryForm extends BaseJobeetCategoryForm
{
  public function configure()
  {
    unset($this['jobeet_category_affiliate_list']);
  }
}
"Virtual" columns
In the display options for the job form, the _generated_token field starts
with an underscore (_). This means that the rendering for this field will be
handled by a custom partial named _generated_token.php.
Create this partial with the following content:
// apps/backend/modules/job/templates/_generated_token.php
<div class="sf_admin_form_row">
  <label>Token</label>
  <?php echo $form->getObject()->getToken() ?>
</div>
In the partial, you have access to the current form ($form) and the related
object is accessible via the getObject() method.
note
You can also delegate the rendering to a component by prefixing the field
name by a tilde (~).
class
As the form will be used by administrators, we have displayed more information
than for the user job form. But for now, some of them do not appear on the form
as they have been removed in the JobeetJobForm class.
To have different forms for the frontend and the backend, we need to create two
form classes. Let's create a BackendJobeetJobForm class that extends the
JobeetJobForm class. As we won't have the same hidden fields, we also need to
refactor the JobeetJobForm class a bit to move the unset() statement in a
method that will be overridden in BackendJobeetJobForm:
// lib/form/JobeetJobForm.class.php
class JobeetJobForm extends BaseJobeetJobForm
{
  public function configure()
  {
    $this->removeFields();

    $this->validatorSchema['email'] = new sfValidatorAnd(array(
      $this->validatorSchema['email'],
      new sfValidatorEmail(),
    ));

    // ...
  }

  protected function removeFields()
  {
    unset(
      $this['created_at'], $this['updated_at'],
      $this['expires_at'], $this['is_activated'],
      $this['token']
    );
  }
}

// lib/form/BackendJobeetJobForm.class.php
class BackendJobeetJobForm extends JobeetJobForm
{
  protected function removeFields()
  {
    unset(
      $this['created_at'], $this['updated_at'],
      $this['token']
    );
  }
}
The default form class used by the admin generator can be
overridden by setting the class option:
# apps/backend/modules/job/config/generator.yml
config:
  form:
    class: BackendJobeetJobForm
note
As we have added a new class, don't forget to clear the cache.
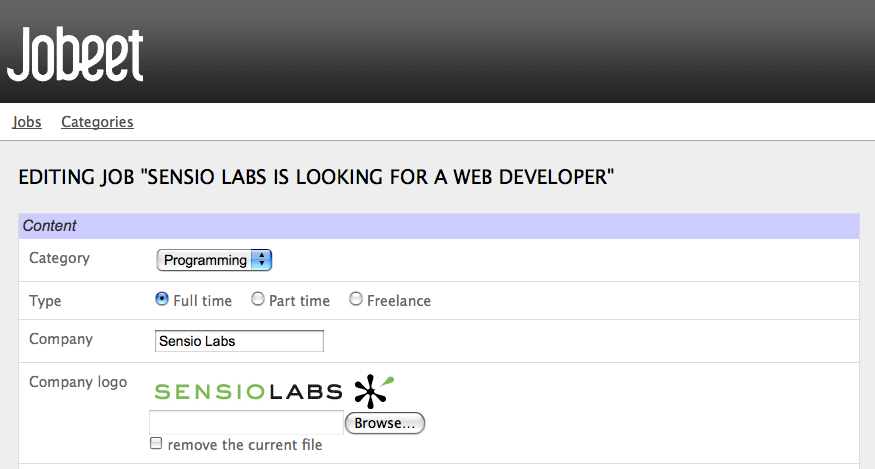
The edit form still has a small annoyance. The current uploaded
logo does not show up anywhere and you cannot remove the current one. The
sfWidgetFormInputFileEditable widget adds editing capabilities to a simple
input file widget:
// lib/form/BackendJobeetJobForm.class.php
class BackendJobeetJobForm extends JobeetJobForm
{
  public function configure()
  {
    parent::configure();

    $this->widgetSchema['logo'] = new sfWidgetFormInputFileEditable(array(
      'label'     => 'Company logo',
      'file_src'  => '/uploads/jobs/'.$this->getObject()->getLogo(),
      'is_image'  => true,
      'edit_mode' => !$this->isNew(),
      'template'  => '<div>%file%<br />%input%<br />%delete% %delete_label%</div>',
    ));

    $this->validatorSchema['logo_delete'] = new sfValidatorPass();
  }

  // ...
}
The sfWidgetFormInputFileEditable widget takes several options to tweak its
features and rendering:
file_src: The web path to the current uploaded fileis_image: Iftrue, the file will be rendered as an imageedit_mode: Whether the form is in edit mode or notwith_delete: Whether to display the delete checkboxtemplate: The template to use to render the widget
tip
The look of the admin generator can be tweaked very easily as the generated
templates define a lot of class and id attributes. For instance, the logo field can
be customized by using the sf_admin_form_field_logo class. Each field also
has a class depending on the field type like sf_admin_text or
sf_admin_boolean.
The edit_mode option uses the sfPropel::isNew() method.
It returns true if the model object of the form is new, and false otherwise.
This is of great help when you need to have different widgets or validators
depending on the status of the embedded object.
Filters Configuration
Configuring filters is quite the same as configuring the form views. As a matter
of fact, filters are just forms. And as for the forms, the classes have been
generated by the propel:build --all task. You can also re-generate them with
the propel:build --filters task.
The form filter classes are located under the
lib/filter/ directory and each model class has an associated filter form class
(JobeetJobFormFilter for JobeetJobForm).
Let's remove them completely for the category module:
# apps/backend/modules/category/config/generator.yml
config:
  filter:
    class: false
For the job module, let's remove some of them:
# apps/backend/modules/job/config/generator.yml
filter:
  display: [category_id, company, position, description, is_activated, is_public, email, expires_at]
As filters are always optional, there is no need to override the filter form class to configure the fields to be displayed.
Actions Customization
When configuration is not sufficient, you can add new methods to the action
class as we have seen with the extend feature, but you can also override the
generated action methods:
| Method | Description |
|---|---|
executeIndex() |
list view action |
executeFilter() |
Updates the filters |
executeNew() |
new view action |
executeCreate() |
Creates a new Job |
executeEdit() |
edit view action |
executeUpdate() |
Updates a Job |
executeDelete() |
Deletes a Job |
executeBatch() |
Executes a batch action |
executeBatchDelete() |
Executes the _delete batch action |
processForm() |
Processes the Job form |
getFilters() |
Returns the current filters |
setFilters() |
Sets the filters |
getPager() |
Returns the list pager |
getPage() |
Gets the pager page |
setPage() |
Sets the pager page |
buildCriteria() |
Builds the Criteria for the list |
addSortCriteria() |
Adds the sort Criteria for the list |
getSort() |
Returns the current sort column |
setSort() |
Sets the current sort column |
As each generated method does only one thing, it is easy to change a behavior without having to copy and paste too much code.
Templates Customization
We have seen how to customize the generated templates thanks to the
class and id attributes added by the admin generator in the HTML code.
As for the classes, you can also override the original templates. As templates
are plain PHP files and not PHP classes, a template can be overridden by
creating a template of the same name in the module (for instance in the
apps/backend/modules/job/templates/ directory for the job admin module):
| Template | Description |
|---|---|
_assets.php |
Renders the CSS and JS to use for templates |
_filters.php |
Renders the filters box |
_filters_field.php |
Renders a single filter field |
_flashes.php |
Renders the flash messages |
_form.php |
Displays the form |
_form_actions.php |
Displays the form actions |
_form_field.php |
Displays a single form field |
_form_fieldset.php |
Displays a form fieldset |
_form_footer.php |
Displays the form footer |
_form_header.php |
Displays the form header |
_list.php |
Displays the list |
_list_actions.php |
Displays the list actions |
_list_batch_actions.php |
Displays the list batch actions |
_list_field_boolean.php |
Displays a single boolean field in the list |
_list_footer.php |
Displays the list footer |
_list_header.php |
Displays the list header |
_list_td_actions.php |
Displays the object actions for a row |
_list_td_batch_actions.php |
Displays the checkbox for a row |
_list_td_stacked.php |
Displays the stacked layout for a row |
_list_td_tabular.php |
Displays a single field for the list |
_list_th_stacked.php |
Displays a single column name for the header |
_list_th_tabular.php |
Displays a single column name for the header |
_pagination.php |
Displays the list pagination |
editSuccess.php |
Displays the edit view |
indexSuccess.php |
Displays the list view |
newSuccess.php |
Displays the new view |
Final Configuration
The final configuration for the Jobeet admin is as follows:
# apps/backend/modules/job/config/generator.yml
generator:
  class: sfPropelGenerator
  param:
    model_class:           JobeetJob
    theme:                 admin
    non_verbose_templates: true
    with_show:             false
    singular:              ~
    plural:                ~
    route_prefix:          jobeet_job
    with_propel_route:     true

    config:
      actions: ~
      fields:
        is_activated: { label: Activated?, help: Whether the user has activated the job, or not }
        is_public:    { label: Public? }
      list:
        title:         Job Management
        layout:        stacked
        display:       [company, position, location, url, is_activated, email]
        params:  |
          %%is_activated%% <small>%%jobeet_category%%</small> - %%company%%
           (<em>%%email%%</em>) is looking for a %%=position%% (%%location%%)
        max_per_page:  10
        sort:          [expires_at, desc]
        batch_actions:
          _delete:    ~
          extend:     ~
        object_actions:
          extend:     ~
          _edit:      ~
          _delete:    ~
        actions:
          deleteNeverActivated: { label: Delete never activated jobs }
        peer_method:  doSelectJoinJobeetCategory
      filter:
        display: [category_id, company, position, description, is_activated, is_public, email, expires_at]
      form:
        class:     BackendJobeetJobForm
        display:
          Content: [category_id, type, company, logo, url, position, location, description, how_to_apply, is_public, email]
          Admin:   [_generated_token, is_activated, expires_at]
      edit:
        title: Editing Job "%%company%% is looking for a %%position%%"
      new:
        title: Job Creation

# apps/backend/modules/category/config/generator.yml
generator:
  class: sfPropelGenerator
  param:
    model_class:           JobeetCategory
    theme:                 admin
    non_verbose_templates: true
    with_show:             false
    singular:              ~
    plural:                ~
    route_prefix:          jobeet_category
    with_propel_route:     true

    config:
      actions: ~
      fields:  ~
      list:
        title:   Category Management
        display: [=name, slug]
        batch_actions: {}
        object_actions: {}
      filter:
        class: false
      form:
        actions:
          _delete: ~
          _list:   ~
          _save:   ~
      edit:
        title: Editing Category "%%name%%"
      new:
        title: New Category
With just these two configuration files, we have developed a great backend interface for Jobeet in a matter of minutes.
tip
You already know that when something is configurable in a YAML file, there is
also the possibility to use plain PHP code. For the admin generator, you can
edit the apps/backend/modules/job/lib/jobGeneratorConfiguration.class.php
file. It gives you the same options as the YAML file but with a PHP
interface. To learn the method names, have a look at the generated base class
in
cache/backend/dev/modules/autoJob/lib/BaseJobGeneratorConfiguration.class.php.
Final Thoughts
In just one hour, we have built a fully featured backend interface for the Jobeet project. And all in all, we have written less than 50 lines of PHP code. Not too bad for so many features!
Tomorrow, we will see how to secure the backend application with a username and a password. This will also be the occasion to talk about the symfony user class.
This work is licensed under the Creative Commons Attribution-Share Alike 3.0 Unported License license.